Low Pass gate
@JMC64 I have not checked it, but I assume you have created a ramp with the shape of the brown/red curve.
In the middle (to the end of) analogue olden days the way to control a voltage with another was through an opto-isolator.
The green line is its input signal. A voltage of 0.5V for 100ms.
0.5V because that was the necessary voltage to set "on" and 100ms because that was the time necessary to get the output side to "full".
Once the input voltage was removed it took about another 75ms before the output returned to zero.
So you have found the non-linearity of the control.
In the synth application the input would have been either a voltage from a keyboard key, or a square/sawtooth lfo wave probably for a repeated pulse, if that was what was selected. Well actually it could have been any waveform that the synth could produce...... depending on where it was patched by the operator.
The problem is that the led in the opto-isolater takes time to ramp down the resistance of the light sensitive resistor (so that the output voltage rises), and so very short control pulses will not get to full voltage on the output. Longer ones will be fine...... the Led can be held "on" for as long as you like......
The low pass filter cutoff and resonance might be harder to evaluate, but this paper....... 44.dafx2013_submission_56.pdf has all the information you will need.
David.
 posted in technical issues
DNA Sequence (Nucleotide) Player: Converting nucleotide sequences to (midi) Music
gene-seq-to-music-via-pd~-help.pd
gene-seq-to-music-via-pd~.pd
DNA Sequence (Nucleotide) Player: Converting nucleotide sequences to (midi) Music
Credits:
All source data is retrieved from the "Nucleotide Database" (DB) via National Center for Biotechnology Information, U.S. National Library of Medicine (NCBI) at
https://www.ncbi.nlm.nih.gov/nucleotide/
Miller Puckette for the J08.classicsynth
and
the creator(?) of the vlist2symbol abstraction.
Requirements:
wget, Linux command line web retrieval tool
Linux
ggee, [shell]
cyclone, [counter]
Use Case:
Actors: those who want to hear the patterns in DNA nucleotide sequences and/or comprehend how Nature makes Music not "noise"/Gene sequences are like one of Nature's "voices"/
Case:
Enter the "Accession" (identification number (id)) of a NCBI DB entry into the id symbol field
Case:
Click on "LOAD"
Case:
Click "PLAY".
Instructions:
1-Go to the DB (https://www.ncbi.nlm.nih.gov/nucleotide/) and find an Accession(id) of a sequence;
2-Enter that value into the ID [symbol] box of the patch
3-Click the "LOAD" [button/bang];
4-Set pitch, velocity, duration, and repeat for G,A,C, and T (representing the four nucleotide bases of a DNA strand — guanine, cytosine, adenine, and thymine);
5-Toggle "PLAY" to 1, i.e. to On, to hear the sequence using the variables you set in 4) and to "0" to stop it.
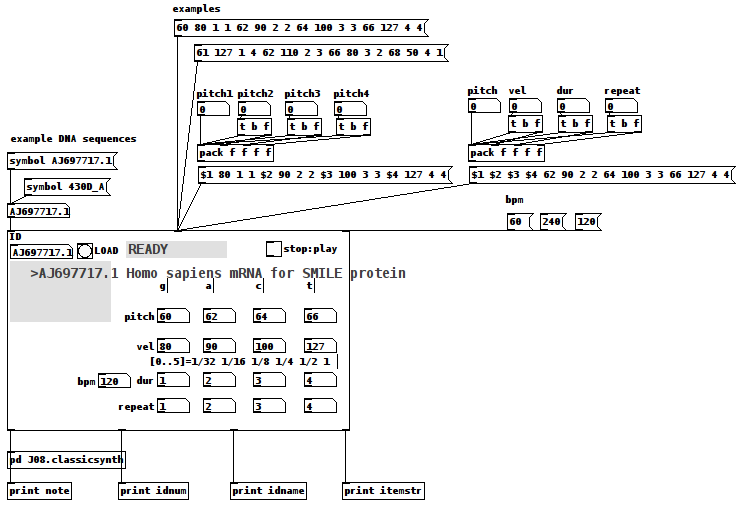
How It Works:
The patch takes the input ID and packs it into a string as the FILE(Path) for wget.
The wget command is then sent as a list to a shell object.
The output of the shell object is then parsed (using an intermediate [text] object) into a [text] object with each line being 4 characters long, each character being either G,C,A, or T.
Once loaded and Play is clicked, each line is then reconstructed as a midi note with the pitch as determined by the first character, velocity (2nd) and duration (3rd) and repeated as many times as the 4th character dictates (as set in 4) above).
Once the entire sequence is played, the player stops sending notes.
Inlets(left to right):
id, either numbers or symbols
values, a 16 item list of 4x4 sets of pitch, velocity, duration, repeat (i.e. one set per nucleotide type, G,C,A, or T) (Note: the sequence, if loaded, will play immediately upon receipt of this list.)
beats per minute, bpm, esp. as it relates to note durations.
Outlets:
the current midi note, i.e. pitch/velocity/duration
id (of the gene sequence)
sequence name, as listed by the NCBI DB
nucleotide being played as a string, ex. GGAC
AFTERWARD:
-
Since it really is only sending midi value it can be connected to whatever synth you would like;
-
Elsewhere on this Forum, I shared a patch which took "noise" as its input and converted it into music using sigmund~, in that case "running water" as its source. (See for reference: https://forum.pdpatchrepo.info/topic/12108/converting-noise-to-music-rushing-water-using-sigmund) This patch takes that concept and applies it to what might also be called "noise", DNA sequences, were it not that the results (like the running water, yet even more so) sound like "Music".
This exploration has me wondering...
How can we delineate what is noise (only natural at this point) and what is music?
Is the creative/ordering/soulful nature's being expressed in our own music not also being expressed by Nature itself? ...so that we might be considered one "bow" playing upon it?
And, if by Music we mean notes laid down on purpose, might not it be said that is what Nature has been done? Is doing?
I hope you find the patch useful, stimulating, and exciting, or at the very least funny to think about.
Love through Music, no matter in what state Life may find you,
Peace,
Scott
 posted in patch~
How do I play up to 64 txt files at once. 16 digits can be 1's or 0's loaded as toggle states.
So I have 64 txt files containing 16 digits that could be a 1 or 0. these digits are used as toggle states for my sequencer. the state of a toggle is sent to [s seqstep1] to [s seqstep16] and recieved to its 1 of the 16 toggles boxes in the sequencer. When a sequence is loaded a file path with the sequence number attached to it like this for example pattern-1.txt to pattern-64.tx there can be up to 64 sequences play at any given time based on the [s seqstep1 ] for the loaded txt file.
I am able to play them one at a time by changing the number atom and pushing play but im not sure how I should go about loading and playing all 64 txt files at once.
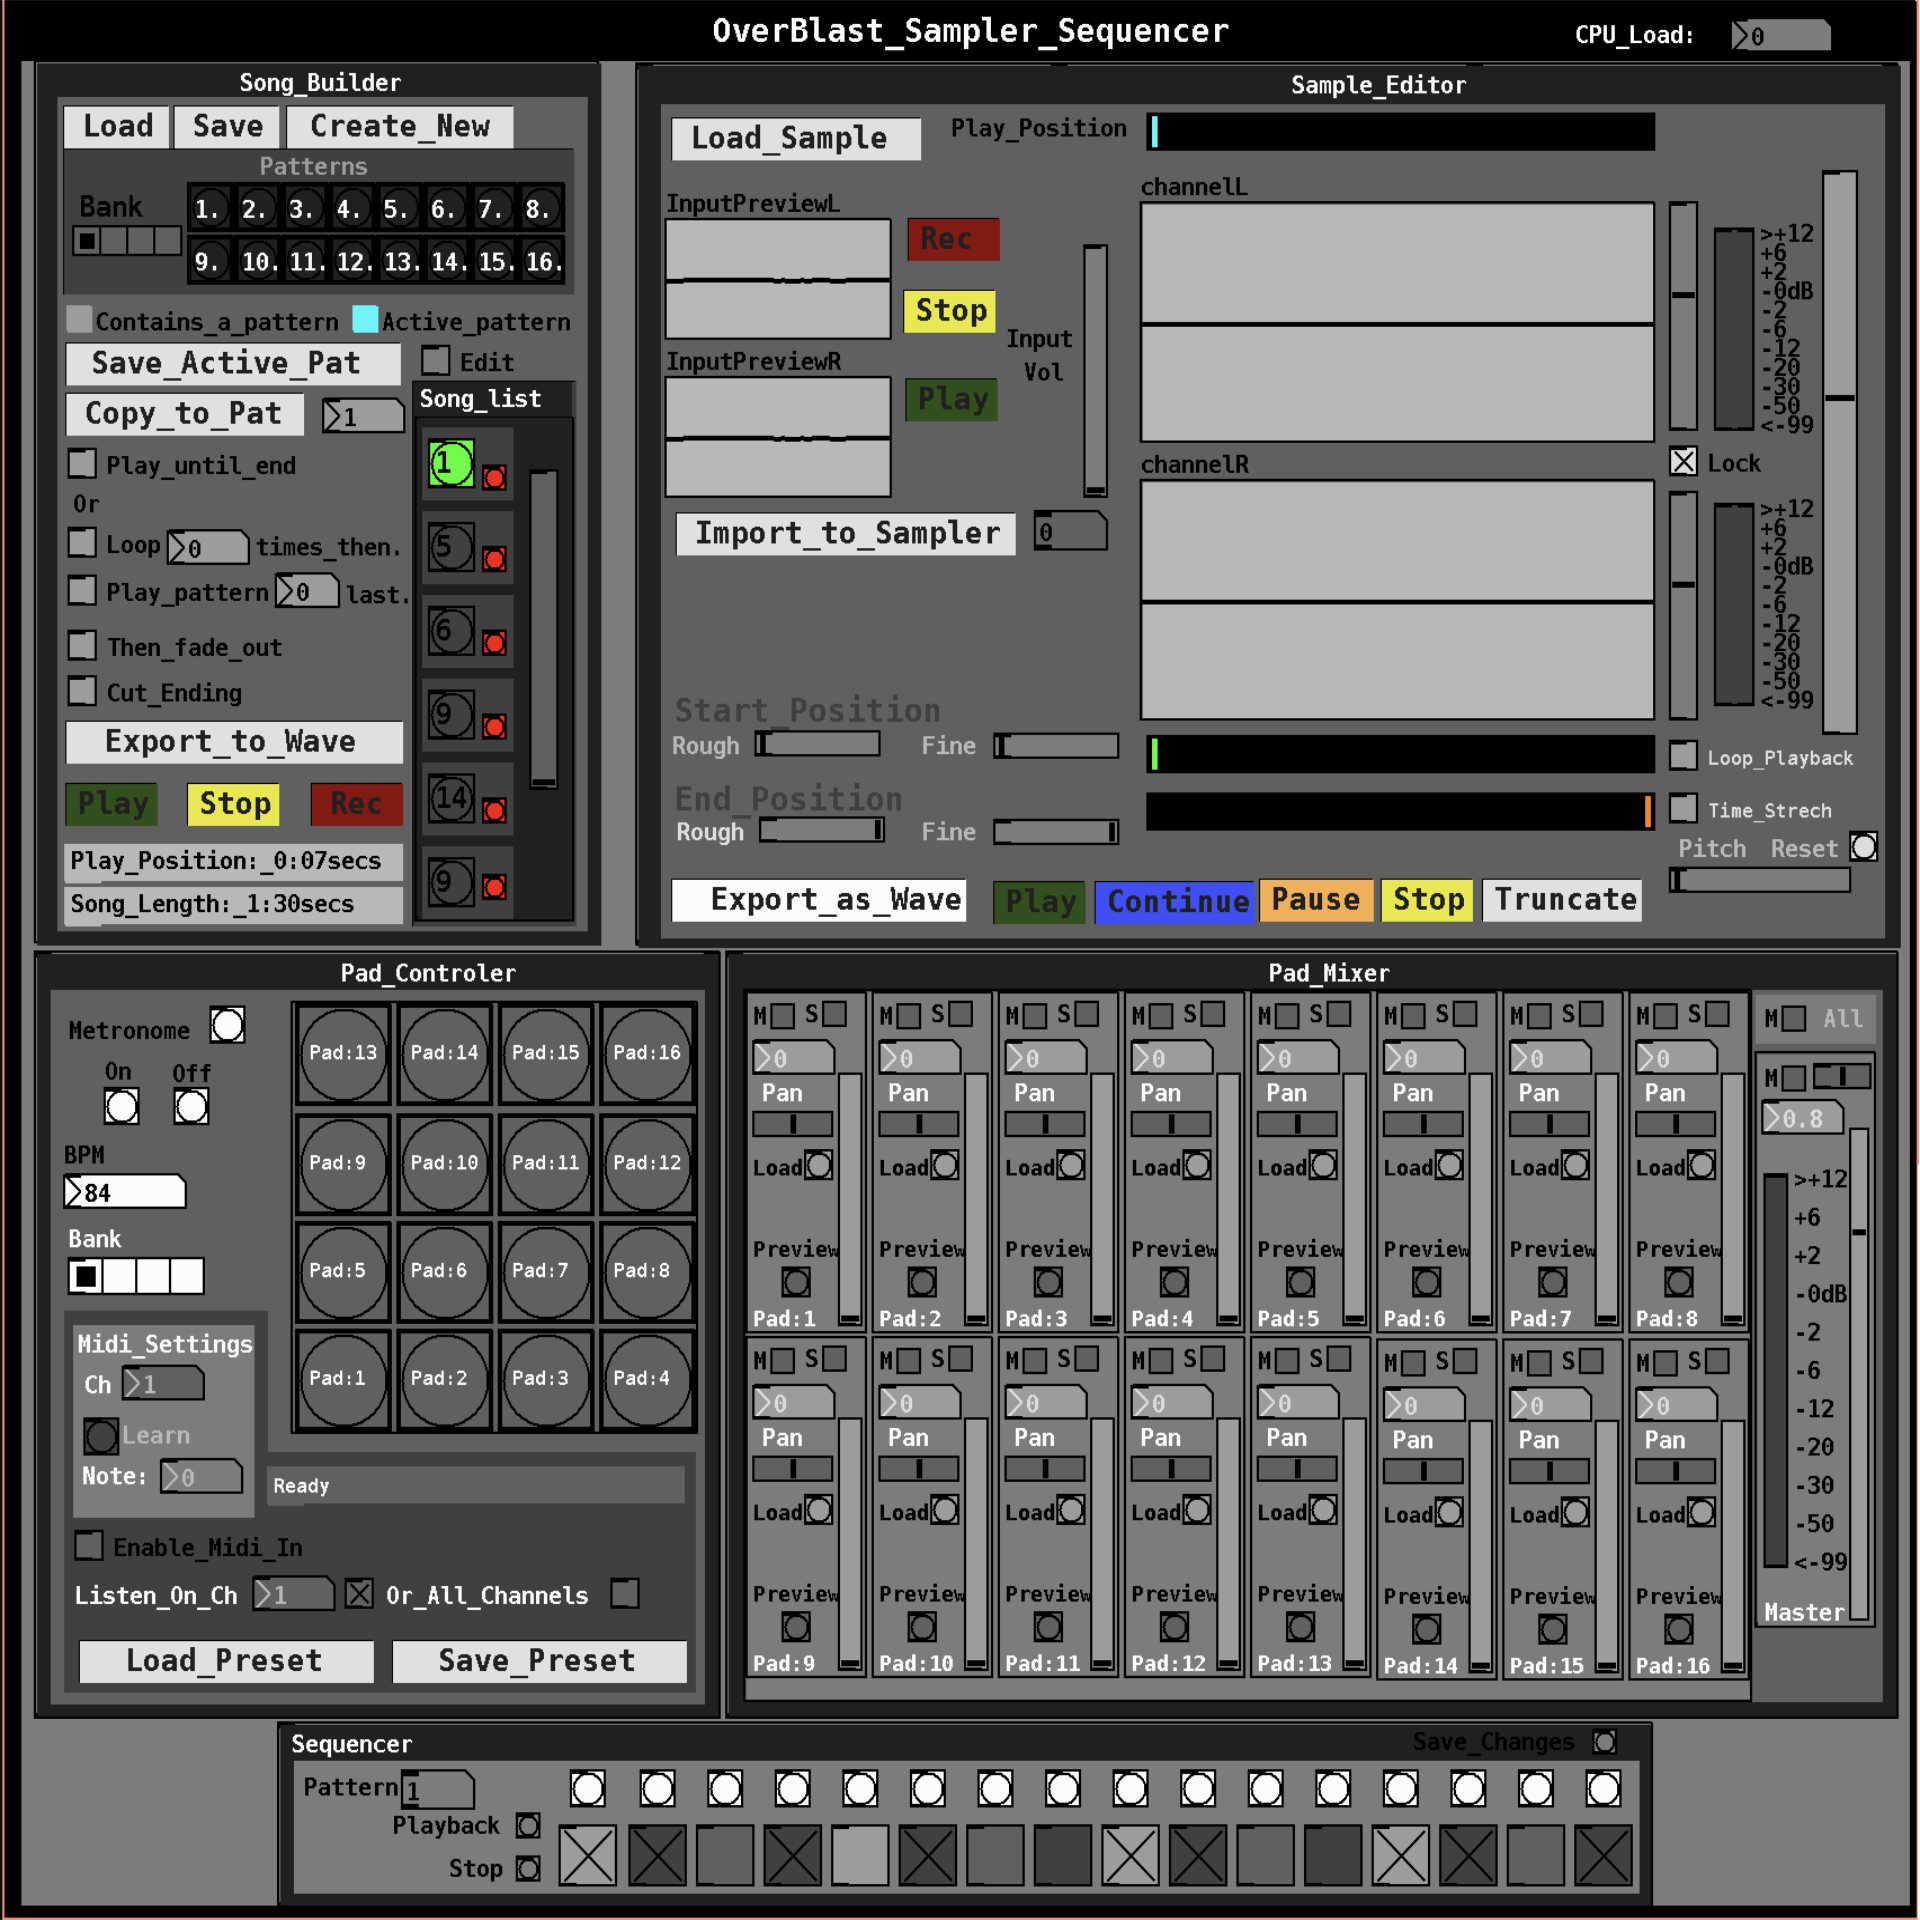
The below screen shot is how the sound is trigger using the [OBBangOnMetronome] abstract. The outlet is sent to second inlet of [OBPlayPadSample]. The first inlet is the selected sequence (the sequence that we want to play) number atom.
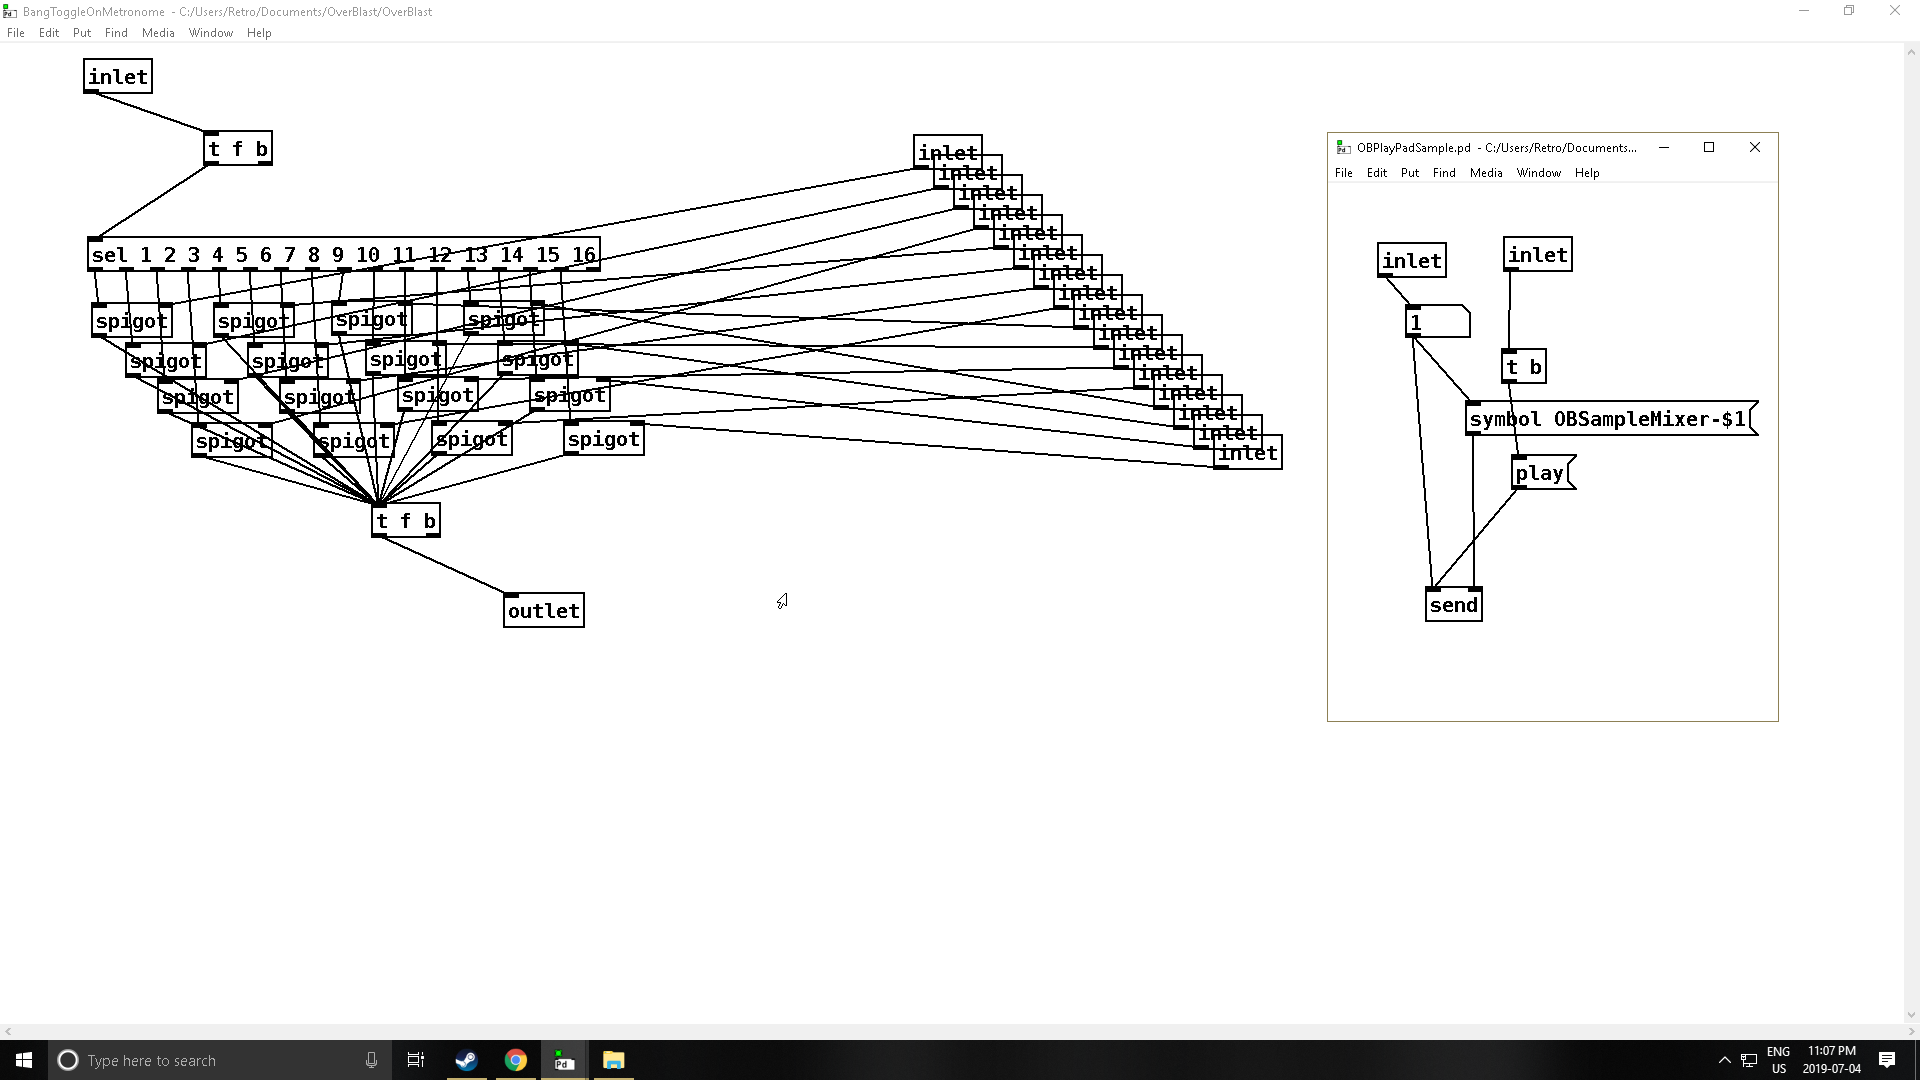
I need a a [Play all] button is the easiest way I can describe it. ")
The last screen shot is simply for visual representation of how the sequencer looks.
 posted in technical issues
Dry/wet control of randomness
Hello,
With no clue, a little debutant in Pd, I'm stuck with a problem.
My idea is to create a rhythm sequencer sending a pattern to a solenoid. But i want this pattern to be alternate by randomness AND that this randomness is controlled by a distance sensor. So when someone is far from the sensor, the pattern is played at the maximum of randomness, and more someone is close to the sensor, more the pattern is played in order.
For now, I have the sequencer part working, either in random or in order. So I have two series of number (the steps position of a 16 steps pattern). But I don't understand how to chose between this two series in function of the sensor. This sensor is meant to act as a dr/wet control of the randomness. I tried with moses, spigot, but none of that worked. Or I don't know ow make it working.
Thank you for your help !
Jerome[sequencer aléatoire 2.pd](uploading 100%)
 posted in technical issues
Voltage control through VGA
@Sebastien I think you will have to get your soldering iron out.
As you say, audio dacs will probably not do 0Hz and will not supply enough voltage.
PWM will be bad news (noise on analog buss).
A usb data acquisition box would be expensive-ish and not report through the os as an audio device.... so useless.
Even a very expensive audio dac that can go to DC would be channel restricted.
You would still need an op-amp
There are chips that can do frequency to voltage conversion..... that would take your existing dac output.
You would need to scale and trim to the output voltage to match the VCA voltages of your synth, or maybe just use the synth voltage rail if the chip can cope with that voltage.
And you would need to build a patch sending appropriate frequencies and scaling..... that is.... do the opposite conversion in your patch...... voltage to frequency.
http://www.ti.com/lit/ds/symlink/vfc32.pdf
Otherwise....... midi to CV.....
https://www.muffwiggler.com/forum/viewtopic.php?t=68228&sid=9b7253b1ad45a1e75a4bb2f3795a56c7
David.
posted in technical issues
Final Solution: Anyone looking to control Ableton Live...easily
Hi All
A little bit of work to set up but forget midi mapping...google it if you dont believe me.
After a lot of time spent trying to get a simple but sophisticated way (using a minimal 8 button floorboard) to control Live on w10, I thought I would share this particular solution to possibly help others (especially after the help offered here on this forum). I tried a number of scenarios, even buying Max 4 Live, but it turns out a lot simpler than that. It needs 3 main areas set
FOOT CONTROLLER BEHAVIOURS/GESTURES
Create pd patch that gives you 'behaviours' per switch. Ill be happy to share mine but Im just cleaning them up atm.
eg I have 4 standard behaviours that dont take too much time to master
- Action A: A quick click (less than 500ms) Always the primary action
- Action B: Long click ie 1 click down and pedal up after 500ms. I use this eg always as a negative ramp down for things like lowering volume but if its just held down and released in a natural way, it is the secondary action of the switch
- Action C: 3 Click ie 1 quick down, up and then hold down. I use this for a positive ramp eg as volume up
4 Actiion D: Double click, Always a cancel
These are all mapped to note/ctrl outs that match the 'Selected Track Control' below
PLUGIN
Use PD VST to create a plugin version of your patch. This is loaded into Live as a control track. Live manages the connection of your floor board etc into the actual track so you dont wrestle with the io. I always use track 1 for click (forget Live metronome, this is much more flexible and can have feel/swing etc) so I dedicate track 2 to control.
Use LoopMIDI to create a virtual midi cable that will go from this track and be fed into the remote script.
REMOTE SCRIPT: 'Selected Track Control'
Download latest from http://stc.wiffbi.com/
Install to live and make sure your notes/control conform.
Enable this as a control surface in live and connect midi in from the plugin. Think about giving the guy a donation...massive amount of work and he deserves it!
I use it to control 8 tracks x 8 scenes and is controlled by 3 switches
- Scene control up and down (A = down, B = up)
- Track control same as scene
- Rec/Fire/Undo Volume up and down (A = fire/rec, B = Volume Down, C = Volume Up, D (Dbl Click) = Undo
The scenes and tracks wrap so there isnt too much foot tapping
There is quite a bit more to it of course...its and maybe no one else needs this but it would have saved me a couple of weeks of time so Im happy to help anyone wanting to achieve gigging without a massive floor rig and an easy way to map and remember.
HTH someone
Cheers
mark
 posted in technical issues
Build a MIDI controller with the Arduino, Firmata and Pure Data
Time to start contributing some knowledge back to the wonderful world that is the internet; today, a step by step nice and easy tutorial on getting started to building your own MIDI controllers with the arduino.
When researching for my ableton controller project, I didn’t find much out there about using firmata on an arduino to send data to software. The standard approach just seemed to be create the code in the arduino language, upload it to your board and hack one of those MIDI to USB cables as a bodge job way of getting the MIDI out of the arduino.
So why firmata and pure data? Well the whole idea of firmata is that you flash it to your arduino, and it throws out serial about whats going on with the arduino inputs and outputs, then you decide how the software treats the readings coming in and going out.
Theory out the way, lets build some controllers. You’ll need a few things…
HARDWARE:
An arduino and something to wire into it (for this i’ll be using a pot)
A USB cable for your arduino
SOFTWARE:
Arduino – http://arduino.cc/en/Main/Software
Pure Data – http://puredata.info/downloads
Firmata – http://at.or.at/hans/pd/objects.html#pduino
Something to patch your new controller into; like Reason or Ableton Live
- SETTING UP FIRMATA AND PURE DATA
Install Pure Data and create a folder to store all your patches somewhere. Unzip Firmata and add the files ‘arduino.pd’, ‘arduino-test.pd’ and ‘arduino-help.pd’ to your new Pure Data folder. The ‘arduino.pd’ file is the object that we use in PD for opening up communication with your arduino and routing it to PD. Done? Awesome, your software is almost set up.
- FLASHING FIRMATA TO YOUR ARDUINO
Install the latest version of arduino and open it up. Connect your arduino with the USB cable to your laptop (i’m using a macbook for this by the way). In the example patches, open up “Standard Firmata”, select your board (im using an arduino mega), and your serial port (look for tty.usbserial for use with a USB cable). Then compile and hit the upload button and your arduino is now ready to use firmata and communicate with Pure Data!
- WIRING UP A POT

Potentiometers are cool, and theres a great arduino tutorial of how to wire one up here: http://www.arduino.cc/en/Tutorial/Potentiometer
Basically, all you need to know is that there are three pins; your two outer pins govern voltage flow across the pot, meaning one has to be 5V and the other has to be ground. It doesn’t matter which, but your 5v pin is going to be where your pot reads maximum, so convention dictates this should be the right hand pin. The center pin needs to be connected to an analog in on the arduino and will read the value of the pot as it sweeps from ground (0v) to 5v.
All wired up? Plug it into your laptop and open Pure Data, we’re ready to get things talking.
- SETTING UP OUR PATCH
Open the example “arduino-test.pd” Pure Data patch you copied over earlier. It should look like this one…

The test patch has everything we need to open a connection and enable pins. Firstly, lets delete a bunch of stuff and make our window a bit bigger. Hit Command + E to enter edit mode in Pure Data.

Ok a quick explaination; the key component here is the ‘arduino’ object. This is being drawn from the file you copied in earlier, and is what communicated with your arduino. Here we can do everything to control the arduino from opening a connection, to receiving data.
The large grid allows us to set the mode of each pin on the arduino. Remember pins 0 and 1 are reserved for Rx and Tx. I’m using analog pin 4 for this demo, so I’ve set my pin mode for pin 4 to ‘analog’.
Now we can plug our arduino in and get a reading from the potentiometer.
- ARDUINO INTO PURE DATA
With your arduino plugged in, hit command and E to bring us out of edit mode. In our patch, click on ‘Devices’ above the arduino object and open up the pure data terminal. (That other thing that loads with PD that has all the scary code in)

The “Devices” message connected to the arduino object pings your computer to find what devices are connected and on what serial ports. Since we’re using a USB cable to connect our arduino, we’re looking for something with ‘usbserial’ in it, in this case; port 2.
Select the relevent port in the green box at the top (remember the first box is ‘0’, second is ‘1’ and so forth) and hit ‘Open’ to establish a connection. Check the terminal to see if the connection was sucessful.

Now lets check we’re getting something in. Create a number box (Command + 3) and connect it to the relevent pin on the ‘Route analog’ box at the bottom. In this case, pin 4.
One more thing; if you’re not getting any readings in, you’ll need to click on ‘pd old analog/digital controls’ and enable your pins here too. What I tend to do in my patches is just not include the large grid but make my own ‘old pd’ controls custom to what i’m enabling/disabling to save space.
Here’s what the ‘old analog/digital controls’ subpatch looks like (pin 4 enabled)…

Come out of edit mode and check that you’ve got readings. If so congratulations! If not, troubleshoot, start with making sure your usb connection is opened, make sure all the correct pins are enabled (remember you’re counting from 0 not 1 on most of these buttons in PD, it’s just the way computers work).
- SCALING READINGS TO MIDI
So we’ve got a reading and chances are it’s to 3 decimal places between 0 to 1. No problem, create a new object (Command + 1) and type “autoscale 0 127”. This allows us to scale the input to a min and max value, in this case 0 to 127 of MIDI. Next, lets get things looking nice, create a new object and type “knob”. Connect this AFTER the autoscale object. (the knob is default set to read inputs from 0 to 127. Then create another number to display the scaled MIDI data coming out, and finally a new object and type “ctlout 1”.
It should look something like this…

The second box should be outputing values from 0 – 127 now, and the knob giving a visual representation of your potentiometer.
Now lets patch it into ableton…
- PURE DATA TO ABLETON LIVE
Firstly, you’ll need to set up your macs IAC driver if you’ve not done this. Basically you’ll need to go into Audio/MIDI preferences and enable your IAC driver. Then create a new input and output. One for input to DAW and one for output from DAW. Google around for a tutorial on this, its really simple, a 30 second job.
After you’ve set up your IAC driver, go back to PD and go to preferences > MIDI Settings, and connect your IAC driver.

Open ableton and go to its MIDI preferences. Create a device listing for your IAC driver and enable its ins and outs into ableton like so…


And thats it! Create an instrument and try to assign something! I’ve got it controlling the brightness of a bass sound here.
Shout out for Facu who requested this tutorial. Hopefully it’ll help some of you looking to get into this stuff and start building things but with no idea where to start.
 posted in tutorials
prophet 3003 wavetable synth prototype
hi folks, thanks for the kind comments!
sure ill share the patch eventually but right now its an uncommented messy laboratory affair. best thing you can do right now is look at the patch image above which is quite self explanatory.
here is the vs rom in one wav file, scan this in 128 chunks of 128 samples and you have the single wave data.
harmonic aliasing is best described by acreil in the above mentioned blog post because thats where i got the idea from. the rest is trial and error and a lot of listening to integer combinations.
harmonic aliasing is actually my own term for what im trying to do. here is how i would describe it:
-
if you repeat 128 samples with a phasor at 128 hz (or 64/32/16/8/4/2) or any multiple of 128 your phasor restarts exactly at the beginning of the wave data and the aliasing frequencies generated by the steppyness of the data will follow the harmonic overtone series 1,2,3 etc. depending on the multiple.
-
if you introduce another prime divider ie. 3 as in 128 / 3 the phasor will line up with the sample data every 3rd sample and the osc will alias at the 3rd subharmonic frequency which will be somewhat more disharmonic than any overtone.
-
another way to look at it would be the pattern repetitions. at subdivision 5 the phasor starts at 5 different points in the sample data and its easy to imagine that the readout patterns are all slightly different ... but the whole thing cycles after 5 phasor rounds = 5th subharmonic..
-
if you subdivide 128 further with a higher prime ie. 563 you will get 562 different sounding samples until nr. 563 lines up again. get the idea?
this is all very easy to hear once you experiment with prime subdivisions and multiplications. just remember its all based on synching the data flow from the sample with the frequency of the index phasor. this will work with ANY sample data, the vs rom is just cool to use for vintage synth fans.
whats important for proper aliasing is that you use a simple [tabread] into the data without any interpolation like tabread4 or oversampling!
all the other elements in the synth like delay, waveshaper, sequencer follow the same rule as they are just repetition devices like the wavetable oscillator.
if you finally synch everything to the sample rate of your soundcard the voltages that hit your speakers will repeat in exact patterns. thats the idea of this synth: precision number repetition controlled by harmonic/disharmonic integer combinations ... just like the great 80s synths waldorf microwave or prophet vs.
 posted in output~
Andúril (MobMuPlat app): fwd/bwd looper + 14 effects + elven cloak (control parameters via env~ and pitch as you play)
Andúril (MobMuPlat app): fwd/bwd looper + 14 effects + elven cloak (control parameters via env~ and pitch as you play)
UPDATED VERSION (corrected MobMuPlat system crash problem):
anduril.zip
This has been long in coming and I am very glad to finally release it (even tho my handheld hardware is not up to the job of running the elven cloak feature).
First a demo video and some screenshots, , and then the instructions.
DEMO VIDEO
SCREENSHOTS
Intention(s):
The app is designed to give (specifically a guitarist) tho really any input (even prerecorded as is the case in the demo (from: "Laura DeNardis Performing Pachabels Canon" from https://archive.org/details/LauraDenardisPerformingPachabelsCanon, specifically the wave file at: https://archive.org/download/LauraDenardisPerformingPachabelsCanon/PachabelsCanon.wav, Attribution-Noncommercial-Share Alike 3.0) FULL Control over the "voice" of their output-sound.
It includes:
a 5-band EQ (on page 2 of the app) (upfront that is applied to all incoming sounds);
a looper: with record, forward, backward, speed, and bypass controls (that runs via a throw along with the effects channel)
14 effects each with 3 controllable parameters (via the xy-slider+centered knob) including: chorus, distortion, delay, reverb, flanger, tremolo, vibrato, vcf, pitchshifter, pitchdelay, 12string, stepvibrato, pushdelay (delayfb driven by magnitude of the env~), and stagdelay (2 out-of-sync delay lines which can be driven in and out of phase by the sum of their delwrite+vd's so what goes in first may come out last)
elven_cloak: which drives the 3 parameter controls via the peak bands amplitude and proximity to a set pitch (midi note) and whose window can be broadened or shrunk and shifted within that window, i.e. the three effect parameters are changed automatically according to what and how you play
and
a tester synth: that randomly sends midi pitches between 20-108, velocities between 20-127, and durations between 250-500ms.
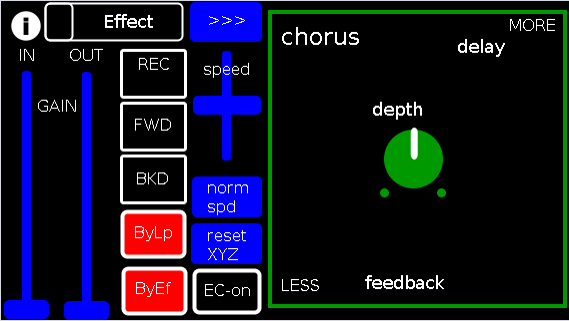
CONTROLS (from top-left to bottom-right):
PAGE 1:
Effect: effects menu where the you choose an effect;
>>>,<<<: page navigation buttons;
IN,OUT: gains (IN is the preamp on the EQ5, and OUT is applied to total output);
REC,FWD,BWD,speed,normspd: the looper toggles and on speed, higher is faster and mid normal and normspd resets to mid;
xy-slider+centered knob: the 3 parameter controls + their labels (the bottom is x, top y and above the knob for the third one), the name of the selected effect and its parameters load each time you choose from the Effects menu, bottom left is lowest, top-right highest;
ByLp,ByEff: bypasses for the looper and effects "channel" (the outputs are summed);
EC-on: elven cloak toggle (default=off);
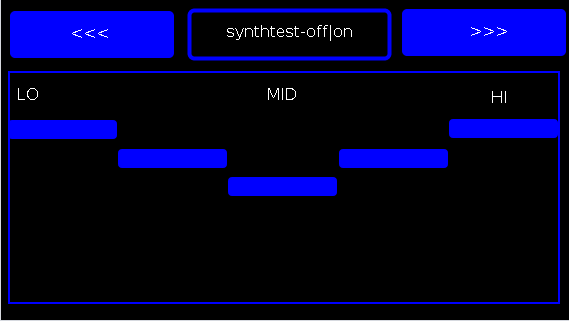
PAGE 2:
the EQ5 controls;
synthtest: off|on, default is off;
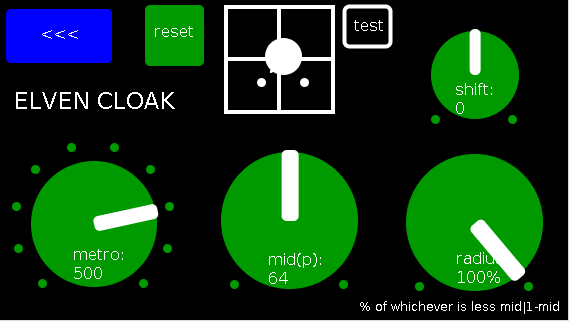
PAGE 3: elven cloak controls
reset: sets shift, metro, mid, and radius to 0, 500(ms),64,100% respectively (i.e. the entire midispectrum, 0-127) respectively;
mini-xyz, test: if test is on, you see a miniature representation of the xyz controls on the first page, so you can calibrate the cloak to your desired values;
shift: throws the center of the range to either the left or right(+/-1);
metro: how frequently in milliseconds to take env~ readings;
mid: the center in midipitch, i.e. 0-127, of the "watched" bands
radius(%): the width of the total bands to watch as a percentage of whichever is lower 1-mid or mid
END CONTROLS
Basic Logic:
There are 4 modes according to the bypass state of the looper and effects.
A throw catch and gain/sum/divide is applied accordingly.
End:
As I mentioned at the first, my handheld(s) are not good enough to let me use this but it runs great on my laptop.
So...
I would love to hear if this Does or Does Not work for others and even better any output others might make using it. I am enormously curious to hear what is "possible" with it.
Presets have not (yet been included as I see it, esp. with the cloak as a tool to be used for improv and less set work. Tho I think it will work nicely for that too if you just turn the cloak off.
hmmm, hmmm,...
I think that's about it.
Let me know if you need any help, suggestions, ideas, explanations, etc. etc. etc. regarding the tool. I would be more than happy to share what I learned.
Peace, Love, and Ever-Lasting Music.
Sincerely,
Scott
p.s. please let me know if I did not handle the "attribution" part of "Laura DeNardis Performing Pachabels Canon" License correctly and I will correct it immediately.
Ciao, for now. Happy PD-ing!
posted in patch~
Audio Ideas (AI) Collection (placeholder, currently only links)-effects, controllers, mmp, etc.
Audio Ideas (AI) Collection (placeholder) currently only links
per @LiamG 's kind suggestion I have begun the process of consolidating my abs and patches, etc. into a single location/zip file or for possible upload to github.
Just to get the ball/me rolling and scope the work I got the links for my shares into a single location to later be consolidated into the single AI Collection.
For now at least, please, bare with me (and the links below) as ideas I am more passionate about currently are demanding my attention. (Which funnily enough will probably also be included in the set, where ever they are shared.)
Thanks, for your patience and all you do for the Pure Data Family.
Sincerely,
Scott
abstract~
pushdelay-envelope-env-driven-delay-line-with-both-delay-time-and-feedback-dependent
numpad-abstraction-for-entry-of-large-numbers-via-click-instead-of-sliders-includes-basic-calculator
abs_delay_fbw-feedbackwards-lifo-last-in-first-out-delay
abs_sequences_by_formula-sequences-by-formula-abstraction-ex-collatz
abs_effects_router-60-effects-in-one-abstraction-router-from-diy2-stamp-album-my-abs
visualcontrolsurface-vsl-values-set-by-their-location-on-the-screen-req-ggee-shell
abs_4-8-14_way_toggle-pair-2-toggles-resulting-in-4-8-or-14-states
audioflow-delay-to-forward-backward-looper-using-speed-control
5-band-equalizer-with-bezier-controller-eq5_mey_w_bezier_sv-pd-updated-to-8-band-below
forward-backward-looper-orig-abs-from-residuum-whale-av
abs_rgb2hex-rgb-0-255-colors-to-hexadecimal-values
pseudo-12-string-effect-6-string-guitar-to-sound-like-a-12-string
jack_midi2pd_2sys_connector_sv-jack-midi_out-to-pd-sys_playback-switcher
abs_4to16pads_bin_conv_sv-convert-4-midi-pads-from-a-binary-value-to-a-decimal-for-rerouting
abs_automatedslider_sv-automated-control-changer-pd-and-mobmuplat-editor-versions
idea-for-effects-stack-ing-technique-control-mother
micin-_abs-abstraction-convert-signal-to-notein-ex-using-a-midi-synth-as-a-guitar-pedal
curve_abs-tri-way-curve-switch-to-change-control-values-in-either-linearly-convex-or-concave-manner
a-preset-control-abstraction-for-saving-parameters-presets-to-text-files
4-tap-delay-with-pitch-shifter-per-delay-line-adaptation-of-diy2-patches
patch~
extra
the-15-owl-faust-patches-compiled-as-32bit-linux-externals-attached
libpd
mmponboardeditortemplate-mmp-for-creation-of-mobmuplat-files-directly-on-the-handheld-android-only
3d-synth-webpd-tree-js-webgl_camera_cinematic-html-example
Off topic
posted in patch~