JASS, Just Another Synth...Sort-of, codename: Gemini (UPDATED: esp with midi fixes)
JASS, Just Another Synth...Sort-of, codename: Gemini (UPDATED TO V-1.0.1)
jass-v1.0.1( esp with midi fixes).zip
1.0.1-CHANGES:
- Fixed issues with midi routing, re the mode selector (mentioned below)
- Upgraded the midi mode "fetch" abstraction to be less granular
- Fix (for midi) so changing cc["14","15","16"] to "rnd" outputs a random wave (It has always done this for non-midi.)
- Added a midi-mode-tester.pd (connect PD's midi out to PD's midi in to use it)
- Upgrade: cc-56 and cc-58 can now change pbend-cc and mod-cc in all modes
- Update: the (this) readme
INFO: Values setting to 0 on initial cc changes is (given midi) to be expected.

JASS is a clone-based, three wavetable, 16 voice polyphonic, Dual-channel synth.
With...
- The initial, two wavetables combined in 1 of 5 possible ways per channel and then adding those two channels. Example: additive+frequency modulation, phase+pulse-modulation, pulse-modulation+amplitude modulation, fm+fm, etc
- The third wavetable is a ring modulator, embedded inside each mod type
- 8 wave types, including a random with a settable number of partials and a square with a settable dutycycle
- A vcf~ filter embedded inside each modulation type
- The attack-decay-release, cutoff, and resonance ranges settable so they immediately and globally recalculate all relevant values
- Four parameters /mod type: p1,p2, cutoff, and resonance
- State-saving, at both the global level (wavetables, env, etc.), as well as, multiple "substates" of for-each-mod-type settings.
- Distortion, reverb
- Midiin, paying special attention to the use of 8-knob, usb, midi controllers (see below for details)
- zexy-limiters, for each channel, after the distortion, and just before dac~
Instructions
Requires: zexy
for-entire-state
- O: Open preset. "default.txt" is loaded by...default
- S: Save preset (all values incl. the multiple substates) (Note: I have Not included any presets, besides the default with 5 substates.)
- SA: Save as
- TEST: A sample player
- symbol: The filename of the currently loaded preset
- CL: Clear, sets all but a few values to 0
- U: Undo CL
- distortion,reverb,MASTER: operate on the total out, just before the limiter.
- MIDI (Each selection corresponds to a pgmin, 123,124,125,126,127, respectively, see below for more information)
- X: Default midi config, cc[1,7,8-64] available
- M: Modulators;cc[10-17] routed to ch1&ch2: p1,p2,cutoff,q controls
- E: Envelopes; cc[10-17] routed to filter- and amp-env controls
- R: Ranges; cc[10-17] routed to adr-min/max,cut-off min/max, resonance min/max, distortion, and reverb
- O: Other; cc[10-17] routed to rngmod controls, 3 wavetypes, and crossfade
- symbol: you may enter 8 cc#'s here to replace the default [10-17] from above to suit your midi-controller's knob configuration; these settings are saved to file upon entry
- vu: for total out to dac~
for-all-mod-types
- /wavetable
- graph: of the chosen wavetype
- part: partials, # of partials to use for the "rn" wavetype; the resulting, random sinesum is saved with the preset
- duty: dutycycle for the "du" wavetype
- type: sin | square | triangle | saw | random | duty | pink (pink-noise: a random sinesum with 128 partials, it is not saved with the preset) | noise (a random sinesum with 2051 partials, also not saved)
- filter-env: (self-explanatory)
- amp-env: (self-explanatory)
- rngmod: self-explanatory, except "sign" is to the modulated signal just before going into the vcf~
- adr-range: min,max[0-10000]; changing these values immediately recalculates all values for the filter- and amp-env's scaled to the new range
- R: randomizes all for-all-mod-types values, but excludes wavetype "noise"; rem: you must S or SA the preset to save the results
- U: Undoes R
for-each-mod-type
- mod-type-1: (In all cases, wavetable1 is the carrier and wavetable2 is the modulator); additive | frequency | phase | pulse | amplitude modulation
- mod-type-2: Same as above; mod-type-2 May be the same type as mod-type-1
- crossfade: Between ch1 and ch2
- detune: Applied to the midi pitch going into ch2
- for-each-clone-type controls:
- p1,p2: (self-explanatory)
- cutoff, resonance: (self-explanatory)
- navigation: Cycles through the saved substates of for-each-mod-type settings (note: they are lines on the end of a [text])
- CP: Copy the current settings, ie. add a line to the end of the [text] identical to the current substate
- -: Delete the current substate
- R: Randomize all (but only a few) substate settings
- U: Undo R
- cut-rng: min,max[0-20000] As adr-range above, this immediately recalculates all cutoff values
- res-rng: min,max[0-100], same as previously but for q
- pbend: cc,rng: the pitchwheel may be assigned to a control by setting this to a value >7 (see midi table below for possibilities); rng is in midi pitches (+/- the value you enter)
- mod-cc: the mod-wheel may be assigned to a control [7..64] by setting this value
midi-implementation
| name | --- | Description |
|---|---|---|
| sysex | not supported | |
| pgmin | 123,124,125,126,127; They set midi mode | |
| notein | 0-127 | |
| bendin | pbend-cc=7>pitchbend; otherwise to the cc# from below | |
| touch | not supported | |
| polytouch | not supported |
cc - basic (for all midi-configs)
| # | name | --- | desciption |
|---|---|---|---|
| 1 | mod-wheel | (assignable) | |
| 7 | volume | Master |
cc - "X" mode/pgmin=123
| cc | --- | parameter |
|---|---|---|
| 8 | wavetype1 | |
| 9 | partials 1 | |
| 10 | duty 1 | |
| 11 | wavetype2 | |
| 12 | partials 2 | |
| 13 | duty 2 | |
| 14 | wavetype3 | |
| 15 | partials 3 | |
| 16 | duty 3 | |
| 17 | filter-att | |
| 18 | filter-dec | |
| 19 | filter-sus | |
| 20 | filter-rel | |
| 21 | amp-att | |
| 22 | amp-dec | |
| 23 | amp-sus | |
| 24 | amp-rel | |
| 25 | rngmod-freq | |
| 26 | rngmod-sig | |
| 27 | rngmod-filt | |
| 28 | rngmod-amp | |
| 29 | distortion | |
| 30 | reverb | |
| 31 | master | |
| 32 | mod-type 1 | |
| 33 | mod-type 2 | |
| 34 | crossfade | |
| 35 | detune | |
| 36 | p1-1 | |
| 37 | p2-1 | |
| 38 | cutoff-1 | |
| 39 | q-1 | |
| 40 | p1-2 | |
| 41 | p2-2 | |
| 42 | cutoff-2 | |
| 43 | q-2 | |
| 44 | p1-3 | |
| 45 | p2-3 | |
| 46 | cutoff-3 | |
| 47 | q-3 | |
| 48 | p1-4 | |
| 49 | p2-4 | |
| 50 | cutoff-4 | |
| 51 | q-4 | |
| 52 | p1-5 | |
| 53 | p2-5 | |
| 54 | cutoff-5 | |
| 55 | q-5 | |
| 56 | pbend-cc | |
| 57 | pbend-rng | |
| 58 | mod-cc | |
| 59 | adr-rng-min | |
| 60 | adr-rng-max | |
| 61 | cut-rng-min | |
| 62 | cut-rng-max | |
| 63 | res-rng-min | |
| 64 | res-rng-max |
cc - Modes M, E, R, O
Jass is designed so that single knobs may be used for multiple purposes without reentering the previous value when you turn the knob, esp. as it pertains to, 8-knob controllers.
Thus, for instance, when in Mode M(pgm=124) your cc send the signals as listed below. When you switch modes, that knob will then change the values for That mode.
In order to do this, you must turn the knob until it hits the previously stored value for that mode-knob.
After hitting that previous value, it will begin to change the current value.
cc - Modes M, E, R, O assignments
Where [10..17] may be the midi cc #'s you enter in the MIDI symbol field (as mentioned above) aligned to your particular midi controller.
| cc# | --- | M/pgm=124 | --- | E/pgm=125 | --- | R/pgm=126 | --- | O/pgm=127 |
|---|---|---|---|---|---|---|---|---|
| 10 | ch1:p1 | filter-env:att | adr-rng-min | rngmod:freq | ||||
| 11 | ch1:p2 | filter-env:dec | adr-rng-max | rngmod:sig | ||||
| 12 | ch1:cutoff | filter-env:sus | cut-rng-min | rngmod:filter | ||||
| 13 | ch1:q | filter-env:re | cut-rng-max | rngmod:amp | ||||
| 14 | ch2:p1 | amp-env:att | res-rng-min | wavetype1 | ||||
| 15 | ch2:p2 | amp-env:dec | res-rng-max | wavetype2 | ||||
| 16 | ch2:cutoff | amp-env:sus | distortion | wavetype3 | ||||
| 17 | ch2:q | amp-env:rel | reverb | crossfade |
In closing
If you have anywhere close to as much fun (using, experimenting with, trying out, etc.) this patch, as I had making it, I will consider it a success.
For while an arduous learning curve (the first synth I ever built), it has been an Enormous pleasure to listen to as I worked on it. Getting better and better sounding at each pass.
Rather, than say to much, I will say this:
Enjoy. May it bring a smile to your face.
Peace through love of creating and sharing.
Sincerely,
Scott
 posted in patch~
PD's scheduler, timing, control-rate, audio-rate, block-size, (sub)sample accuracy,
@Nicolas-Danet said:
control messages and compute audio vectors of the DSP graph are interleaved operations. The internal audio vector size is 64.
[64][control][64][control][64][control][64][control]
Ok, i see.
But I read control messages are first, then audio. f.e. [loadbang] is proceeded before an upcoming audio-block.
And [vline~] is calculated and "drawn" before and "modulating" the *following * audio blocks.
[control][64][control][64][control][64][control][64]
What's happen in a 1 sample reblocked subpatch? In short, instead of compute 1 vector of 64 samples, it computes 64 times following a vector of 1 sample.
And there is no way to change this interval rate of 64?
Is upsampling in a subpatch increasing the computation time-interval of control-messages?
The tricky stuff with real time audio is not to do the things fast, but do things fast at the right time. Wait the sound in, deliver the sound out, compute the next sound and wait. When i benchmark my fork for instance, most of the time is spent in sleeping!
I see. In the analog world it is very different. This is why we have the buffer-latency in digital everywhere:
...incoming audio-samples in blocks, computation, audio out, and again...
And the control-domain every 64 samples.
For me as "user" of PD this is confusing.
So every object with a [v ...] will be sampleaccurate on point in upcoming audio-blocks, as long as it is not needed more often then 64 samples later!??? i.e. as long it is not starting several times in a smaller interval then 64 samples?
 posted in technical issues
FFT analysis in wav files
Hi, guys!
I'm relatively new to Pure Data and I'm making a visual project — with Pure Data (Purr Data version) and Processing — that depends on a good FFT analysis.
I've been trying to solve this problem for some time now.
I made the patch that is in this tutorial:
This patch opens a file and "draws" the left and right channels on two arrays.
I'm trying to mix this patch with the "patches/3-8-1-1-rfft-array.pd" of this tutorial:
http://www.pd-tutorial.com/english/ch03s08.html#id431716
So, what I'm trying to do is to make an FFT analysis to an wav file to represent visually the amplitude of each range of frequencies from the lower frequencies to the higher frequencies for different songs.
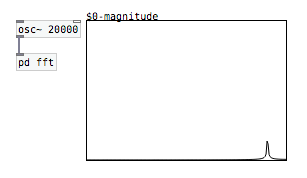
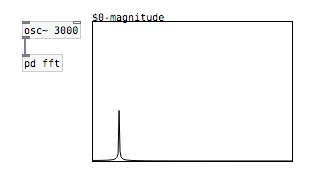
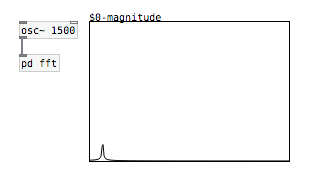
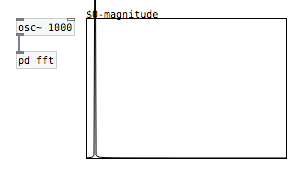
When I test the FFT analysis with an [osc~] object (writing it in an array), everything is kind of fine: 10000Hz in the middle, 20000Hz glued to the right. But I noticed that when I put [osc~ 0], the amplitude glued to the left is really high. Same with 50Hz, 100Hz, 150Hz, etc.. until around 1500Hz. Another thing I noticed is that each frequency has a different amplitude.
So, one thing I tried to do: I put the FFT code in a subpatch and changed the blocksize inside it to 4096 with the object [block~]. Since only the first 32 bins shows the frequencies, I put the size of the array with half the blocksize: 2048. Then, since the main frequencies of the majority of the songs goes until around 5000Hz — I've been told that C8 correspond to around 4200Hz, and that would be in the 7th bin in a block size of 64 —, I tried to reduce the size of the array to 512:
20000 (total frequencies) / 2048 (bins) = 9,76 (frequencies per bin)
5000 (frequencies for songs) / 9,76 (frequencies per bin) = 512 (bins)
In a blocksize of 64, this would correspond to the first 8 bins.
But still, after all this, the frequencies are always glued to the left:
I've tried everything to make a well-distributed FFT analysis, like it should be, but it's ALWAYS glued to the left with all the songs that I tried with...
Sorry for the long post and let me know if I wasn't clear in my question...
Thank you in advance!
 posted in technical issues
Final Solution: Anyone looking to control Ableton Live...easily
Hi All
A little bit of work to set up but forget midi mapping...google it if you dont believe me.
After a lot of time spent trying to get a simple but sophisticated way (using a minimal 8 button floorboard) to control Live on w10, I thought I would share this particular solution to possibly help others (especially after the help offered here on this forum). I tried a number of scenarios, even buying Max 4 Live, but it turns out a lot simpler than that. It needs 3 main areas set
FOOT CONTROLLER BEHAVIOURS/GESTURES
Create pd patch that gives you 'behaviours' per switch. Ill be happy to share mine but Im just cleaning them up atm.
eg I have 4 standard behaviours that dont take too much time to master
- Action A: A quick click (less than 500ms) Always the primary action
- Action B: Long click ie 1 click down and pedal up after 500ms. I use this eg always as a negative ramp down for things like lowering volume but if its just held down and released in a natural way, it is the secondary action of the switch
- Action C: 3 Click ie 1 quick down, up and then hold down. I use this for a positive ramp eg as volume up
4 Actiion D: Double click, Always a cancel
These are all mapped to note/ctrl outs that match the 'Selected Track Control' below
PLUGIN
Use PD VST to create a plugin version of your patch. This is loaded into Live as a control track. Live manages the connection of your floor board etc into the actual track so you dont wrestle with the io. I always use track 1 for click (forget Live metronome, this is much more flexible and can have feel/swing etc) so I dedicate track 2 to control.
Use LoopMIDI to create a virtual midi cable that will go from this track and be fed into the remote script.
REMOTE SCRIPT: 'Selected Track Control'
Download latest from http://stc.wiffbi.com/
Install to live and make sure your notes/control conform.
Enable this as a control surface in live and connect midi in from the plugin. Think about giving the guy a donation...massive amount of work and he deserves it!
I use it to control 8 tracks x 8 scenes and is controlled by 3 switches
- Scene control up and down (A = down, B = up)
- Track control same as scene
- Rec/Fire/Undo Volume up and down (A = fire/rec, B = Volume Down, C = Volume Up, D (Dbl Click) = Undo
The scenes and tracks wrap so there isnt too much foot tapping
There is quite a bit more to it of course...its and maybe no one else needs this but it would have saved me a couple of weeks of time so Im happy to help anyone wanting to achieve gigging without a massive floor rig and an easy way to map and remember.
HTH someone
Cheers
mark
 posted in technical issues
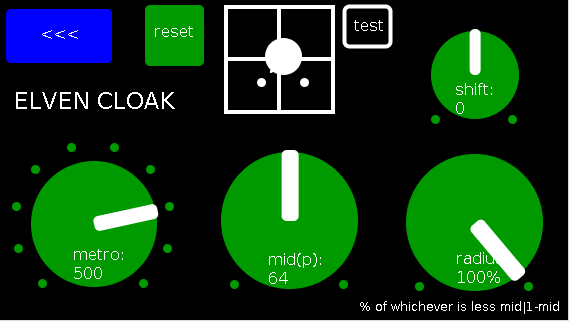
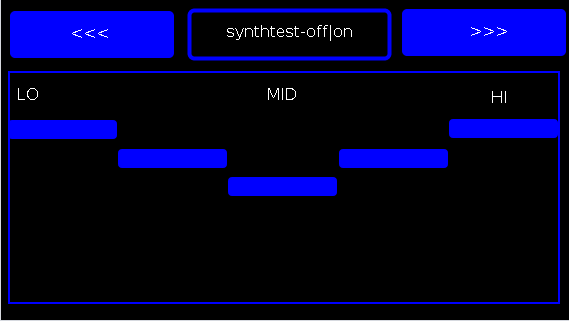
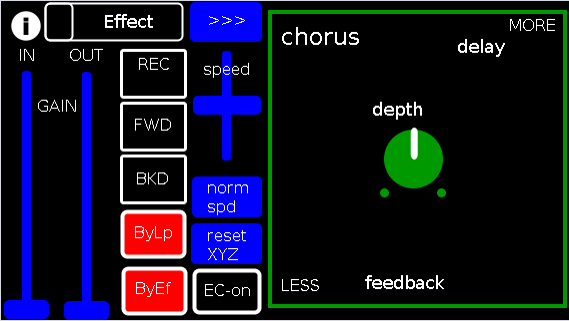
Andúril (MobMuPlat app): fwd/bwd looper + 14 effects + elven cloak (control parameters via env~ and pitch as you play)
Andúril (MobMuPlat app): fwd/bwd looper + 14 effects + elven cloak (control parameters via env~ and pitch as you play)
UPDATED VERSION (corrected MobMuPlat system crash problem):
anduril.zip
This has been long in coming and I am very glad to finally release it (even tho my handheld hardware is not up to the job of running the elven cloak feature).
First a demo video and some screenshots, , and then the instructions.
DEMO VIDEO
SCREENSHOTS
Intention(s):
The app is designed to give (specifically a guitarist) tho really any input (even prerecorded as is the case in the demo (from: "Laura DeNardis Performing Pachabels Canon" from https://archive.org/details/LauraDenardisPerformingPachabelsCanon, specifically the wave file at: https://archive.org/download/LauraDenardisPerformingPachabelsCanon/PachabelsCanon.wav, Attribution-Noncommercial-Share Alike 3.0) FULL Control over the "voice" of their output-sound.
It includes:
a 5-band EQ (on page 2 of the app) (upfront that is applied to all incoming sounds);
a looper: with record, forward, backward, speed, and bypass controls (that runs via a throw along with the effects channel)
14 effects each with 3 controllable parameters (via the xy-slider+centered knob) including: chorus, distortion, delay, reverb, flanger, tremolo, vibrato, vcf, pitchshifter, pitchdelay, 12string, stepvibrato, pushdelay (delayfb driven by magnitude of the env~), and stagdelay (2 out-of-sync delay lines which can be driven in and out of phase by the sum of their delwrite+vd's so what goes in first may come out last)
elven_cloak: which drives the 3 parameter controls via the peak bands amplitude and proximity to a set pitch (midi note) and whose window can be broadened or shrunk and shifted within that window, i.e. the three effect parameters are changed automatically according to what and how you play
and
a tester synth: that randomly sends midi pitches between 20-108, velocities between 20-127, and durations between 250-500ms.
CONTROLS (from top-left to bottom-right):
PAGE 1:
Effect: effects menu where the you choose an effect;
>>>,<<<: page navigation buttons;
IN,OUT: gains (IN is the preamp on the EQ5, and OUT is applied to total output);
REC,FWD,BWD,speed,normspd: the looper toggles and on speed, higher is faster and mid normal and normspd resets to mid;
xy-slider+centered knob: the 3 parameter controls + their labels (the bottom is x, top y and above the knob for the third one), the name of the selected effect and its parameters load each time you choose from the Effects menu, bottom left is lowest, top-right highest;
ByLp,ByEff: bypasses for the looper and effects "channel" (the outputs are summed);
EC-on: elven cloak toggle (default=off);
PAGE 2:
the EQ5 controls;
synthtest: off|on, default is off;
PAGE 3: elven cloak controls
reset: sets shift, metro, mid, and radius to 0, 500(ms),64,100% respectively (i.e. the entire midispectrum, 0-127) respectively;
mini-xyz, test: if test is on, you see a miniature representation of the xyz controls on the first page, so you can calibrate the cloak to your desired values;
shift: throws the center of the range to either the left or right(+/-1);
metro: how frequently in milliseconds to take env~ readings;
mid: the center in midipitch, i.e. 0-127, of the "watched" bands
radius(%): the width of the total bands to watch as a percentage of whichever is lower 1-mid or mid
END CONTROLS
Basic Logic:
There are 4 modes according to the bypass state of the looper and effects.
A throw catch and gain/sum/divide is applied accordingly.
End:
As I mentioned at the first, my handheld(s) are not good enough to let me use this but it runs great on my laptop.
So...
I would love to hear if this Does or Does Not work for others and even better any output others might make using it. I am enormously curious to hear what is "possible" with it.
Presets have not (yet ") been included as I see it, esp. with the cloak as a tool to be used for improv and less set work. Tho I think it will work nicely for that too if you just turn the cloak off.
been included as I see it, esp. with the cloak as a tool to be used for improv and less set work. Tho I think it will work nicely for that too if you just turn the cloak off.
hmmm, hmmm,...
I think that's about it.
Let me know if you need any help, suggestions, ideas, explanations, etc. etc. etc. regarding the tool. I would be more than happy to share what I learned.
Peace, Love, and Ever-Lasting Music.
Sincerely,
Scott
p.s. please let me know if I did not handle the "attribution" part of "Laura DeNardis Performing Pachabels Canon" License correctly and I will correct it immediately.
Ciao, for now. Happy PD-ing!
posted in patch~
Audio Ideas (AI) Collection (placeholder, currently only links)-effects, controllers, mmp, etc.
Audio Ideas (AI) Collection (placeholder) currently only links
per @LiamG 's kind suggestion I have begun the process of consolidating my abs and patches, etc. into a single location/zip file or for possible upload to github.
Just to get the ball/me rolling and scope the work I got the links for my shares into a single location to later be consolidated into the single AI Collection.
For now at least, please, bare with me (and the links below) as ideas I am more passionate about currently are demanding my attention. (Which funnily enough will probably also be included in the set, where ever they are shared.)
Thanks, for your patience and all you do for the Pure Data Family.
Sincerely,
Scott
abstract~
pushdelay-envelope-env-driven-delay-line-with-both-delay-time-and-feedback-dependent
numpad-abstraction-for-entry-of-large-numbers-via-click-instead-of-sliders-includes-basic-calculator
abs_delay_fbw-feedbackwards-lifo-last-in-first-out-delay
abs_sequences_by_formula-sequences-by-formula-abstraction-ex-collatz
abs_effects_router-60-effects-in-one-abstraction-router-from-diy2-stamp-album-my-abs
visualcontrolsurface-vsl-values-set-by-their-location-on-the-screen-req-ggee-shell
abs_4-8-14_way_toggle-pair-2-toggles-resulting-in-4-8-or-14-states
audioflow-delay-to-forward-backward-looper-using-speed-control
5-band-equalizer-with-bezier-controller-eq5_mey_w_bezier_sv-pd-updated-to-8-band-below
forward-backward-looper-orig-abs-from-residuum-whale-av
abs_rgb2hex-rgb-0-255-colors-to-hexadecimal-values
pseudo-12-string-effect-6-string-guitar-to-sound-like-a-12-string
jack_midi2pd_2sys_connector_sv-jack-midi_out-to-pd-sys_playback-switcher
abs_4to16pads_bin_conv_sv-convert-4-midi-pads-from-a-binary-value-to-a-decimal-for-rerouting
abs_automatedslider_sv-automated-control-changer-pd-and-mobmuplat-editor-versions
idea-for-effects-stack-ing-technique-control-mother
micin-_abs-abstraction-convert-signal-to-notein-ex-using-a-midi-synth-as-a-guitar-pedal
curve_abs-tri-way-curve-switch-to-change-control-values-in-either-linearly-convex-or-concave-manner
a-preset-control-abstraction-for-saving-parameters-presets-to-text-files
4-tap-delay-with-pitch-shifter-per-delay-line-adaptation-of-diy2-patches
patch~
extra
the-15-owl-faust-patches-compiled-as-32bit-linux-externals-attached
libpd
mmponboardeditortemplate-mmp-for-creation-of-mobmuplat-files-directly-on-the-handheld-android-only
3d-synth-webpd-tree-js-webgl_camera_cinematic-html-example
Off topic
posted in patch~
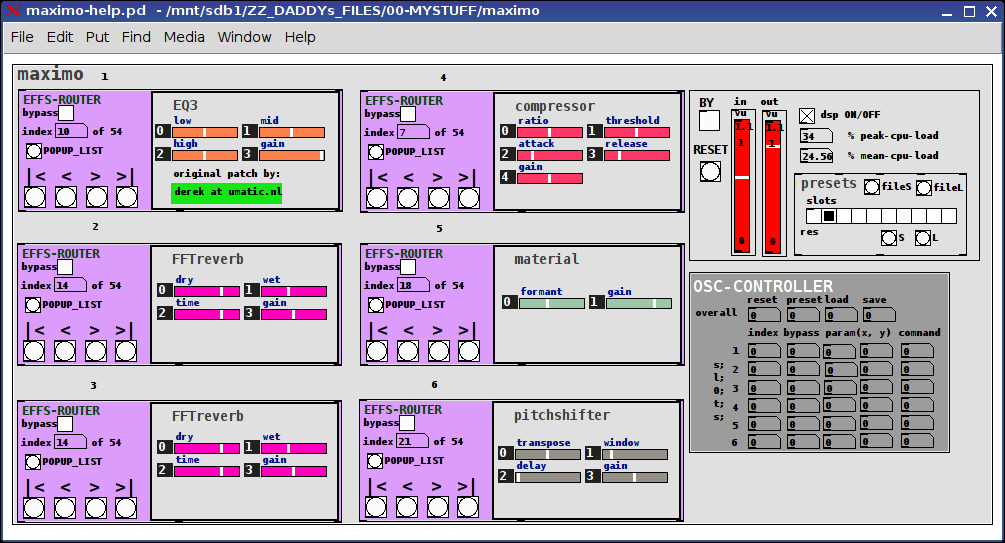
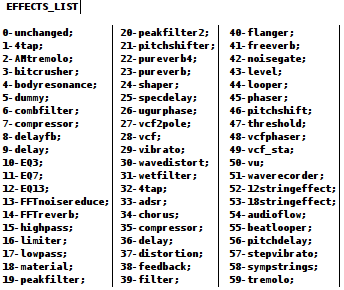
Maximo (Guitar Rack) - 6 slots with 1 of 60 effects per slot (using "abs_effects_router" + an OSC controller (MobMuPlat)
Maximo (Guitar Rack) - 6 slots with 1 of 60 effects per slot (using "abs_effects_router" + an OSC controller (MobMuPlat)
The app is "maximo-help.pd".
maximo is an effects-chain giving the user 6 slots each one of which may be used to select from 1 of 60 effects (the first being "unchanged").
Check her for details about how to use the "abs_effects_router", http://forum.pdpatchrepo.info/topic/10693/abs_effects_router-60-effects-in-one-abstraction-router-from-diy2-stamp-album-my-abs/1 .
It also includes
- a "maximo/admin.pd" abstraction to control:
dsp, bypass (all), reset (to set all effects to "unchanged"), and 9 presets (0 reserved for program usage) and both save-to-file and load-from-file preset buttons
- an Open Sound Control (OSC) mapper ("maximo/osc_control.pd") for sending values (0 thru 1) to controls /cc/1 thru /cc/34 (see the patch for details).
and
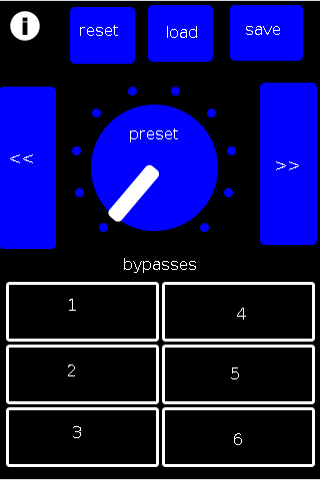
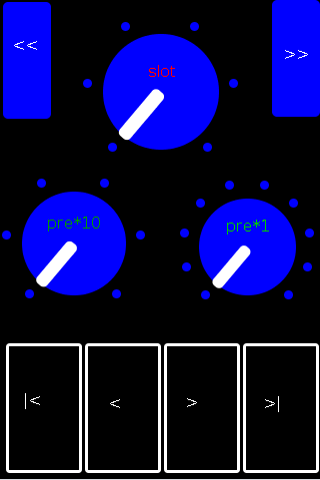
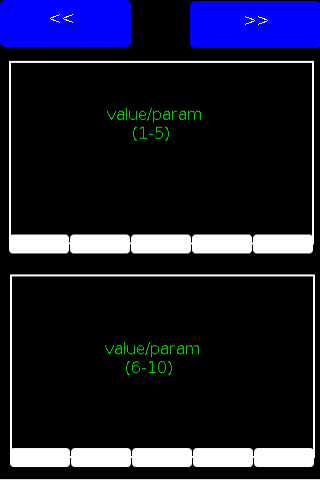
- an example OSC (MobMuPlat) controller at "./maximo-osc.mmp" and "./maximo-osc-mmp.pd"
MAXIMO EXAMPLE
MOBMUPLAT INTERFACE
PAGE 1
PAGE 2
PAGE 3
All of this was contingent on the foundation and resources laid out in the DIY2 and Stamp Album collections and actually this was largely an example of persistence not any real insight and the largest percentage of the success goes to their creators for being so diligent about standardizing their abstractions.
I DO however hope you find it useful.
My GOAL was to eliminate what is often the case with effect stacks (I have seen) of having to connect all the effects. This eliminates that and makes it much cleaner: only having to select from the (tof/pmenu POPUP_LIST button) or navigate to the desired effect with the standard "first, previous, next, last" controls.
I hope you find the work useful and capable of helping you to manifest all those wonderful sounds you have in your head.
Peace and only Love,
Scott
The List of Effects per slot is:
posted in patch~
mrpeach on Raspberry
Hi there,
Thanks for taking the time. I am getting a little bit frustrated here, so I guess it’s best to ask the community:
How do I get MrPeach to work on 0.47.1? I am using a Raspberry Pi 3 (running Linux version 4.9.20-v7+) and Pure Data 0.47.1.
I installed mrpeach using the “find externals” functionality. Of course I edited the path to “/home/pi/pd-externals” and created a “mrpeach” entry in the startup preferences.
Some background information: I want my Python code to “communicate” with pd but actually I do not care how they do this. OSC-Messages seem to be the easiest solution.
Well, seemed. I am a total beginner to pd
Help much appreciated 
Daniel
By the way here is the log:
tried ./osc/routeOSC.l_arm and failed
tried ./osc/routeOSC.pd_linux and failed
tried ./osc/routeOSC/routeOSC.l_arm and failed
tried ./osc/routeOSC/routeOSC.pd_linux and failed
tried ./osc/routeOSC.pd and failed
tried ./osc/routeOSC.pat and failed
tried ./osc/routeOSC/osc/routeOSC.pd and failed
tried /home/pi/pd-externals/osc/routeOSC.l_arm and failed
tried /home/pi/pd-externals/osc/routeOSC.pd_linux and succeeded
tried ./mrpeach.l_arm and failed
tried ./mrpeach.pd_linux and failed
tried ./mrpeach/mrpeach.l_arm and failed
tried ./mrpeach/mrpeach.pd_linux and failed
tried ./mrpeach.pd and failed
tried ./mrpeach.pat and failed
tried ./mrpeach/mrpeach.pd and failed
tried /home/pi/pd-externals/mrpeach.l_arm and failed
tried /home/pi/pd-externals/mrpeach.pd_linux and failed
tried /home/pi/pd-externals/mrpeach/mrpeach.l_arm and failed
tried /home/pi/pd-externals/mrpeach/mrpeach.pd_linux and failed
tried /home/pi/pd-externals/mrpeach.pd and failed
tried /home/pi/pd-externals/mrpeach.pat and failed
tried /home/pi/pd-externals/mrpeach/mrpeach.pd and failed
mrpeach: can't load library
 posted in technical issues
Using pduino and Firmata to read values from the Grove I2C Touch sensor
Hi @alexandros
code is below, if you can figure anything out that would be great !
/* GroveI2CTouchTest.pde - Sample code for the SeeedStudio Grove I2C Touch Sensor
http://seeedstudio.com/wiki/index.php?title=Twig_-_I2C_Touch_Sensor_v0.93b
Prerequisite: A modification of the Grove I2C Touch sensor is needed Solder a pin to
the INT terminal in the I2C sensor to connect it to one pin in Arduino  Created by
Wendell A. Capili, August 27, 2011. http://wendellinfinity.wordpress.com
Released into the public domain.*/

#include <Wire.h> // include I2C library
#include <i2c_touch_sensor.h>
#include <MPR121.h>
// include our Grove I2C touch sensor library
// initialize the Grove I2C touch sensor
// IMPORTANT: in this case, INT pin was connected to pin7 of the Arduino
// (this is the interrupt pin)
i2ctouchsensor touchsensor; // keep track of 4 pads' states
//boolean padTouched[4];
long previousMillis = 0;
long interval = 100;
void setup()
  {
    Serial.begin(9600); // for debugging
    Serial.print("begin to init");
    Wire.begin(); // needed by the GroveMultiTouch lib
    touchsensor.initialize(); // initialize the feelers     // initialize the containers
    //for(int i=0; i<=3; i++)
    //{
   // padTouched[i]=false;
    //}

  }
void loop()
{
   unsigned char MPR_Query=0;
   unsigned long currentMillis = millis();
 if(currentMillis - previousMillis > interval)
  {
    previousMillis = currentMillis;
    touchsensor.getTouchState();
  }
 for (int i=0;i<12;i++)
 {
 if (touchsensor.touched&(1<<i))
    {
    Serial.print("pin ");
        Serial.print(i);
        Serial.println(" was  touched");
         }
 }
}

/*

  touchsensor.readTouchInputs(); // test read the touch sensors
// loop through our touch sensors 1 to 4
  for(int i=0; i<=3; i++)
  {
// get the touch state based on pin #
    if(feelers.getTouchState(i))
    {
      if(!padTouched[i])
        {                    // print in serial that it was touched
        Serial.print("Pad ");
        Serial.print(i);
        Serial.println(" was touched");
        }
// flag the touch sensor state
    padTouched[i]=true;
     }
    else
    {
    if(padTouched[i])
    {
      // print in serial that it was released
      Serial.print("Pad ");
      Serial.print(i);
      Serial.println(" was released");
    }               // reset the touch sensor state
    padTouched[i]=false;
    }
  }*/
 posted in technical issues
RaspberryPi audio cutoff
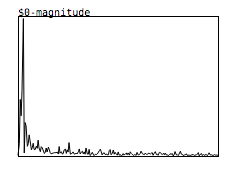
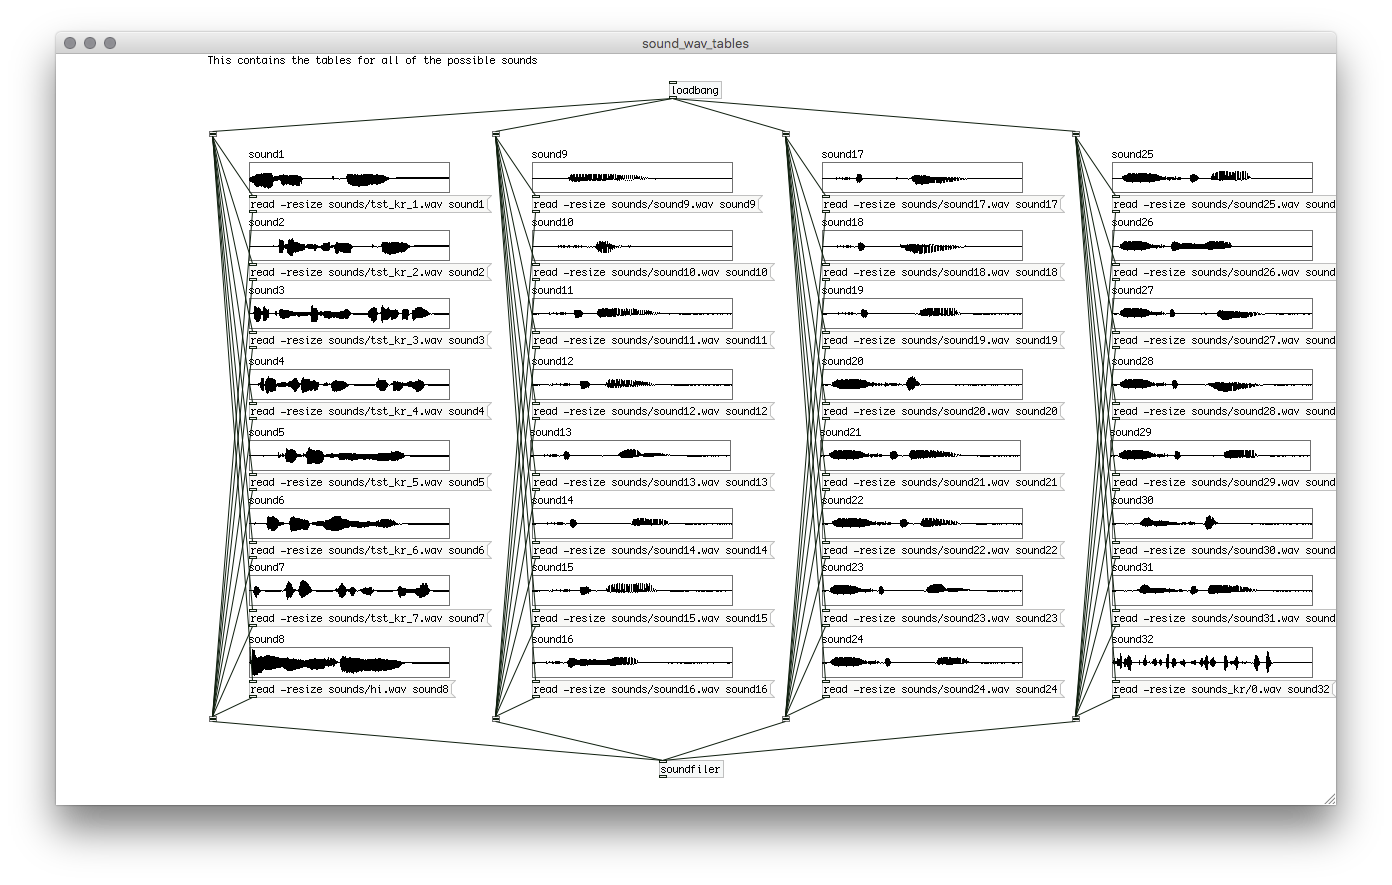
I have a PD-extended sketch running on a RaspberryPi (RPI) that plays wav's from 32+ tabread4 array's. They can be selected via OSC messages sent over network. I noticed that every so often the audio would cutout. The following is a recording from PD on the RPI. The cutout is heard clearly at 22seconds and 50 to 54 seconds. This happens with both the internal sound card of the RPI and when using a USB soundcard. 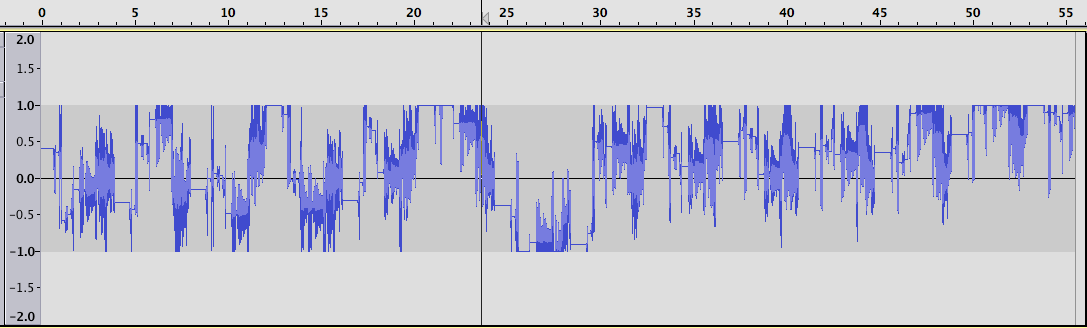
For comparison here is a similar graph from running the same sketch on OSX. The waveforms differ because the tabread4 arrays played are a bit random. But the graph shows that the sway from the 0 middle line is much more on the RPi than OSX.
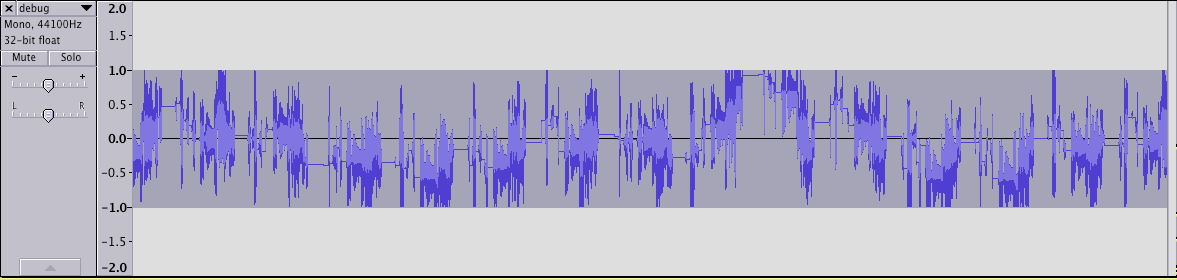
To attempt to resolve I have to be certain the sketch DAC is given a volume of around 0.5. But perhaps someone knows better what is going on and could advise me?
Sketch elements:
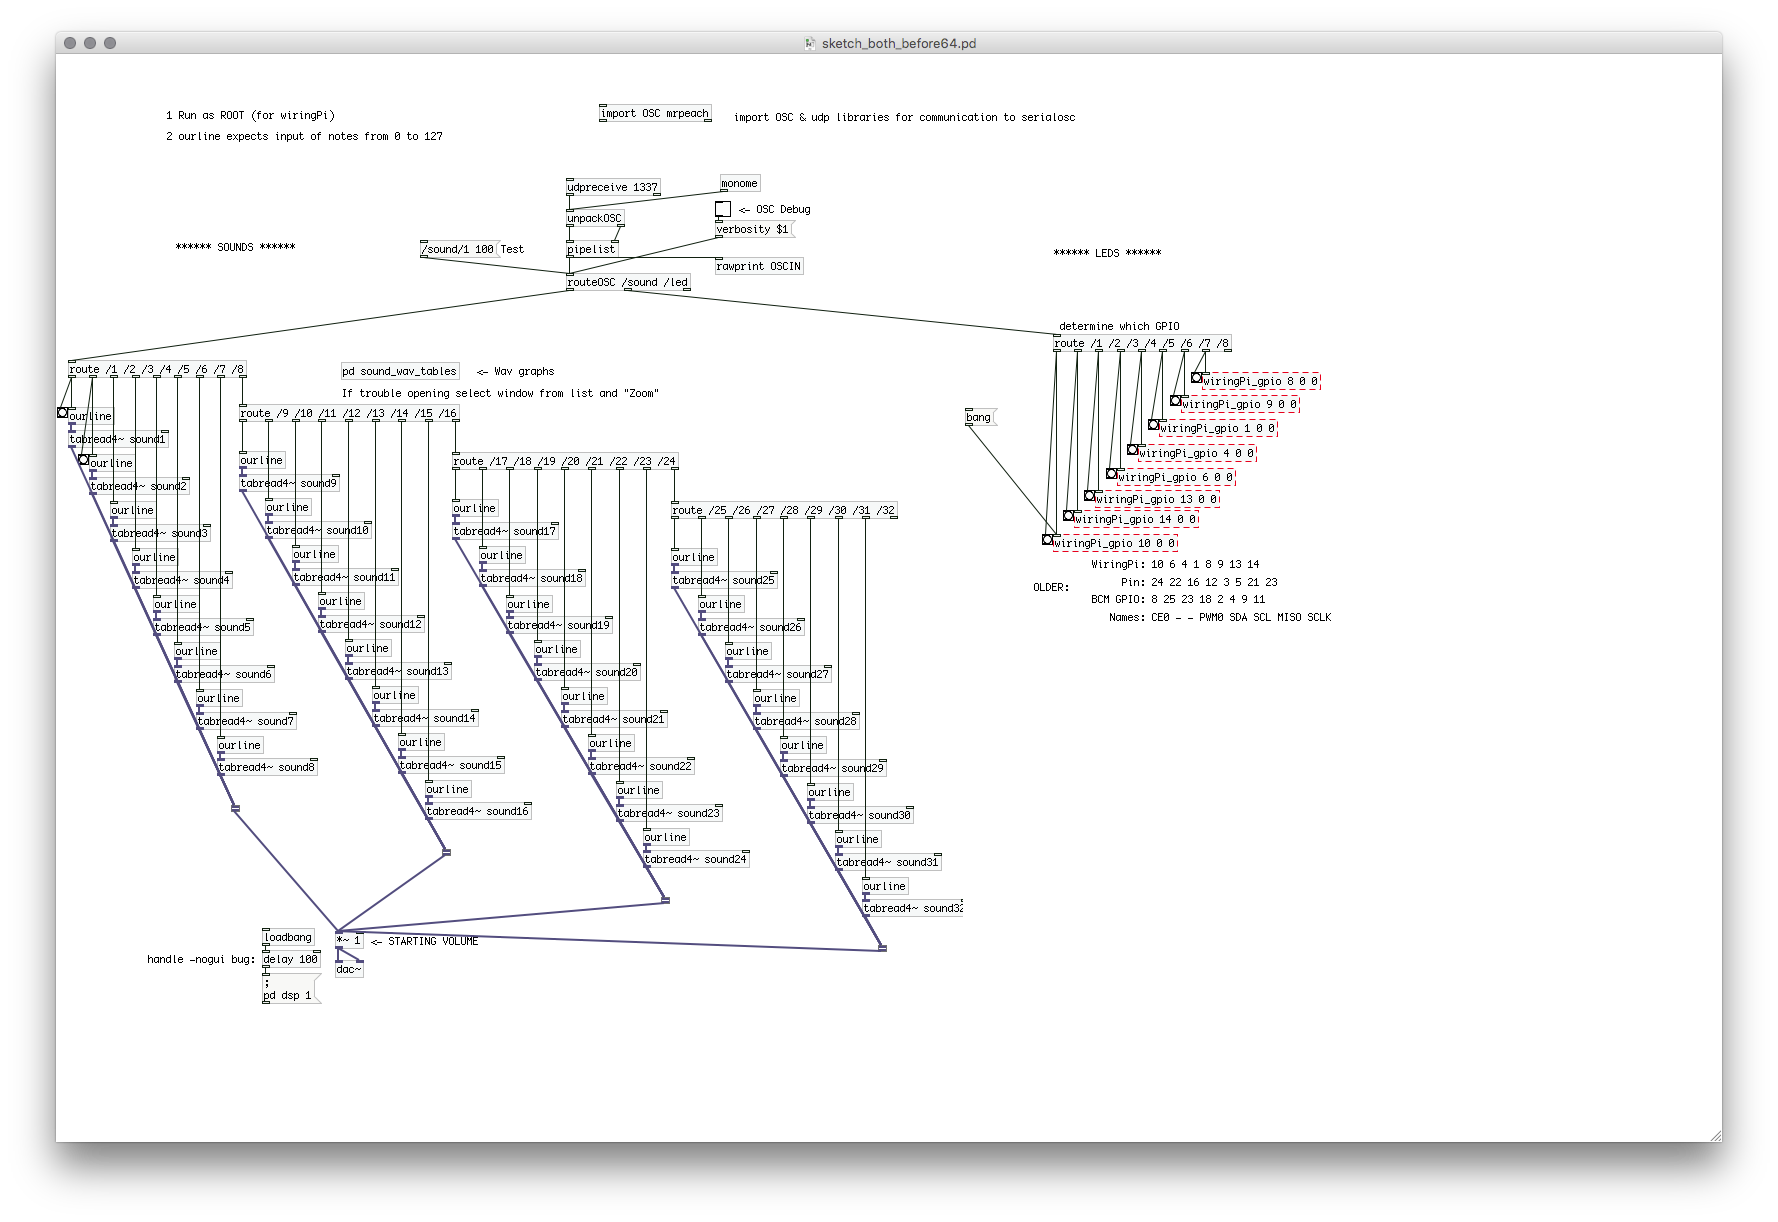
 posted in I/O hardware diy