abl_link~ midi and audio sync setup
Hi Folks,
I thought I’d share this patch in the hopes that someone might be able to help improve upon it. I am by no means even semi competent with PD and jumped into this task without actually bothering to learn the basics of PD or RPi, but nevertheless here we are: maybe you can share a better implementation.
Mods/experienced folks, if I am sharing irrelevant/wrong/confusing info, mea culpa and please correct me.
I wanted to make a patch for PD in Raspberry Pi that would do 3 things:
- Get the abl_link~ temp data over wifi
- Create a midi clock output using a 5-pin midi adapter (I have one of the cheapo usb-to-midi cable things here)
-simultaneously create an audio pulse ‘clock’ output such as those used by volcas, Teenage Engineering Pocket operators, and the like (I am not sure if such an audio signal over a 3.5mm jack would be hot enough to be considered a CV pulse too, maybe you can help clear that up?)
As I say, after much struggles I have globbed something together that sort of does this.
A couple of things for newcomers like myself:
The abl_link~ object in the patch isn’t initially part of the standard pure data install as I write. I was able to use deken (ie the code that powers the ‘help/find externals’ bit of PD) to look for abl_link~. Search for it. At the time of writing there is a version for Arm7 devices like the Raspberry Pi 3 which was put together by the illustrious mzero with code from antlr. Go ahead and install the abl_link~ object. (Possibly you may have to uncheck the ‘hide foreign architectures’ box to get the arm7 version to show up. This is usually a safeguard to stop users from trying to install versions of externals that won’t work on their systems. So long as you see ‘arm7’ in the description it should hopefully be the one you want) PD will ask where you want to store the external, and I would just leave it at the default unless you have a special reason to do otherwise.
To get the patch to hook up to your preferred audio and midi outputs by default you may have to take certain steps. In my version of it I have deemed the built in audio and my cheapo USB midi output to be good enough for this task.
[As part of my troubleshooting process I ended up installing amidiauto which is linked to here: https://community.blokas.io/t/script-for-launching-pd-patch-with-midi-without-aconnect/1010/2
I undertook several installations in support of amidiauto which may be helping my system to see and link up my USB midi and PD, but nothing worked until I took the step in the following paragraph about startup flags in PD. (It may also be that I did not need to put in amidiauto at all. Maybe I’ll try that on another card to see if it simplifies the process. I’m saying you might want to try it without amidiauto first to see).]
Midi: - (ALSA is the onboard audio and midi solution that is part of Raspbian). To have PD use ALSA midi at the start I made the following setting in the preferences/startup dialog - within that window there is a section (initially blank) for startup flags. Here you can set instructions for PD to take note of when it starts up. I put in -alsamidi to tell it that alsamidi will be my preferred midi output. (I also took the step of going to file/preferences/midi settings, then ‘apply’ and ‘ok’ to confirm the Alsa midi ports that showed up. Then I went back to file/preferences/save all preferences. This seems to have (fingers crossed) saved the connection to my USB midi output.
Audio: I used the terminal and sudo raspi-config to set my audio out to the internal sound card (advanced options/audio/3.5mm jack). Since I had a fairly unused installation of PD I’d never asked it to do anything but work with the system defaults so getting audio out was fairly simple.
[nb I initially stuck this patch together on my Mac where everything worked pretty trouble free in terms of audio and midi selection]
About the patch. Obviously it is sort of horrible but there it is. It is a combination of stuff I cribbed from the demo example of abl_link~ in the example, and two example patches created by users NoDSP and jpg in this forum post https://forum.pdpatchrepo.info/topic/9545/generate-midi-clock-messages-from-pd/2
As well as some basic synthesis to make the bip bip noises I learned from LWMs youtube channel
https://www.youtube.com/channel/UCw5MbnaoDDuRPFsqaQpU9ig
Any and all errors and bad practice are mine alone.
The patch has some comments in it that doubtless expose my own lack of understanding more than anything. Undoubtedly many users can do a better job than I can.
Some observations on limitations/screwups of the patch:
-
If you disconnect from the stream for a bit, it will attempt to catch up. There will be a massive flurry of notes and/or audio bips as it plays all the intervening notes.
-
It doesn’t seem to be too fussy about where in the bar it is getting started (It will be "on" the beat but sometimes the ‘1’will be the ‘2’ etc. This is okay if I’m using internal sequencers from scratch (in the volca, say) but not if there is an existing pattern that I am trying to have come in 'on the 1'.
-
My solution to more detailed subdivision of bars was to make a big old list of numbers up to 32 so that abl_link~ can count up to more than 4. There’s probably a better solution for this. If you find that you need even more subdivisions because you are making some sort of inhumanly manic speed gabba, add even yet more numbers and connections.
I haven’t tested this much. And since it’s taken me the better part of 18 months to do this at all, I’m really not your guy to make it work any better. I’m posting here so that wiser souls can do a better job and maybe share what I think has the potential to be a useful midi sync tool.
I plan to revisit https://community.blokas.io/t/script-for-launching-pd-patch-with-midi-without-aconnect/1010/3
for some pointers on setting this up to launch the patch at startup to give me a small, portable midi Link sync device for 5-pin and audio-pulse clocked devices.
This is my first ever bit of quasi productive input to any technical community (mostly I just hang around asking dumb questions… So be kind and please use your giant brains to make it better) I look forward to spending some time learning the basics now. ") link-sync.pd
link-sync.pd
 posted in patch~
Web Audio Conference 2019 - 2nd Call for Submissions & Keynotes
Apologies for cross-postings
Fifth Annual Web Audio Conference - 2nd Call for Submissions
The fifth Web Audio Conference (WAC) will be held 4-6 December, 2019 at the Norwegian University of Science and Technology (NTNU) in Trondheim, Norway. WAC is an international conference dedicated to web audio technologies and applications. The conference addresses academic research, artistic research, development, design, evaluation and standards concerned with emerging audio-related web technologies such as Web Audio API, Web RTC, WebSockets and Javascript. The conference welcomes web developers, music technologists, computer musicians, application designers, industry engineers, R&D scientists, academic researchers, artists, students and people interested in the fields of web development, music technology, computer music, audio applications and web standards. The previous Web Audio Conferences were held in 2015 at IRCAM and Mozilla in Paris, in 2016 at Georgia Tech in Atlanta, in 2017 at the Centre for Digital Music, Queen Mary University of London in London, and in 2018 at TU Berlin in Berlin.
The internet has become much more than a simple storage and delivery network for audio files, as modern web browsers on desktop and mobile devices bring new user experiences and interaction opportunities. New and emerging web technologies and standards now allow applications to create and manipulate sound in real-time at near-native speeds, enabling the creation of a new generation of web-based applications that mimic the capabilities of desktop software while leveraging unique opportunities afforded by the web in areas such as social collaboration, user experience, cloud computing, and portability. The Web Audio Conference focuses on innovative work by artists, researchers, students, and engineers in industry and academia, highlighting new standards, tools, APIs, and practices as well as innovative web audio applications for musical performance, education, research, collaboration, and production, with an emphasis on bringing more diversity into audio.
Keynote Speakers
We are pleased to announce our two keynote speakers: Rebekah Wilson (independent researcher, technologist, composer, co-founder and technology director for Chicago’s Source Elements) and Norbert Schnell (professor of Music Design at the Digital Media Faculty at the Furtwangen University).
More info available at: https://www.ntnu.edu/wac2019/keynotes
Theme and Topics
The theme for the fifth edition of the Web Audio Conference is Diversity in Web Audio. We particularly encourage submissions focusing on inclusive computing, cultural computing, postcolonial computing, and collaborative and participatory interfaces across the web in the context of generation, production, distribution, consumption and delivery of audio material that especially promote diversity and inclusion.
Further areas of interest include:
- Web Audio API, Web MIDI, Web RTC and other existing or emerging web standards for audio and music.
- Development tools, practices, and strategies of web audio applications.
- Innovative audio-based web applications.
- Web-based music composition, production, delivery, and experience.
- Client-side audio engines and audio processing/rendering (real-time or non real-time).
- Cloud/HPC for music production and live performances.
- Audio data and metadata formats and network delivery.
- Server-side audio processing and client access.
- Frameworks for audio synthesis, processing, and transformation.
- Web-based audio visualization and/or sonification.
- Multimedia integration.
- Web-based live coding and collaborative environments for audio and music generation.
- Web standards and use of standards within audio-based web projects.
- Hardware and tangible interfaces and human-computer interaction in web applications.
- Codecs and standards for remote audio transmission.
- Any other innovative work related to web audio that does not fall into the above categories.
Submission Tracks
We welcome submissions in the following tracks: papers, talks, posters, demos, performances, and artworks. All submissions will be single-blind peer reviewed. The conference proceedings, which will include both papers (for papers and posters) and extended abstracts (for talks, demos, performances, and artworks), will be published open-access online with Creative Commons attribution, and with an ISSN number. A selection of the best papers, as determined by a specialized jury, will be offered the opportunity to publish an extended version at the Journal of Audio Engineering Society.
Papers: Submit a 4-6 page paper to be given as an oral presentation.
Talks: Submit a 1-2 page extended abstract to be given as an oral presentation.
Posters: Submit a 2-4 page paper to be presented at a poster session.
Demos: Submit a work to be presented at a hands-on demo session. Demo submissions should consist of a 1-2 page extended abstract including diagrams or images, and a complete list of technical requirements (including anything expected to be provided by the conference organizers).
Performances: Submit a performance making creative use of web-based audio applications. Performances can include elements such as audience device participation and collaboration, web-based interfaces, Web MIDI, WebSockets, and/or other imaginative approaches to web technology. Submissions must include a title, a 1-2 page description of the performance, links to audio/video/image documentation of the work, a complete list of technical requirements (including anything expected to be provided by conference organizers), and names and one-paragraph biographies of all performers.
Artworks: Submit a sonic web artwork or interactive application which makes significant use of web audio standards such as Web Audio API or Web MIDI in conjunction with other technologies such as HTML5 graphics, WebGL, and Virtual Reality frameworks. Works must be suitable for presentation on a computer kiosk with headphones. They will be featured at the conference venue throughout the conference and on the conference web site. Submissions must include a title, 1-2 page description of the work, a link to access the work, and names and one-paragraph biographies of the authors.
Tutorials: If you are interested in running a tutorial session at the conference, please contact the organizers directly.
Important Dates
March 26, 2019: Open call for submissions starts.
June 16, 2019: Submissions deadline.
September 2, 2019: Notification of acceptances and rejections.
September 15, 2019: Early-bird registration deadline.
October 6, 2019: Camera ready submission and presenter registration deadline.
December 4-6, 2019: The conference.
At least one author of each accepted submission must register for and attend the conference in order to present their work. A limited number of diversity tickets will be available.
Templates and Submission System
Templates and information about the submission system are available on the official conference website: https://www.ntnu.edu/wac2019
Best wishes,
The WAC 2019 Committee
 posted in news
Final Solution: Anyone looking to control Ableton Live...easily
Hi All
A little bit of work to set up but forget midi mapping...google it if you dont believe me.
After a lot of time spent trying to get a simple but sophisticated way (using a minimal 8 button floorboard) to control Live on w10, I thought I would share this particular solution to possibly help others (especially after the help offered here on this forum). I tried a number of scenarios, even buying Max 4 Live, but it turns out a lot simpler than that. It needs 3 main areas set
FOOT CONTROLLER BEHAVIOURS/GESTURES
Create pd patch that gives you 'behaviours' per switch. Ill be happy to share mine but Im just cleaning them up atm.
eg I have 4 standard behaviours that dont take too much time to master
- Action A: A quick click (less than 500ms) Always the primary action
- Action B: Long click ie 1 click down and pedal up after 500ms. I use this eg always as a negative ramp down for things like lowering volume but if its just held down and released in a natural way, it is the secondary action of the switch
- Action C: 3 Click ie 1 quick down, up and then hold down. I use this for a positive ramp eg as volume up
4 Actiion D: Double click, Always a cancel
These are all mapped to note/ctrl outs that match the 'Selected Track Control' below
PLUGIN
Use PD VST to create a plugin version of your patch. This is loaded into Live as a control track. Live manages the connection of your floor board etc into the actual track so you dont wrestle with the io. I always use track 1 for click (forget Live metronome, this is much more flexible and can have feel/swing etc) so I dedicate track 2 to control.
Use LoopMIDI to create a virtual midi cable that will go from this track and be fed into the remote script.
REMOTE SCRIPT: 'Selected Track Control'
Download latest from http://stc.wiffbi.com/
Install to live and make sure your notes/control conform.
Enable this as a control surface in live and connect midi in from the plugin. Think about giving the guy a donation...massive amount of work and he deserves it!
I use it to control 8 tracks x 8 scenes and is controlled by 3 switches
- Scene control up and down (A = down, B = up)
- Track control same as scene
- Rec/Fire/Undo Volume up and down (A = fire/rec, B = Volume Down, C = Volume Up, D (Dbl Click) = Undo
The scenes and tracks wrap so there isnt too much foot tapping
There is quite a bit more to it of course...its and maybe no one else needs this but it would have saved me a couple of weeks of time so Im happy to help anyone wanting to achieve gigging without a massive floor rig and an easy way to map and remember.
HTH someone
Cheers
mark
 posted in technical issues
Build a MIDI controller with the Arduino, Firmata and Pure Data
Time to start contributing some knowledge back to the wonderful world that is the internet; today, a step by step nice and easy tutorial on getting started to building your own MIDI controllers with the arduino.
When researching for my ableton controller project, I didn’t find much out there about using firmata on an arduino to send data to software. The standard approach just seemed to be create the code in the arduino language, upload it to your board and hack one of those MIDI to USB cables as a bodge job way of getting the MIDI out of the arduino.
So why firmata and pure data? Well the whole idea of firmata is that you flash it to your arduino, and it throws out serial about whats going on with the arduino inputs and outputs, then you decide how the software treats the readings coming in and going out.
Theory out the way, lets build some controllers. You’ll need a few things…
HARDWARE:
An arduino and something to wire into it (for this i’ll be using a pot)
A USB cable for your arduino
SOFTWARE:
Arduino – http://arduino.cc/en/Main/Software
Pure Data – http://puredata.info/downloads
Firmata – http://at.or.at/hans/pd/objects.html#pduino
Something to patch your new controller into; like Reason or Ableton Live
- SETTING UP FIRMATA AND PURE DATA
Install Pure Data and create a folder to store all your patches somewhere. Unzip Firmata and add the files ‘arduino.pd’, ‘arduino-test.pd’ and ‘arduino-help.pd’ to your new Pure Data folder. The ‘arduino.pd’ file is the object that we use in PD for opening up communication with your arduino and routing it to PD. Done? Awesome, your software is almost set up.
- FLASHING FIRMATA TO YOUR ARDUINO
Install the latest version of arduino and open it up. Connect your arduino with the USB cable to your laptop (i’m using a macbook for this by the way). In the example patches, open up “Standard Firmata”, select your board (im using an arduino mega), and your serial port (look for tty.usbserial for use with a USB cable). Then compile and hit the upload button and your arduino is now ready to use firmata and communicate with Pure Data!
- WIRING UP A POT

Potentiometers are cool, and theres a great arduino tutorial of how to wire one up here: http://www.arduino.cc/en/Tutorial/Potentiometer
Basically, all you need to know is that there are three pins; your two outer pins govern voltage flow across the pot, meaning one has to be 5V and the other has to be ground. It doesn’t matter which, but your 5v pin is going to be where your pot reads maximum, so convention dictates this should be the right hand pin. The center pin needs to be connected to an analog in on the arduino and will read the value of the pot as it sweeps from ground (0v) to 5v.
All wired up? Plug it into your laptop and open Pure Data, we’re ready to get things talking.
- SETTING UP OUR PATCH
Open the example “arduino-test.pd” Pure Data patch you copied over earlier. It should look like this one…

The test patch has everything we need to open a connection and enable pins. Firstly, lets delete a bunch of stuff and make our window a bit bigger. Hit Command + E to enter edit mode in Pure Data.

Ok a quick explaination; the key component here is the ‘arduino’ object. This is being drawn from the file you copied in earlier, and is what communicated with your arduino. Here we can do everything to control the arduino from opening a connection, to receiving data.
The large grid allows us to set the mode of each pin on the arduino. Remember pins 0 and 1 are reserved for Rx and Tx. I’m using analog pin 4 for this demo, so I’ve set my pin mode for pin 4 to ‘analog’.
Now we can plug our arduino in and get a reading from the potentiometer.
- ARDUINO INTO PURE DATA
With your arduino plugged in, hit command and E to bring us out of edit mode. In our patch, click on ‘Devices’ above the arduino object and open up the pure data terminal. (That other thing that loads with PD that has all the scary code in)

The “Devices” message connected to the arduino object pings your computer to find what devices are connected and on what serial ports. Since we’re using a USB cable to connect our arduino, we’re looking for something with ‘usbserial’ in it, in this case; port 2.
Select the relevent port in the green box at the top (remember the first box is ‘0’, second is ‘1’ and so forth) and hit ‘Open’ to establish a connection. Check the terminal to see if the connection was sucessful.

Now lets check we’re getting something in. Create a number box (Command + 3) and connect it to the relevent pin on the ‘Route analog’ box at the bottom. In this case, pin 4.
One more thing; if you’re not getting any readings in, you’ll need to click on ‘pd old analog/digital controls’ and enable your pins here too. What I tend to do in my patches is just not include the large grid but make my own ‘old pd’ controls custom to what i’m enabling/disabling to save space.
Here’s what the ‘old analog/digital controls’ subpatch looks like (pin 4 enabled)…

Come out of edit mode and check that you’ve got readings. If so congratulations! If not, troubleshoot, start with making sure your usb connection is opened, make sure all the correct pins are enabled (remember you’re counting from 0 not 1 on most of these buttons in PD, it’s just the way computers work).
- SCALING READINGS TO MIDI
So we’ve got a reading and chances are it’s to 3 decimal places between 0 to 1. No problem, create a new object (Command + 1) and type “autoscale 0 127”. This allows us to scale the input to a min and max value, in this case 0 to 127 of MIDI. Next, lets get things looking nice, create a new object and type “knob”. Connect this AFTER the autoscale object. (the knob is default set to read inputs from 0 to 127. Then create another number to display the scaled MIDI data coming out, and finally a new object and type “ctlout 1”.
It should look something like this…

The second box should be outputing values from 0 – 127 now, and the knob giving a visual representation of your potentiometer.
Now lets patch it into ableton…
- PURE DATA TO ABLETON LIVE
Firstly, you’ll need to set up your macs IAC driver if you’ve not done this. Basically you’ll need to go into Audio/MIDI preferences and enable your IAC driver. Then create a new input and output. One for input to DAW and one for output from DAW. Google around for a tutorial on this, its really simple, a 30 second job.
After you’ve set up your IAC driver, go back to PD and go to preferences > MIDI Settings, and connect your IAC driver.

Open ableton and go to its MIDI preferences. Create a device listing for your IAC driver and enable its ins and outs into ableton like so…


And thats it! Create an instrument and try to assign something! I’ve got it controlling the brightness of a bass sound here.
Shout out for Facu who requested this tutorial. Hopefully it’ll help some of you looking to get into this stuff and start building things but with no idea where to start.
 posted in tutorials
Pduino + Arduino Output to Pins
Unfortunately, snapshot~ doesn't seem to send data at a rate which enables clean signaling of arduino pins. When it comes to audio anything, I find that outputting signal is necessary, as outputting control values just cannot keep up with audio. If you are looking to make a square wave generator that is controllable from puredata, the best way that I have found to do this is by using a combination of arduino, a DAC chip and an op-amp chip. Also, you'll want to use at least a 12 bit DAC, such as mcp4921 or mcp4725, as 8 bit DAC lacks the ability to tune the output fine enough to stay in tune with standard tuning. For opamp choices, you can pretty much take your pick. They all do pretty much the same thing, though you will find that every opamp has it's own unique sound quality. I really love the gritty sound of the CA313. A very good and popular sound for opamp VCO is the tl072 or tl075. There are tons of schematics out there for how to configure a square wave vco with opamps. You would just modify the components to fit the output of your DAC.
Next, you would send your controller values from PD to the arduino and have some code in the ar'dweener to handle communicating with the DAC. You can then add all sorts of fun stuff to your board like digipots, opamp buffers, VCAs and so on to make envelopes, LFOs etc.
If you don't want to track down additional chips (usually ordered from china being the only way to find them, cheap though they tend to be,) but want to have square waves being output directly from the arduino, then you would still be better off having pd send control values to the arduino and then let the arduino handle the signal generation to it's pins. For this purpose, you may want to look at the tone library or the mozzi library. Teensy boards have some expanded audio capabilities as well, but teensy boards are a bit expensive for my taste, as you can get a freakin raspberry pi with a full linux operating system on it for a fraction of what it costs. Still, teensies are great and extremely handy for these types of applications if you dont mind dropping some extra money. I try to build everything to work on cheap arduino clones just for financial and practicality sake.
I have code and patches that I have written to control these types of circuits for many DACs and digipots with SPI and I2C protocalls... let me know if you'd like to check them out for some guidance.
 posted in technical issues
Andúril (MobMuPlat app): fwd/bwd looper + 14 effects + elven cloak (control parameters via env~ and pitch as you play)
Andúril (MobMuPlat app): fwd/bwd looper + 14 effects + elven cloak (control parameters via env~ and pitch as you play)
UPDATED VERSION (corrected MobMuPlat system crash problem):
anduril.zip
This has been long in coming and I am very glad to finally release it (even tho my handheld hardware is not up to the job of running the elven cloak feature).
First a demo video and some screenshots, , and then the instructions.
DEMO VIDEO
SCREENSHOTS
Intention(s):
The app is designed to give (specifically a guitarist) tho really any input (even prerecorded as is the case in the demo (from: "Laura DeNardis Performing Pachabels Canon" from https://archive.org/details/LauraDenardisPerformingPachabelsCanon, specifically the wave file at: https://archive.org/download/LauraDenardisPerformingPachabelsCanon/PachabelsCanon.wav, Attribution-Noncommercial-Share Alike 3.0) FULL Control over the "voice" of their output-sound.
It includes:
a 5-band EQ (on page 2 of the app) (upfront that is applied to all incoming sounds);
a looper: with record, forward, backward, speed, and bypass controls (that runs via a throw along with the effects channel)
14 effects each with 3 controllable parameters (via the xy-slider+centered knob) including: chorus, distortion, delay, reverb, flanger, tremolo, vibrato, vcf, pitchshifter, pitchdelay, 12string, stepvibrato, pushdelay (delayfb driven by magnitude of the env~), and stagdelay (2 out-of-sync delay lines which can be driven in and out of phase by the sum of their delwrite+vd's so what goes in first may come out last)
elven_cloak: which drives the 3 parameter controls via the peak bands amplitude and proximity to a set pitch (midi note) and whose window can be broadened or shrunk and shifted within that window, i.e. the three effect parameters are changed automatically according to what and how you play
and
a tester synth: that randomly sends midi pitches between 20-108, velocities between 20-127, and durations between 250-500ms.
CONTROLS (from top-left to bottom-right):
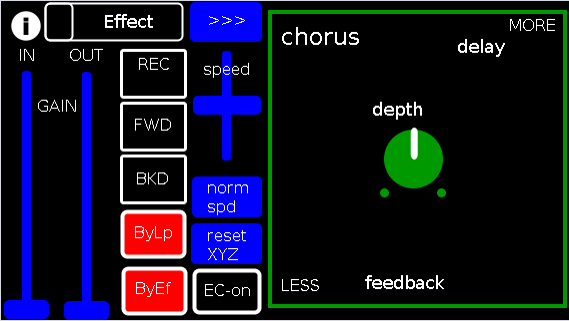
PAGE 1:
Effect: effects menu where the you choose an effect;
>>>,<<<: page navigation buttons;
IN,OUT: gains (IN is the preamp on the EQ5, and OUT is applied to total output);
REC,FWD,BWD,speed,normspd: the looper toggles and on speed, higher is faster and mid normal and normspd resets to mid;
xy-slider+centered knob: the 3 parameter controls + their labels (the bottom is x, top y and above the knob for the third one), the name of the selected effect and its parameters load each time you choose from the Effects menu, bottom left is lowest, top-right highest;
ByLp,ByEff: bypasses for the looper and effects "channel" (the outputs are summed);
EC-on: elven cloak toggle (default=off);
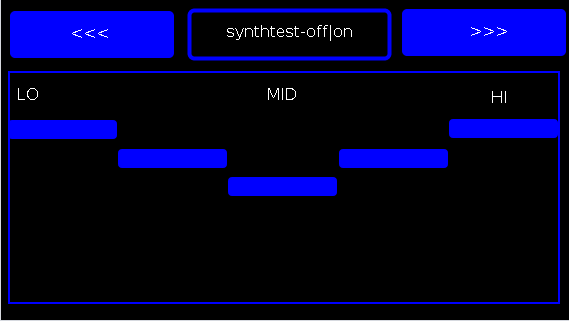
PAGE 2:
the EQ5 controls;
synthtest: off|on, default is off;
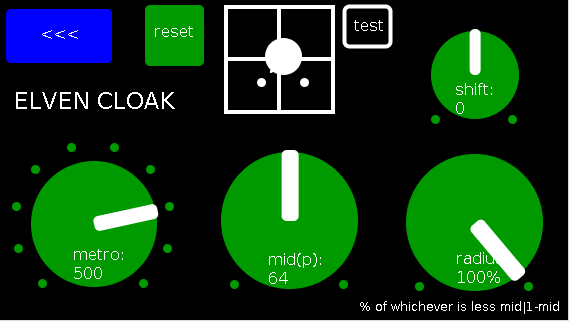
PAGE 3: elven cloak controls
reset: sets shift, metro, mid, and radius to 0, 500(ms),64,100% respectively (i.e. the entire midispectrum, 0-127) respectively;
mini-xyz, test: if test is on, you see a miniature representation of the xyz controls on the first page, so you can calibrate the cloak to your desired values;
shift: throws the center of the range to either the left or right(+/-1);
metro: how frequently in milliseconds to take env~ readings;
mid: the center in midipitch, i.e. 0-127, of the "watched" bands
radius(%): the width of the total bands to watch as a percentage of whichever is lower 1-mid or mid
END CONTROLS
Basic Logic:
There are 4 modes according to the bypass state of the looper and effects.
A throw catch and gain/sum/divide is applied accordingly.
End:
As I mentioned at the first, my handheld(s) are not good enough to let me use this but it runs great on my laptop.
So...
I would love to hear if this Does or Does Not work for others and even better any output others might make using it. I am enormously curious to hear what is "possible" with it.
Presets have not (yet been included as I see it, esp. with the cloak as a tool to be used for improv and less set work. Tho I think it will work nicely for that too if you just turn the cloak off.
hmmm, hmmm,...
I think that's about it.
Let me know if you need any help, suggestions, ideas, explanations, etc. etc. etc. regarding the tool. I would be more than happy to share what I learned.
Peace, Love, and Ever-Lasting Music.
Sincerely,
Scott
p.s. please let me know if I did not handle the "attribution" part of "Laura DeNardis Performing Pachabels Canon" License correctly and I will correct it immediately.
Ciao, for now. Happy PD-ing!
 posted in patch~
Audio Ideas (AI) Collection (placeholder, currently only links)-effects, controllers, mmp, etc.
Audio Ideas (AI) Collection (placeholder) currently only links
per @LiamG 's kind suggestion I have begun the process of consolidating my abs and patches, etc. into a single location/zip file or for possible upload to github.
Just to get the ball/me rolling and scope the work I got the links for my shares into a single location to later be consolidated into the single AI Collection.
For now at least, please, bare with me (and the links below) as ideas I am more passionate about currently are demanding my attention. (Which funnily enough will probably also be included in the set, where ever they are shared.)
Thanks, for your patience and all you do for the Pure Data Family.
Sincerely,
Scott
abstract~
pushdelay-envelope-env-driven-delay-line-with-both-delay-time-and-feedback-dependent
numpad-abstraction-for-entry-of-large-numbers-via-click-instead-of-sliders-includes-basic-calculator
abs_delay_fbw-feedbackwards-lifo-last-in-first-out-delay
abs_sequences_by_formula-sequences-by-formula-abstraction-ex-collatz
abs_effects_router-60-effects-in-one-abstraction-router-from-diy2-stamp-album-my-abs
visualcontrolsurface-vsl-values-set-by-their-location-on-the-screen-req-ggee-shell
abs_4-8-14_way_toggle-pair-2-toggles-resulting-in-4-8-or-14-states
audioflow-delay-to-forward-backward-looper-using-speed-control
5-band-equalizer-with-bezier-controller-eq5_mey_w_bezier_sv-pd-updated-to-8-band-below
forward-backward-looper-orig-abs-from-residuum-whale-av
abs_rgb2hex-rgb-0-255-colors-to-hexadecimal-values
pseudo-12-string-effect-6-string-guitar-to-sound-like-a-12-string
jack_midi2pd_2sys_connector_sv-jack-midi_out-to-pd-sys_playback-switcher
abs_4to16pads_bin_conv_sv-convert-4-midi-pads-from-a-binary-value-to-a-decimal-for-rerouting
abs_automatedslider_sv-automated-control-changer-pd-and-mobmuplat-editor-versions
idea-for-effects-stack-ing-technique-control-mother
micin-_abs-abstraction-convert-signal-to-notein-ex-using-a-midi-synth-as-a-guitar-pedal
curve_abs-tri-way-curve-switch-to-change-control-values-in-either-linearly-convex-or-concave-manner
a-preset-control-abstraction-for-saving-parameters-presets-to-text-files
4-tap-delay-with-pitch-shifter-per-delay-line-adaptation-of-diy2-patches
patch~
extra
the-15-owl-faust-patches-compiled-as-32bit-linux-externals-attached
libpd
mmponboardeditortemplate-mmp-for-creation-of-mobmuplat-files-directly-on-the-handheld-android-only
3d-synth-webpd-tree-js-webgl_camera_cinematic-html-example
Off topic
posted in patch~
Multiple patches sending to the same Arduino / change block size?
I'm working on a project involving Pure Data and Arduino. The idea is to play an audio file while controlling a pump that breathes air into an aquarium, based on the envelope of the audio, so that the bubbles correspond to the voice that you hear in headphones.
My problem is, while it works perfectly with one aquarium (playing the audio file + controlling the pump), it's less precise, and sometimes completely off, when I'm adding the others.
Files : main.pd, aquarium.pd, arduino.pd
The logic of one aquarium is inside an abstraction, [aquarium], with the file, threshold, audio output and Arduino pin as creation arguments. Every instance of the abstraction is playing its own file into a given audio output, and sending messages to the Arduino ("turn on pump X" or "turn off pump X"). It works quite well for most of the aquariums, so I guess (hope) the fix must be simple.
I tried different ideas to limit the message flow but didn't quite succeed (hence the mess below the [dac~] object, this stuff is not used anymore).
I only recently thought about increasing block size, thinking that would reduce the number of messages sent to the Arduino. However using the audio settings, it didn't seem to change anything, and I'm not sure how to use the [block~] object. Do I have to send the audio output through an [outlet~] object? I guess that would mean each of my 9 [aquarium…] blocks would need to have 9 outlets going into a [dac~] object in my main patch, and that would be a big spaghetti plate
I'd be curious to know if any of you has ever encountered this kind of issue, or has an idea to fix it, either with block size, pure data magic or anything else…
Thanks!
 posted in technical issues
Workshop: Xth Sense - Biophysical generation and control of music
April 6, 7, 8 2011
11:00-19:00
Xth Sense – biophysical generation and control of music
@NK
Elsenstr. 52/
2.Hinterhaus Etage 2
12059 Berlin Neukölln
FULL PROGRAM: http://www.nkprojekt.de/xth-sense-%E2%80%93-biophysical-generation-and-control-of-music/
~ What
The workshop offers an hands-on experience and both theoretical and practical training in gestural control of music and bodily musical performance, deploying the brand-new biosensing technology Xth Sense.
Developed by the workshop teacher Marco Donnarumma within a research project at The University of Edinburgh, Xth Sense is a framework for the application of muscle sounds to the biophysical generation and control of music. It consists of a low cost, DIY biosensing wearable device and an Open Source based software for capture, analysis and audio processing of biological sounds of the body (Pure Data-based).
Muscle sounds are captured in real time and used both as sonic source material and control values for sound effects, enabling the performer to control music simply with his body and kinetic energy. Forget your mice, MIDI controllers, you will not even need to look at your laptop anymore.
The Xth Sense biosensor was designed to be easily implemented by anyone, no previous experience in
electronics is required.
The applications of the Xth Sense technology are manifold: from complex gestural control of samples and audio synthesis, through biophysical generation of music and sounds, to kinetic control of real time digital processing of traditional musical instruments, and more.
~ How
Firstly, participants will be introduced to the Xth Sense Technology by its author and led through the assembling of their own biosensing wearable hardware using the materials provided.
Next, they will become proficient with the Xth Sense software framework: all the features of the framework will be unleashed through practical exercises.
Theoretical background on the state of art of gestural control of music and new musical instruments will be developed by means of an audiovisual review and participatory critical analysis of relevant projects selected by the instructor.
Eventually, participants will combine hardware and software to implement a solo or group performance to be presented during the closing event. At the end of the workshop, participants will be free to keep the Xth Sense biosensors they built and the related software for their own use.
~ Perspective participants
The workshop is open to anyone passionate about sound and music. Musical background and education does not matter as long as you are ready to challenge your usual perspective on musical performance. Composers, producers, sound designers, musicians, field recordists are all welcome to join our team for an innovative and highly creative experience. No previous experience in electronics or programming is required, however participants should be familiar with digital music creation.
Participation is limited to 10 candidates.
Preregistration is required and can be done by sending an email to info@nkprojekt.de
Requirements and further info
Participants need to provide their own headphones, soundcards and laptops with Pd-extended already installed.
Musicians interested in augmenting their favourite musical instrument by means of body gestures are encouraged to bring their instrument along. More information about the Xth Sense and a video of a live performance can be viewed on-line at
http://res.marcodonnarumma.com/projects/xth-sense/
http://marcodonnarumma.com/works/music-for-flesh-ii/
http://marcodonnarumma.com/teaching/
Dates
6-7-8 April, 11.00-19.00 daily (6 hours sessions + 1 hour break)
Fee
EUR 90 including materials (EUR 15).
Contact
Marco Donnarumma
m[at]marcodonnarumma.com
http://marcodonnarumma.com
 posted in news
NVidia puredyne vs vista
Hey
Once again I'm back on vista. My brief journey to puredyne goes something like this.
from puredyne
partitioned new hard drive with 4 partitions 1-swap , 2 ext4 200Gib, 1 NTFS 200GB . Copied Vista to NTFS partition with gparted(started to do this with dd but with new Gibabits stuff I was skeered but hey a platter is a platter and a cluster is a cluster right). Actually there was a 5th partition in there which was the vista restoration partition but I eventually deleted it for obvious reasons.
Removed old drive ,
took machine to ethernet connection with internet,
booted to vista ,
installed Norton virus scanner - only 1 virus, 2 tracking cookies, and one gain trickler after over a year with no virus scanner, Thats pretty good and shows you can be selective about what you download and where you visit on the web and not get any viruses.
Was trying to get windows movie maker to work with mov codec which it doesnt.
Installed auto updates for the first and only time. this took about 3 hours and still needed to install service pack 1, 2. Aborted trying to update win movie maker
****Problem 1***** MS movie maker does not work with GEM mov video output codec.
Installed latest Nvidia drivers for vista.
Woohooo OpenGl hardware acceleration GEM works so much better in vista now.
*****Problem 2********ASIO for all does not allow 2 applications to run with audio and midi at the same time. If I wanted to run Widi and play my guitar so puredata can receive midi input from guitar ASIO will not allow it but ASIO for all is the only way I can get latency down so this would be feasible.
Got frustrated.
Installed fresh copy of puredyne onto 2nd ext4 partition.
ran puredata audio latency good with fresh install. gem video bad.
used synaptics to install nvidia drivers. v185 I think.
ran GEm error no opengl config.
downloaded gdeb , flash player, google chrome, nvidia drivers from nvidia site.
installed gdeb from terminal, flash and chrome from gdeb.
rebooted to log in as root and iunstalled nvidia drivers.
woohoo hardware acceleration for opengl
******problem 3************
gem works great but audio glitches with puredata window visible.
when only gem window is visible i can unaudioglitchily move the mouse around to control same parameters that would normaly be controled with sliders in pd window.
Seems like before i upgraded nvidia video drivers hw:do o whatever it is, was listed in JackD as realtek HD Audio, now it is listed as NVIDIA HD Audio.
So Gem works great but not when Pd window is open and I think my audio drivers were replaced with Nvidia.
I would really like to get back to my patch and stop wasting time on these operating systems and hardware configurations I thought in the last 15 years all this hardware acelleration and autodetection would be figured out but no all we got is rc.0, rc.01, rc.02, rc, etc...... instead of just rc.d.
Ok I'm getting an error when I exit puredyne that says pid file not found is jackd running. anyone know what that means?
Also does anyone have a keymap for gem keyboard for linux, windows and mac so I don't have to record them.
Any suggestions about what to do about my ASIO problems in windows?
Any suggestions about my audio driver in Linux?
Any suggestions about my GEM mov video / windows incompatibilities?
I can import the mov video and audio to SF Acid 3.0 and output a 2Gb avi then import it into windows movie maker but this is crazy to do for a 7 minute 12fps 320x240 video.
Ahhhhhhhhh!
Any suggestions are welcome!
PS I believe someone could rewrite puredata's audio and video interface in assembly language to control their hardware before figuring out how to get these operating systems to do it.
 posted in I/O hardware diy