How to change startpoint of array playback?
Hi. I have 8 looping arrays, they're all sized 65535 (so 64kb each). They have fades at the start and at the end.
My question is this.
I would like to (have control of the) offset of playback.
So, let's say I have a plucked melodic sound in two arrays. The pluck-sound starts right at the beginning of the array.
I would like to de-sync them (they would currently play at exactly the same speed, so both plucks "pluck" at the same time).
I would like to offset the other. How would I go about doing that? This would let me "kind of" do tape looping where they keep triggering but so that they are slowly going off sync.

 posted in technical issues
rPi no midi input or output found
I've been doing a bunch of experiments with PD on a Raspberry Pi, with custom-built MIDI control via a Teensy microcontroller. I've been using Raspbian lite with no GUI. This was working really well until recently.
For various reasons I updated my Raspberry Pi to the latest Raspbian (Stretch) which also allowed me to get a slightly more decent build of PD, 0.47.1.
Since doing that I can't seem to get any MIDI input in PD, no matter what startup flags I use. Most tellingly, if I run pd -nogui -listdev I get the following list:
audio input devices:
- bcm2835 ALSA (hardware)
- bcm2835 ALSA (plug-in)
- Teensy MIDI (hardware)
- Teensy MIDI (plug-in)
audio output devices: - bcm2835 ALSA (hardware)
- bcm2835 ALSA (plug-in)
- Teensy MIDI (hardware)
- Teensy MIDI (plug-in)
API number 1
no midi input devices found
no midi output devices found
--
I find it very odd that it lists my Teensy MIDI device as an audio input and output, and also says that no midi input or output devices have been found. It is somewhat understandable that my patches will not therefore recognise any midi activity, but I don't understand why PD isn't seeing the MIDI devices.
If I run aconnect -o I can see that the Raspberry Pi recognises the device:
client 14: 'Midi Through' [type=kernel]
0 'Midi Through Port-0'
client 20: 'Teensy MIDI' [type=kernel,card=1]
0 'Teensy MIDI MIDI 1'
and if I run aseqdump -p 20 the MIDI data comes streaming through normally. I'm interpreting this to mean that the MIDI device is working, and the alsamidi system is working on the rPi. My only explanation is that something has changed in PD 0.47.1 to create this bug?
I am thinking about starting from scratch and installing Raspbian Jessie instead to test and see if this works, but I'd like to avoid that if possible! Any ideas?
 posted in technical issues
configure pd to listen to my midi controller from the command line (rpi)
Some more details, in case anyone else is able to jump in on this...running PD 0.47.1 on my Raspberry Pi headless on the latest raspbian stretch lite.
similar to @francis666, if I run sudo pd -nogui -listdev I get the following list:
audio input devices:
- bcm2835 ALSA (hardware)
- bcm2835 ALSA (plug-in)
- Teensy MIDI (hardware)
- Teensy MIDI (plug-in)
audio output devices: - bcm2835 ALSA (hardware)
- bcm2835 ALSA (plug-in)
- Teensy MIDI (hardware)
- Teensy MIDI (plug-in)
API number 1
no midi input devices found
no midi output devices found
I'm hoping to use Teensy MIDI as a USB midi device. If I run aconnect I can see the MIDI input coming in so it's definitely working, it's just not getting recognised by PD. I've tried a number of different startup flag combinations, but there's something fishy about the "no midi input devices found" message that I'm getting there. What's going on? Any ideas? I've definitely done this a number of times in the past, just using the command sudo pd -nogui -midiindev 1 midwest.pd but that now doesn't seem to work.
The main recent change has been updating to Stretch and PD .47 from .46, is there any way that could be causing the problem?
posted in technical issues
configure pd to listen to my midi controller from the command line (rpi)
hey there! i have a question: im trying to get pd (vanilla) to listen to my faderfox DX3 when started from the command line, i ran sudo pd -nogui -listdev
and got:
audio input devices:
- bcm2835 ALSA (hardware)
- bcm2835 ALSA (plug-in)
- Faderfox DX3 (hardware)
- Faderfox DX3 (plug-in)
audio output devices: - bcm2835 ALSA (hardware)
- bcm2835 ALSA (plug-in)
- Faderfox DX3 (hardware)
- Faderfox DX3 (plug-in)
API number 1
no midi input devices found
no midi output devices found
then i ran:
sudo pd -nogui -alsamidi -mididev 3 test.pd where the test patch is just ctlin connected to print to see the midi activity
and got: Opened Alsa Client 128 in:1 out:1 but it does not seem to work. can anyone shed some light?
thank you!
 posted in technical issues
Foot Pedal Behaviours Abstraction
Thanks for your thoughts...great to get feedback from your very much wider perspective.
RE Bug...bit of a background
It was as you said...but more the point that pd was trying to take exclusive control of the audio i/o and seemed to create a collision...as soon as I unticked the io...it all worked...thanks again.
Your patch seems to work great...good to see a clean up and understand a little deeper.
The help file for input_event still opens so I think the dll is kaput...sadly as there is no other way to undo via midi in Live. Not sure what to do there. Could pd execute an autoit script or dll? That way you could use a direct send to window rather than needing focus?
Im obviously trying to set up performance rig like a hardware box whereby I basically plug up, turn on and play (have performance daw set up on a dedicated surface pro 3 that doesnt do anything else)
I use the setup in a couple of modes;
A. Midi Guitarist
B. Percussionist/atmospheres etc
with LIve as the centre hub.
USB Hardware
- Floor board is always present (looking for some way of installing better switches on the rig kontrol 3 if anyone has any pointers or maybe arduino/pd/bluetooth would be amazing)
- UR44 IO always present
- Fishman Triple Play always present
- Optional Axiom Controller Keyboard or Percussion controller eg KMI Boppad
In boot sequence (using vbs/autoit script to facilitate auto start up);
- loopMidi - To setup internal patching
- Midiox - To take care of different usb hardware being plugged in via vbs as I have had a lot of trouble trying to do this in pd and eventually gave up...although it would be a lot simpler. Can interrogate usb devices plugged in etc
- Pd patch
- Ableton Live
So if there are any resources really detailing the auto connection of midi io in Pd, that would be brilliant...would like to remove the need for midiox.
The idea of using arduino to hardwire this into a new foot controller sounds amazing but I just dont have the time to learn more atm...anyone out there interested...Id be willing to donate towards it ")
 posted in technical issues
Build a MIDI controller with the Arduino, Firmata and Pure Data
Time to start contributing some knowledge back to the wonderful world that is the internet; today, a step by step nice and easy tutorial on getting started to building your own MIDI controllers with the arduino.
When researching for my ableton controller project, I didn’t find much out there about using firmata on an arduino to send data to software. The standard approach just seemed to be create the code in the arduino language, upload it to your board and hack one of those MIDI to USB cables as a bodge job way of getting the MIDI out of the arduino.
So why firmata and pure data? Well the whole idea of firmata is that you flash it to your arduino, and it throws out serial about whats going on with the arduino inputs and outputs, then you decide how the software treats the readings coming in and going out.
Theory out the way, lets build some controllers. You’ll need a few things…
HARDWARE:
An arduino and something to wire into it (for this i’ll be using a pot)
A USB cable for your arduino
SOFTWARE:
Arduino – http://arduino.cc/en/Main/Software
Pure Data – http://puredata.info/downloads
Firmata – http://at.or.at/hans/pd/objects.html#pduino
Something to patch your new controller into; like Reason or Ableton Live
- SETTING UP FIRMATA AND PURE DATA
Install Pure Data and create a folder to store all your patches somewhere. Unzip Firmata and add the files ‘arduino.pd’, ‘arduino-test.pd’ and ‘arduino-help.pd’ to your new Pure Data folder. The ‘arduino.pd’ file is the object that we use in PD for opening up communication with your arduino and routing it to PD. Done? Awesome, your software is almost set up.
- FLASHING FIRMATA TO YOUR ARDUINO
Install the latest version of arduino and open it up. Connect your arduino with the USB cable to your laptop (i’m using a macbook for this by the way). In the example patches, open up “Standard Firmata”, select your board (im using an arduino mega), and your serial port (look for tty.usbserial for use with a USB cable). Then compile and hit the upload button and your arduino is now ready to use firmata and communicate with Pure Data!
- WIRING UP A POT

Potentiometers are cool, and theres a great arduino tutorial of how to wire one up here: http://www.arduino.cc/en/Tutorial/Potentiometer
Basically, all you need to know is that there are three pins; your two outer pins govern voltage flow across the pot, meaning one has to be 5V and the other has to be ground. It doesn’t matter which, but your 5v pin is going to be where your pot reads maximum, so convention dictates this should be the right hand pin. The center pin needs to be connected to an analog in on the arduino and will read the value of the pot as it sweeps from ground (0v) to 5v.
All wired up? Plug it into your laptop and open Pure Data, we’re ready to get things talking.
- SETTING UP OUR PATCH
Open the example “arduino-test.pd” Pure Data patch you copied over earlier. It should look like this one…

The test patch has everything we need to open a connection and enable pins. Firstly, lets delete a bunch of stuff and make our window a bit bigger. Hit Command + E to enter edit mode in Pure Data.

Ok a quick explaination; the key component here is the ‘arduino’ object. This is being drawn from the file you copied in earlier, and is what communicated with your arduino. Here we can do everything to control the arduino from opening a connection, to receiving data.
The large grid allows us to set the mode of each pin on the arduino. Remember pins 0 and 1 are reserved for Rx and Tx. I’m using analog pin 4 for this demo, so I’ve set my pin mode for pin 4 to ‘analog’.
Now we can plug our arduino in and get a reading from the potentiometer.
- ARDUINO INTO PURE DATA
With your arduino plugged in, hit command and E to bring us out of edit mode. In our patch, click on ‘Devices’ above the arduino object and open up the pure data terminal. (That other thing that loads with PD that has all the scary code in)

The “Devices” message connected to the arduino object pings your computer to find what devices are connected and on what serial ports. Since we’re using a USB cable to connect our arduino, we’re looking for something with ‘usbserial’ in it, in this case; port 2.
Select the relevent port in the green box at the top (remember the first box is ‘0’, second is ‘1’ and so forth) and hit ‘Open’ to establish a connection. Check the terminal to see if the connection was sucessful.

Now lets check we’re getting something in. Create a number box (Command + 3) and connect it to the relevent pin on the ‘Route analog’ box at the bottom. In this case, pin 4.
One more thing; if you’re not getting any readings in, you’ll need to click on ‘pd old analog/digital controls’ and enable your pins here too. What I tend to do in my patches is just not include the large grid but make my own ‘old pd’ controls custom to what i’m enabling/disabling to save space.
Here’s what the ‘old analog/digital controls’ subpatch looks like (pin 4 enabled)…

Come out of edit mode and check that you’ve got readings. If so congratulations! If not, troubleshoot, start with making sure your usb connection is opened, make sure all the correct pins are enabled (remember you’re counting from 0 not 1 on most of these buttons in PD, it’s just the way computers work).
- SCALING READINGS TO MIDI
So we’ve got a reading and chances are it’s to 3 decimal places between 0 to 1. No problem, create a new object (Command + 1) and type “autoscale 0 127”. This allows us to scale the input to a min and max value, in this case 0 to 127 of MIDI. Next, lets get things looking nice, create a new object and type “knob”. Connect this AFTER the autoscale object. (the knob is default set to read inputs from 0 to 127. Then create another number to display the scaled MIDI data coming out, and finally a new object and type “ctlout 1”.
It should look something like this…

The second box should be outputing values from 0 – 127 now, and the knob giving a visual representation of your potentiometer.
Now lets patch it into ableton…
- PURE DATA TO ABLETON LIVE
Firstly, you’ll need to set up your macs IAC driver if you’ve not done this. Basically you’ll need to go into Audio/MIDI preferences and enable your IAC driver. Then create a new input and output. One for input to DAW and one for output from DAW. Google around for a tutorial on this, its really simple, a 30 second job.
After you’ve set up your IAC driver, go back to PD and go to preferences > MIDI Settings, and connect your IAC driver.

Open ableton and go to its MIDI preferences. Create a device listing for your IAC driver and enable its ins and outs into ableton like so…


And thats it! Create an instrument and try to assign something! I’ve got it controlling the brightness of a bass sound here.
Shout out for Facu who requested this tutorial. Hopefully it’ll help some of you looking to get into this stuff and start building things but with no idea where to start.
 posted in tutorials
Ubuntu - Browsers and Puredata wont share audio output device. [SOLVED]
I found this solution and it worked
@sdaau_ml said:
Sorry to necro this thread, but I finally found out how to run PureData under Pulseaudio (which otherwise results with "ALSA output error (snd_pcm_open): Device or resource busy").
First of all, run:
pd -alsa -listdevPD will start, and in the message window you'll see:
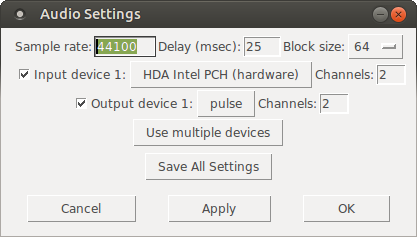
audio input devices:
1. HDA Intel PCH (hardware)
2. HDA Intel PCH (plug-in)
audio output devices:
1. HDA Intel PCH (hardware)
2. HDA Intel PCH (plug-in)
API number 1

no midi input devices found
no midi output devices found
... or something similar.
Now, let's add the
pulseALSA device, and run-listdevagain:pd -alsa -alsaadd pulse -listdevThe output is now:
audio input devices:
1. HDA Intel PCH (hardware)
2. HDA Intel PCH (plug-in)
3. pulse
audio output devices:
1. HDA Intel PCH (hardware)
2. HDA Intel PCH (plug-in)
3. pulse
API number 1

no midi input devices found
no midi output devices found
Notice, how from the original two ALSA devices, now we got three - where the third one is
pulse!Now, the only thing we want to do, is that at startup (so, via the command line), we set
pdto run in ALSA mode, we add thepulseALSA device, and then we choose the third (3) device (which is to say,pulse) as the audio output device - and the command line argument for that inpdis-audiooutdev:pd -alsa -alsaadd pulse -audiooutdev 3 ~/Desktop/mypatch.pdYup, now when you enable DSP, the patch
mypatch.pdshould play through Pulseaudio, which means it will play (and mix) with other applications that may be playing sound at the time! You can confirm that the correct output device has been selected from the command line, if you open Media/Audio Settings... oncepdstarts:
As the screenshot shows, now "Output device 1" is set to "pulse", which is what we needed.
Hope this helps someone!
EDIT: I had also done changes to
/etc/pulse/default.paas per https://wiki.archlinux.org/index.php/PulseAudio#ALSA.2Fdmix_without_grabbing_hardware_device beforehand, not sure whether that makes a difference or not (in any case, trying to adddmixas a PD device and playing through it, doesn't work on my Ubuntu 14.04)
 posted in technical issues
Implementations of "wavetable" synthesis
@nuromantix Thanks for the info. So we could say that a simple crossfade between two waveforms (like the TG33 and Prophet VS) would be equivalent to a mix between two oscillators. On the other hand, Stepping through a wavetable (aka a bank of pre-computed waveforms) like the PPG would be equivalent to re-doing the transition that was recorded in the wavetable. In your filter example, crossfading between a filter-open and a filter-closed waveforms is not the same as opening or closing the filter, but if a high number of snapshots of the filter sweep have been saved to a wavetable as consecutive, single-cycle waveforms, stepping through the wavetable achieves a much similar result. (In my last example the patch is also crossfading between adjacent waveforms in the wavetable, which might not be necessary).
My idea was to be able to morph between two arbitrary waveforms, but I think that creating a wavetable of the "morph" between wave A and wave B is pretty much the same as crossfading. Nevertheless, a wavetable is useful if the transition from A to B involves some other processing that the crossfade can't reproduce.
 posted in technical issues
Some questions regarding a loop station
They don't necessarily play in time anyway.
Well, nor do I.
But you can fix this later at mastering. You could record the click track to a second channel (having sent it out and back in) to aid with re-syncing. The distance from ear to monitoring you can measure physically and calculate the delay.
And when I know the latency in advance, I can record while I play along and shift the recording afterwards, so it'll be in sync again.
I'm not shure, but I think, when I use Katja's latency patch, it measures the latency between speakers and microphone. Only trouble might be too much ambient noise.
@LiamG
For now I tried to crossfade at the end of the sample. I'm mixing a fade-in of the start of the sample with a fade-out of the end of the sample.
Maybe this picture is helpfull for a better understanding:
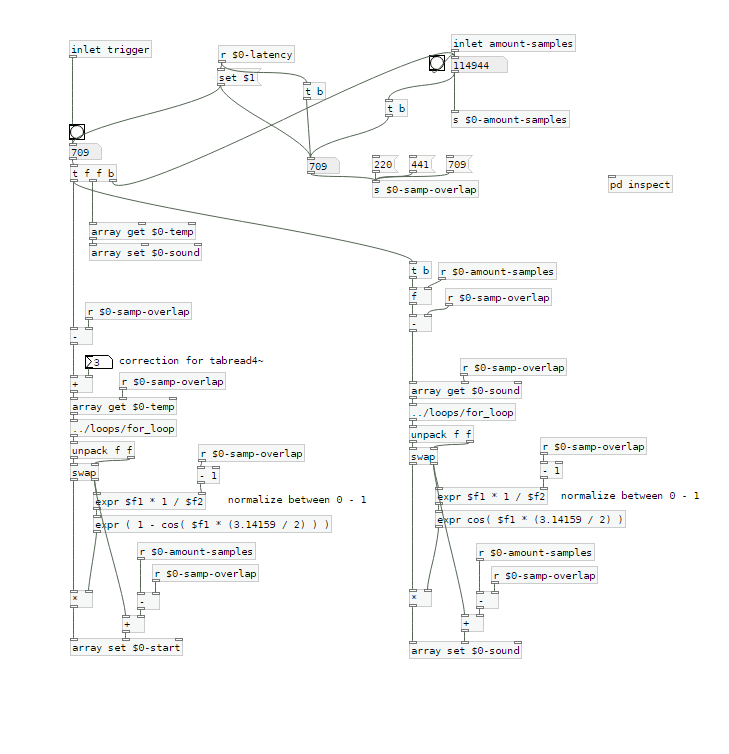
The startsamples are taken from $0-temp, which is recorded first and which is delayed by the latency.
$0-sound is the array used for playback.
I tried to use a crossfade of equal power, but still I can hear a little dip when the sample is restarted.
This is the calculation: expr ( 1 - cos( $f1 * (3.14159 / 2) ) )
with 0 < $f1 < 1
This is, what it looks like in a scope:
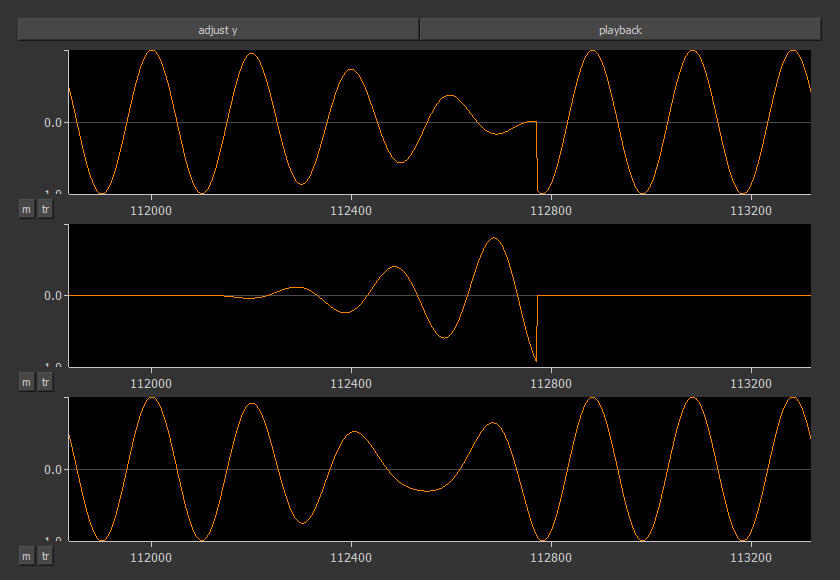
The first row shows the cutted sample $0-sound. It's start is around 112800 samples. On the left side you can see the end with a fade out.
The second row shows the fade-in of the start sample.
The third row is the mixed result.
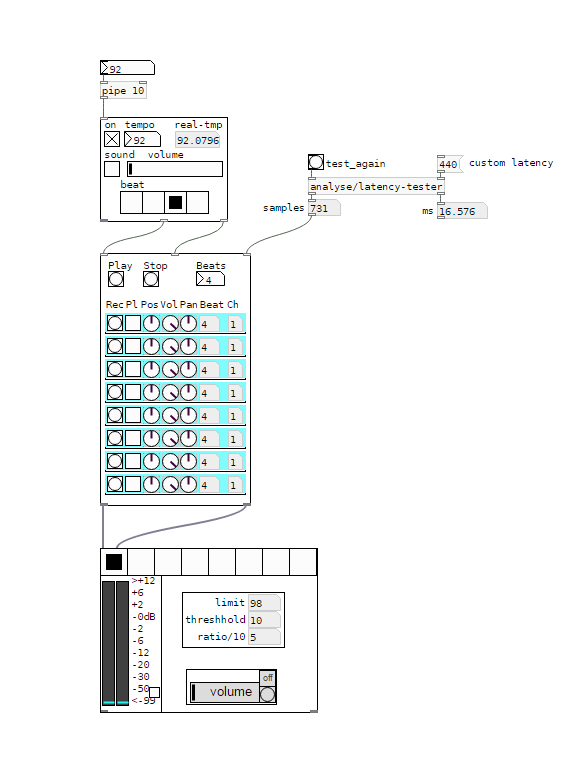
Here's the new patch:
loop-machine.7z
Are there any ideas of how the mixing can be done better?
Xaver
 posted in technical issues
Some questions regarding a loop station
I changed my first post and uploaded a zip at the end.
Works with Purr Data or pd (plus zexy)
@whale-av
Thanks for your patch. I tested it with extended, but I get latency issues. When I record saying something like "tik" on the beat, the "tik" is heavily delayed to the metronom on playback. But on pd extended I can't set the latency lower than 24 msecs. So there might be some issues with extendend on my machine. (pd or Purr Data let me set the latency to 5 msecs without problems.)
You wrote: The biggest problem with (not noticing) an edit will be a difference of volume (power). Our ears are very sensitive to that.
The second biggest problem will be the quality.... timbre..... but as you say a crossfade could help. But the bigger the difference the longer the crossfade needs to be.
I thought about starting recording a little bit earlier and stop somewhat later, so I can crossfade between these extra samples. And maybe it's easier than I thought.
@LiamG
Thanks. How can I trigger between blocks? I thought messages are only send once during a block, aren't they?
About 3): I was wondering, if it is a problem, not to be able to set the exact metronom tempo
And here's a little screenshot to see what it looks like:
I would say, anything above 5 ms latency between the metronom and some voices starts to feel strange. And when you start to change your reference - say you start recording with the metronom, change to first recorded line as a reference, than to the second etc, - the latency will sum up and increase.
I wonder how latency is treated on hardware loop stations.
And I'm still asking myself how latency should be treated to get it right.
Regards,
Xaver
posted in technical issues