FFT analysis in wav files
Hi, guys!
I'm relatively new to Pure Data and I'm making a visual project — with Pure Data (Purr Data version) and Processing — that depends on a good FFT analysis.
I've been trying to solve this problem for some time now.
I made the patch that is in this tutorial:
This patch opens a file and "draws" the left and right channels on two arrays.
I'm trying to mix this patch with the "patches/3-8-1-1-rfft-array.pd" of this tutorial:
http://www.pd-tutorial.com/english/ch03s08.html#id431716
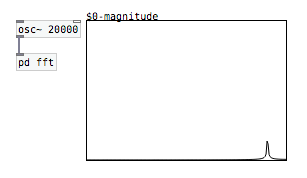
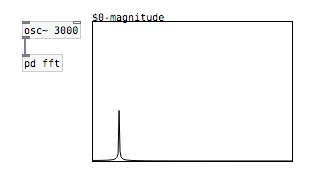
So, what I'm trying to do is to make an FFT analysis to an wav file to represent visually the amplitude of each range of frequencies from the lower frequencies to the higher frequencies for different songs.
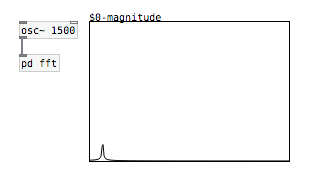
When I test the FFT analysis with an [osc~] object (writing it in an array), everything is kind of fine: 10000Hz in the middle, 20000Hz glued to the right. But I noticed that when I put [osc~ 0], the amplitude glued to the left is really high. Same with 50Hz, 100Hz, 150Hz, etc.. until around 1500Hz. Another thing I noticed is that each frequency has a different amplitude.
So, one thing I tried to do: I put the FFT code in a subpatch and changed the blocksize inside it to 4096 with the object [block~]. Since only the first 32 bins shows the frequencies, I put the size of the array with half the blocksize: 2048. Then, since the main frequencies of the majority of the songs goes until around 5000Hz — I've been told that C8 correspond to around 4200Hz, and that would be in the 7th bin in a block size of 64 —, I tried to reduce the size of the array to 512:
20000 (total frequencies) / 2048 (bins) = 9,76 (frequencies per bin)
5000 (frequencies for songs) / 9,76 (frequencies per bin) = 512 (bins)
In a blocksize of 64, this would correspond to the first 8 bins.
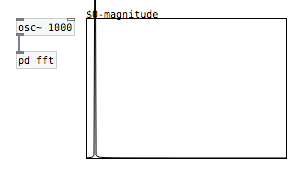
But still, after all this, the frequencies are always glued to the left:
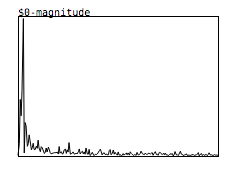
I've tried everything to make a well-distributed FFT analysis, like it should be, but it's ALWAYS glued to the left with all the songs that I tried with...
Sorry for the long post and let me know if I wasn't clear in my question...
Thank you in advance!
 posted in technical issues
Build a MIDI controller with the Arduino, Firmata and Pure Data
Time to start contributing some knowledge back to the wonderful world that is the internet; today, a step by step nice and easy tutorial on getting started to building your own MIDI controllers with the arduino.
When researching for my ableton controller project, I didn’t find much out there about using firmata on an arduino to send data to software. The standard approach just seemed to be create the code in the arduino language, upload it to your board and hack one of those MIDI to USB cables as a bodge job way of getting the MIDI out of the arduino.
So why firmata and pure data? Well the whole idea of firmata is that you flash it to your arduino, and it throws out serial about whats going on with the arduino inputs and outputs, then you decide how the software treats the readings coming in and going out.
Theory out the way, lets build some controllers. You’ll need a few things…
HARDWARE:
An arduino and something to wire into it (for this i’ll be using a pot)
A USB cable for your arduino
SOFTWARE:
Arduino – http://arduino.cc/en/Main/Software
Pure Data – http://puredata.info/downloads
Firmata – http://at.or.at/hans/pd/objects.html#pduino
Something to patch your new controller into; like Reason or Ableton Live
- SETTING UP FIRMATA AND PURE DATA
Install Pure Data and create a folder to store all your patches somewhere. Unzip Firmata and add the files ‘arduino.pd’, ‘arduino-test.pd’ and ‘arduino-help.pd’ to your new Pure Data folder. The ‘arduino.pd’ file is the object that we use in PD for opening up communication with your arduino and routing it to PD. Done? Awesome, your software is almost set up.
- FLASHING FIRMATA TO YOUR ARDUINO
Install the latest version of arduino and open it up. Connect your arduino with the USB cable to your laptop (i’m using a macbook for this by the way). In the example patches, open up “Standard Firmata”, select your board (im using an arduino mega), and your serial port (look for tty.usbserial for use with a USB cable). Then compile and hit the upload button and your arduino is now ready to use firmata and communicate with Pure Data!
- WIRING UP A POT

Potentiometers are cool, and theres a great arduino tutorial of how to wire one up here: http://www.arduino.cc/en/Tutorial/Potentiometer
Basically, all you need to know is that there are three pins; your two outer pins govern voltage flow across the pot, meaning one has to be 5V and the other has to be ground. It doesn’t matter which, but your 5v pin is going to be where your pot reads maximum, so convention dictates this should be the right hand pin. The center pin needs to be connected to an analog in on the arduino and will read the value of the pot as it sweeps from ground (0v) to 5v.
All wired up? Plug it into your laptop and open Pure Data, we’re ready to get things talking.
- SETTING UP OUR PATCH
Open the example “arduino-test.pd” Pure Data patch you copied over earlier. It should look like this one…

The test patch has everything we need to open a connection and enable pins. Firstly, lets delete a bunch of stuff and make our window a bit bigger. Hit Command + E to enter edit mode in Pure Data.

Ok a quick explaination; the key component here is the ‘arduino’ object. This is being drawn from the file you copied in earlier, and is what communicated with your arduino. Here we can do everything to control the arduino from opening a connection, to receiving data.
The large grid allows us to set the mode of each pin on the arduino. Remember pins 0 and 1 are reserved for Rx and Tx. I’m using analog pin 4 for this demo, so I’ve set my pin mode for pin 4 to ‘analog’.
Now we can plug our arduino in and get a reading from the potentiometer.
- ARDUINO INTO PURE DATA
With your arduino plugged in, hit command and E to bring us out of edit mode. In our patch, click on ‘Devices’ above the arduino object and open up the pure data terminal. (That other thing that loads with PD that has all the scary code in)

The “Devices” message connected to the arduino object pings your computer to find what devices are connected and on what serial ports. Since we’re using a USB cable to connect our arduino, we’re looking for something with ‘usbserial’ in it, in this case; port 2.
Select the relevent port in the green box at the top (remember the first box is ‘0’, second is ‘1’ and so forth) and hit ‘Open’ to establish a connection. Check the terminal to see if the connection was sucessful.

Now lets check we’re getting something in. Create a number box (Command + 3) and connect it to the relevent pin on the ‘Route analog’ box at the bottom. In this case, pin 4.
One more thing; if you’re not getting any readings in, you’ll need to click on ‘pd old analog/digital controls’ and enable your pins here too. What I tend to do in my patches is just not include the large grid but make my own ‘old pd’ controls custom to what i’m enabling/disabling to save space.
Here’s what the ‘old analog/digital controls’ subpatch looks like (pin 4 enabled)…

Come out of edit mode and check that you’ve got readings. If so congratulations! If not, troubleshoot, start with making sure your usb connection is opened, make sure all the correct pins are enabled (remember you’re counting from 0 not 1 on most of these buttons in PD, it’s just the way computers work).
- SCALING READINGS TO MIDI
So we’ve got a reading and chances are it’s to 3 decimal places between 0 to 1. No problem, create a new object (Command + 1) and type “autoscale 0 127”. This allows us to scale the input to a min and max value, in this case 0 to 127 of MIDI. Next, lets get things looking nice, create a new object and type “knob”. Connect this AFTER the autoscale object. (the knob is default set to read inputs from 0 to 127. Then create another number to display the scaled MIDI data coming out, and finally a new object and type “ctlout 1”.
It should look something like this…

The second box should be outputing values from 0 – 127 now, and the knob giving a visual representation of your potentiometer.
Now lets patch it into ableton…
- PURE DATA TO ABLETON LIVE
Firstly, you’ll need to set up your macs IAC driver if you’ve not done this. Basically you’ll need to go into Audio/MIDI preferences and enable your IAC driver. Then create a new input and output. One for input to DAW and one for output from DAW. Google around for a tutorial on this, its really simple, a 30 second job.
After you’ve set up your IAC driver, go back to PD and go to preferences > MIDI Settings, and connect your IAC driver.

Open ableton and go to its MIDI preferences. Create a device listing for your IAC driver and enable its ins and outs into ableton like so…


And thats it! Create an instrument and try to assign something! I’ve got it controlling the brightness of a bass sound here.
Shout out for Facu who requested this tutorial. Hopefully it’ll help some of you looking to get into this stuff and start building things but with no idea where to start.
 posted in tutorials
Gem for 64-bit OSX
Coincidentally, I've been working on the same thing myself for the past several days. I succeeded in compiling Gem on OSX 10.12 with Pd 0.47.1 (64 bit), using an amalgam of these instructions:
As seb noted, no quicktime film/video support, and I also get the extra dock icon & Pd crashing sometimes when I close my patch.
Having noticed this conversation the other day, I tried compiling Gem against Purr Data 2.3.1 using the same general method, but didn't get far at all. I didn't save the errors, but got a sense that it'd be much more involved than just adjusting paths to Pd-l2ork/Contents/Resources...
I haven't tried to compile the gmerlin plugin, but I have the imageJPEG plugin working, and I've spent many hours trying to get videoVLC working. There are several mailing list discussions which suggest that the problem might be with gem_videoVLC.so (perhaps not pointing to libvlc.5.dylib correctly, either needing editing or symlinking?).
I'm reaching the limits of my meager hacking abilities, but nonetheless it's pretty exciting to have Gem back up & running on 64 bit! I'm happy to join the cause if others are also interested in trying to work out the kinks in enabling the rest of the workaround plugins (gmerlin, videoVLC), and hopefully also find a way to get Gem working on Purr Data.
 posted in extra~
how to install gem library in pd
@maddynakedymaddy Do you get these lines in terminal? or others? (obviously not the same paths though)
tried C:/Users/David/Desktop/dot/0.94-test3/Gem.dll and succeeded

GEM: Graphics Environment for Multimedia
GEM: ver: 0.93.CVS
GEM: compiled: Sep 22 2014

GEM: compiled for MMX/SSE2 architecture
GEM: using SSE2 optimization
GEM: detected 8 CPUs
GEM: image loading support: QT SGI
GEM: image saving support: QT SGI
Probably you get others...... as it is not working.
What do you get?
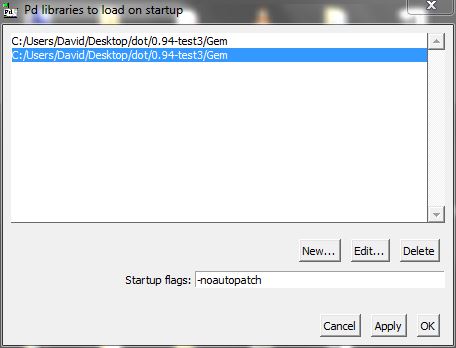
You might simply need to to set startup preferences like this (again...... not "desktop/david"...put whatever your path is.....)
You need the complete path to the "Gem" within 0.94-test3. It is documented somewhere. "Gem" is the library, not the folder that contains Gem.dll ..... It must be Gem with a capital, and without the extension.
You don't need -noautopatch........ it is just one of my preferences.
David.
 posted in technical issues
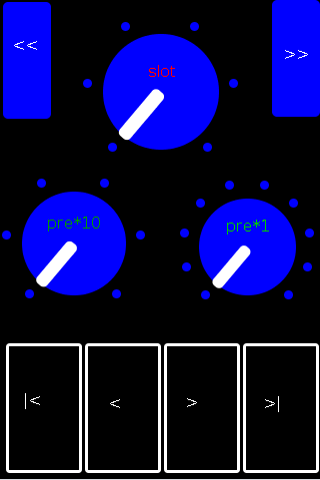
Maximo (Guitar Rack) - 6 slots with 1 of 60 effects per slot (using "abs_effects_router" + an OSC controller (MobMuPlat)
Maximo (Guitar Rack) - 6 slots with 1 of 60 effects per slot (using "abs_effects_router" + an OSC controller (MobMuPlat)
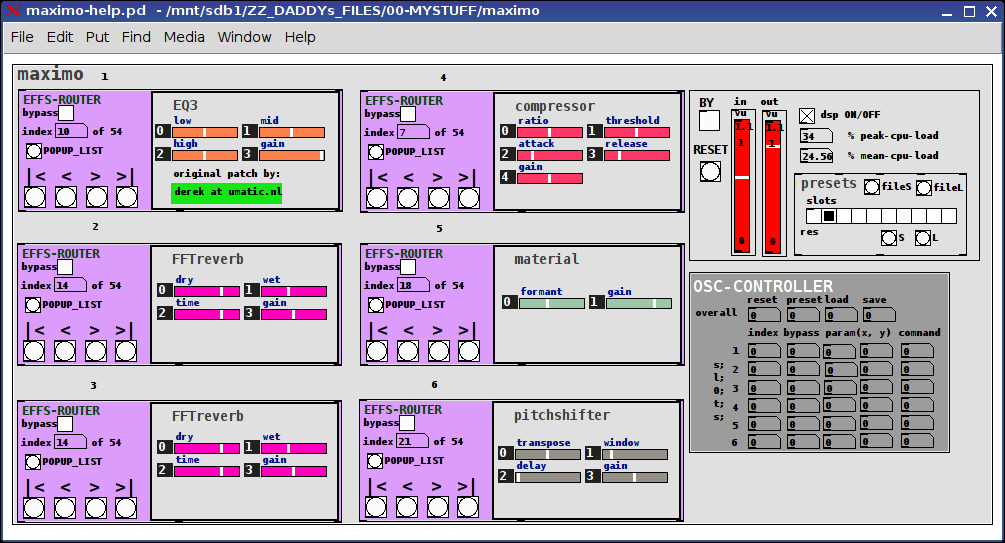
The app is "maximo-help.pd".
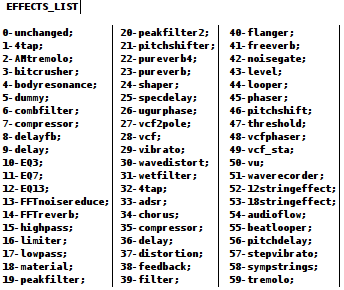
maximo is an effects-chain giving the user 6 slots each one of which may be used to select from 1 of 60 effects (the first being "unchanged").
Check her for details about how to use the "abs_effects_router", http://forum.pdpatchrepo.info/topic/10693/abs_effects_router-60-effects-in-one-abstraction-router-from-diy2-stamp-album-my-abs/1 .
It also includes
- a "maximo/admin.pd" abstraction to control:
dsp, bypass (all), reset (to set all effects to "unchanged"), and 9 presets (0 reserved for program usage) and both save-to-file and load-from-file preset buttons
- an Open Sound Control (OSC) mapper ("maximo/osc_control.pd") for sending values (0 thru 1) to controls /cc/1 thru /cc/34 (see the patch for details).
and
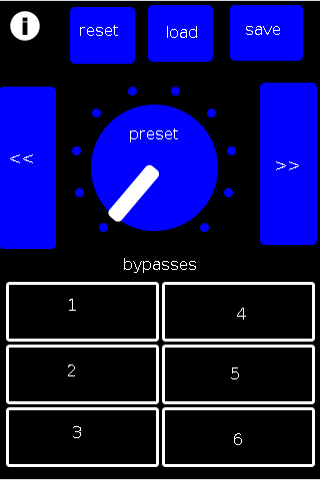
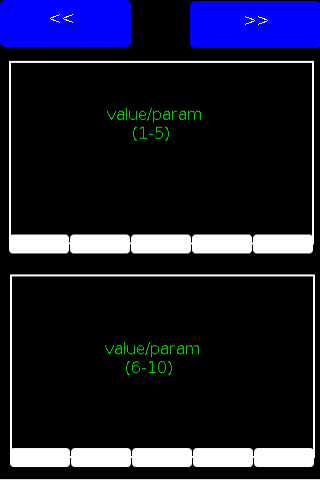
- an example OSC (MobMuPlat) controller at "./maximo-osc.mmp" and "./maximo-osc-mmp.pd"
MAXIMO EXAMPLE
MOBMUPLAT INTERFACE
PAGE 1
PAGE 2
PAGE 3
All of this was contingent on the foundation and resources laid out in the DIY2 and Stamp Album collections and actually this was largely an example of persistence not any real insight and the largest percentage of the success goes to their creators for being so diligent about standardizing their abstractions.
I DO however hope you find it useful.
My GOAL was to eliminate what is often the case with effect stacks (I have seen) of having to connect all the effects. This eliminates that and makes it much cleaner: only having to select from the (tof/pmenu POPUP_LIST button) or navigate to the desired effect with the standard "first, previous, next, last" controls.
I hope you find the work useful and capable of helping you to manifest all those wonderful sounds you have in your head.
Peace and only Love,
Scott
The List of Effects per slot is:
 posted in patch~
Load Libraries, plug-ins
@Balwyn I've follow your steps but still nothing this is what i got in the console:
'pd-gui' connecting to 'pd' on localhost 5400 ...
------------------ done with main ----------------------
Default font: DejaVu Sans Mono
tried ./Gem.m_i386 and failed
tried ./Gem.dll and failed
tried ./Gem/Gem.m_i386 and failed
tried ./Gem/Gem.dll and failed
tried ./Gem.pd and failed
tried ./Gem.pat and failed
tried ./Gem/Gem.pd and failed
tried C:/Users/Jose/pd-externals/Gem.m_i386 and failed
tried C:/Users/Jose/pd-externals/Gem.dll and failed
tried C:/Users/Jose/pd-externals/Gem/Gem.m_i386 and failed
tried C:/Users/Jose/pd-externals/Gem/Gem.dll and succeeded
C:\Users\Jose\pd-externals\Gem\Gem.dll: couldn't load
tried C:/Users/Jose/pd-externals/Gem.pd and failed
tried C:/Users/Jose/pd-externals/Gem.pat and failed
tried C:/Users/Jose/pd-externals/Gem/Gem.pd and failed
tried C:/Users/Jose/pd-externals/Gem/Gem.m_i386 and failed
tried C:/Users/Jose/pd-externals/Gem/Gem.dll and succeeded
C:\Users\Jose\pd-externals\Gem\Gem.dll: couldn't load
tried C:/Users/Jose/pd-externals/Gem/Gem.pd and failed
tried C:/Users/Jose/pd-externals/Gem/Gem.pat and failed
tried C:/Users/Jose/pd-externals/Gem/Gem/Gem.pd and failed
Gem: can't load library
Loading plugin: C:/Program Files (x86)/Pd/tcl/pd_deken.tcl
The Pd window filtered 26 lines
The Pd window filtered 27 lines
 posted in extra~
Pd-extended to Vanilla migrations issues. Gui freeze, console errors, etc.
Hello Dxk,
Yours are the exact instructions I tried to follow a few days ago.
As of now, I'm still a whole lot wiser. As far as I've understood, libraries that are contained in a single file are to be added to the "startup" for load at start-up. Libraries consisting of a folder with multiple, separate files should be added to "path".
First off, the Deken manager downloads the libraries to a folder called "extra", not "pd-externals" or something similar. I've got no folder called that. I couldn't access the folder through the "choose folder"-prompt, since I have to access the contents of the Pure Data application, so I had to create a desktop shortcut to which I could easily choose the "extra"-folder when adding paths to "path".
This is what I am greeted with on start-up.
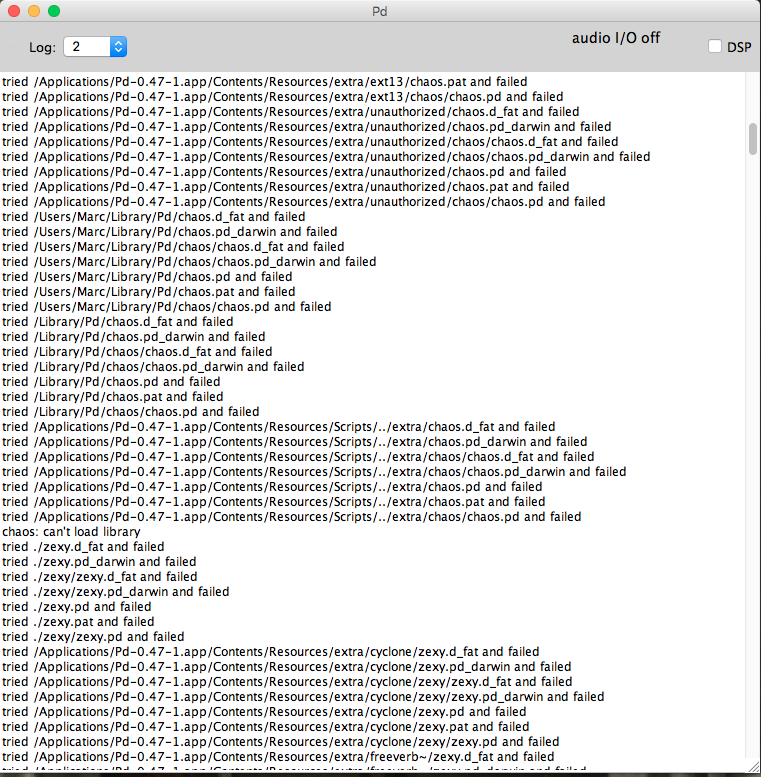
And it just keeps going all the way down. It seems to go through the contents of the libraries, but gives me a failed message. I now see that it looks for the contents of the zexy library in the folder of cyclone and tries to look for the files in neighbouring folders. Why would it do that?
But, say I call up an object I know only exists in an external library, say, cyclone's [cycle~] object, I will get this:
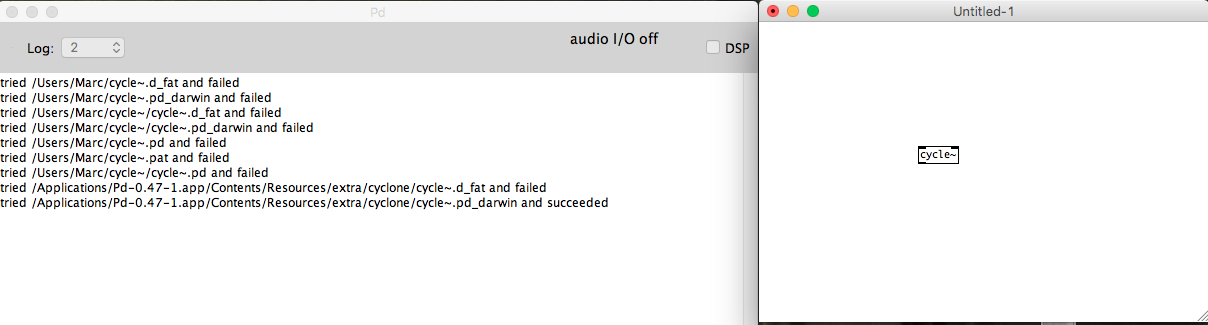
The first few lines show that it's trying to look for the library contents in my main folder (users/marc). I can't see why it would try that. It then tries the paths, fails, but then succeeds.
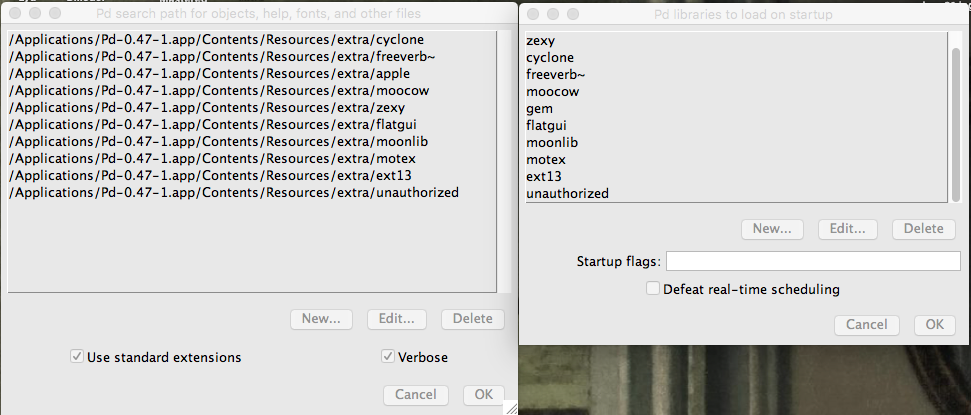
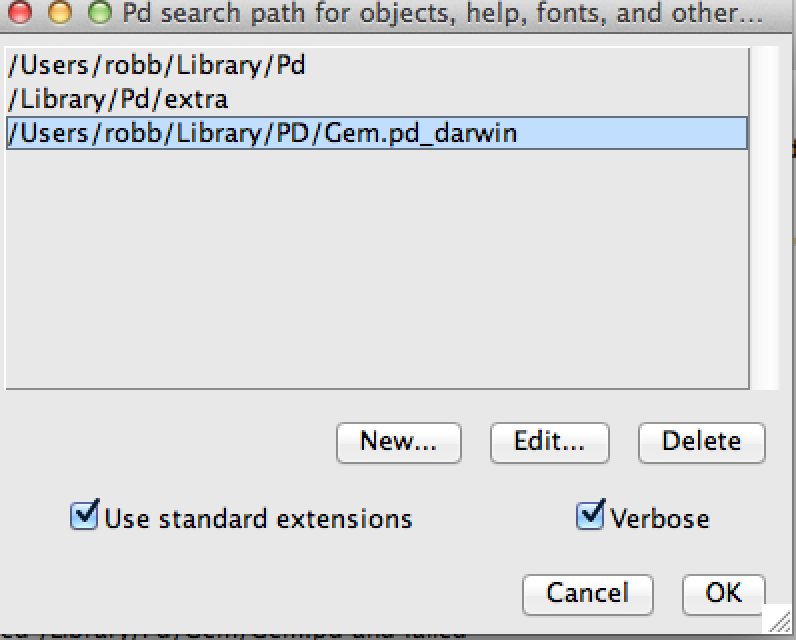
This is what my "startup" and "path" folders look like, respectively:
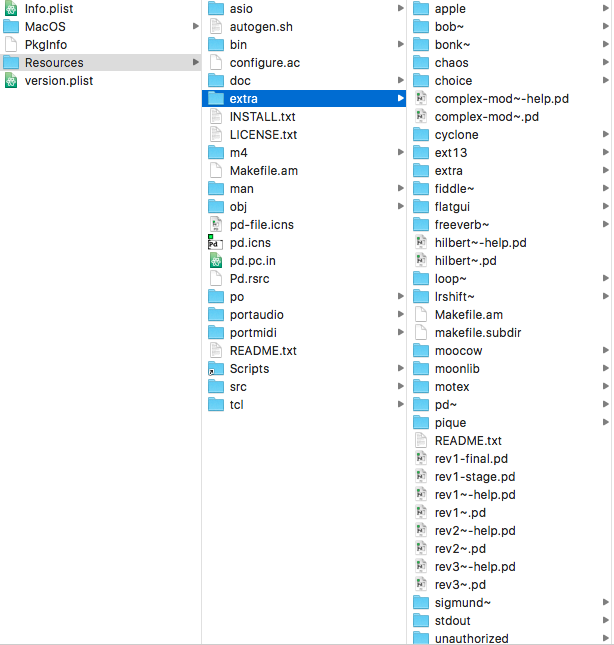
And the contents of the "extra" folder:
Thank you, in advance.
 posted in technical issues
Gem - trouble loading (or compiling?) Gem
Hey - Happy clock changing day! ")
I am not a newbie, but a newbie to Vanilla. Looking for some suggestions please concerning getting Gem working in 0.47.1 on Mac OSX.
I have tried following lots of the advice given to lots of people who seemed to have had this struggle at some time. But not getting much closer.
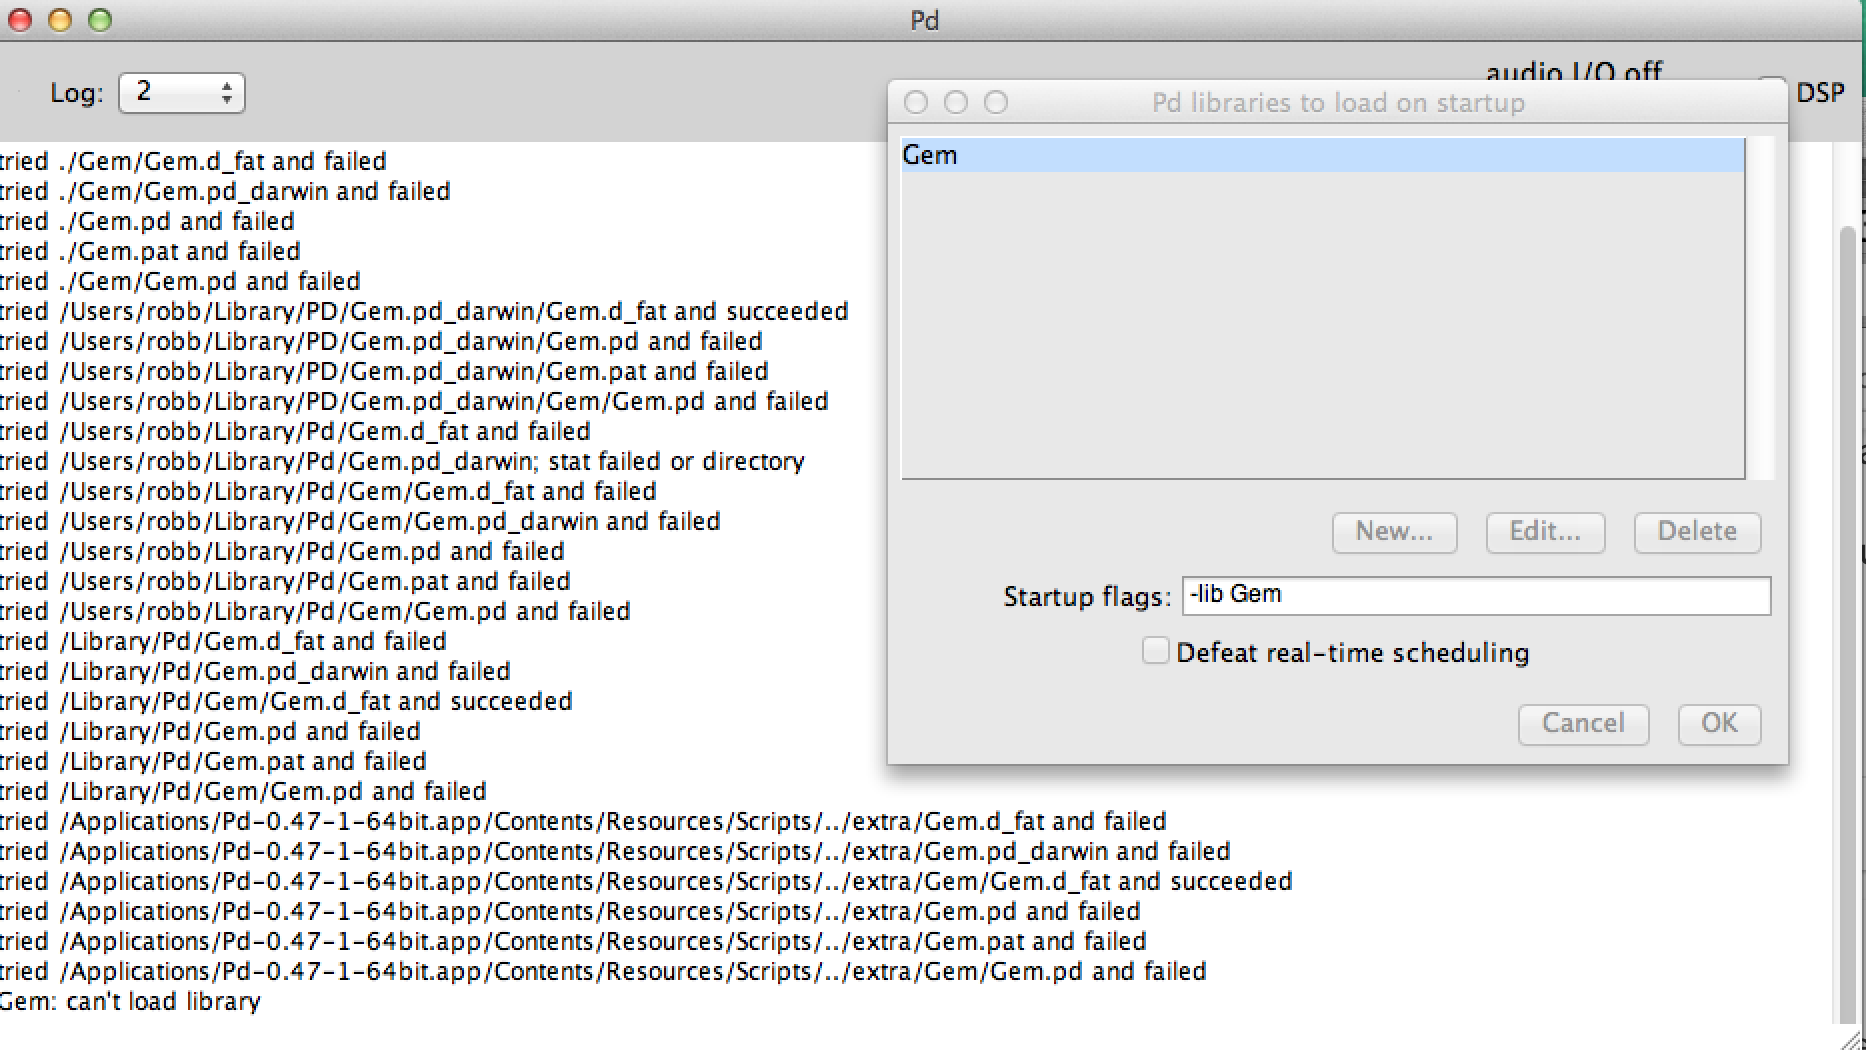
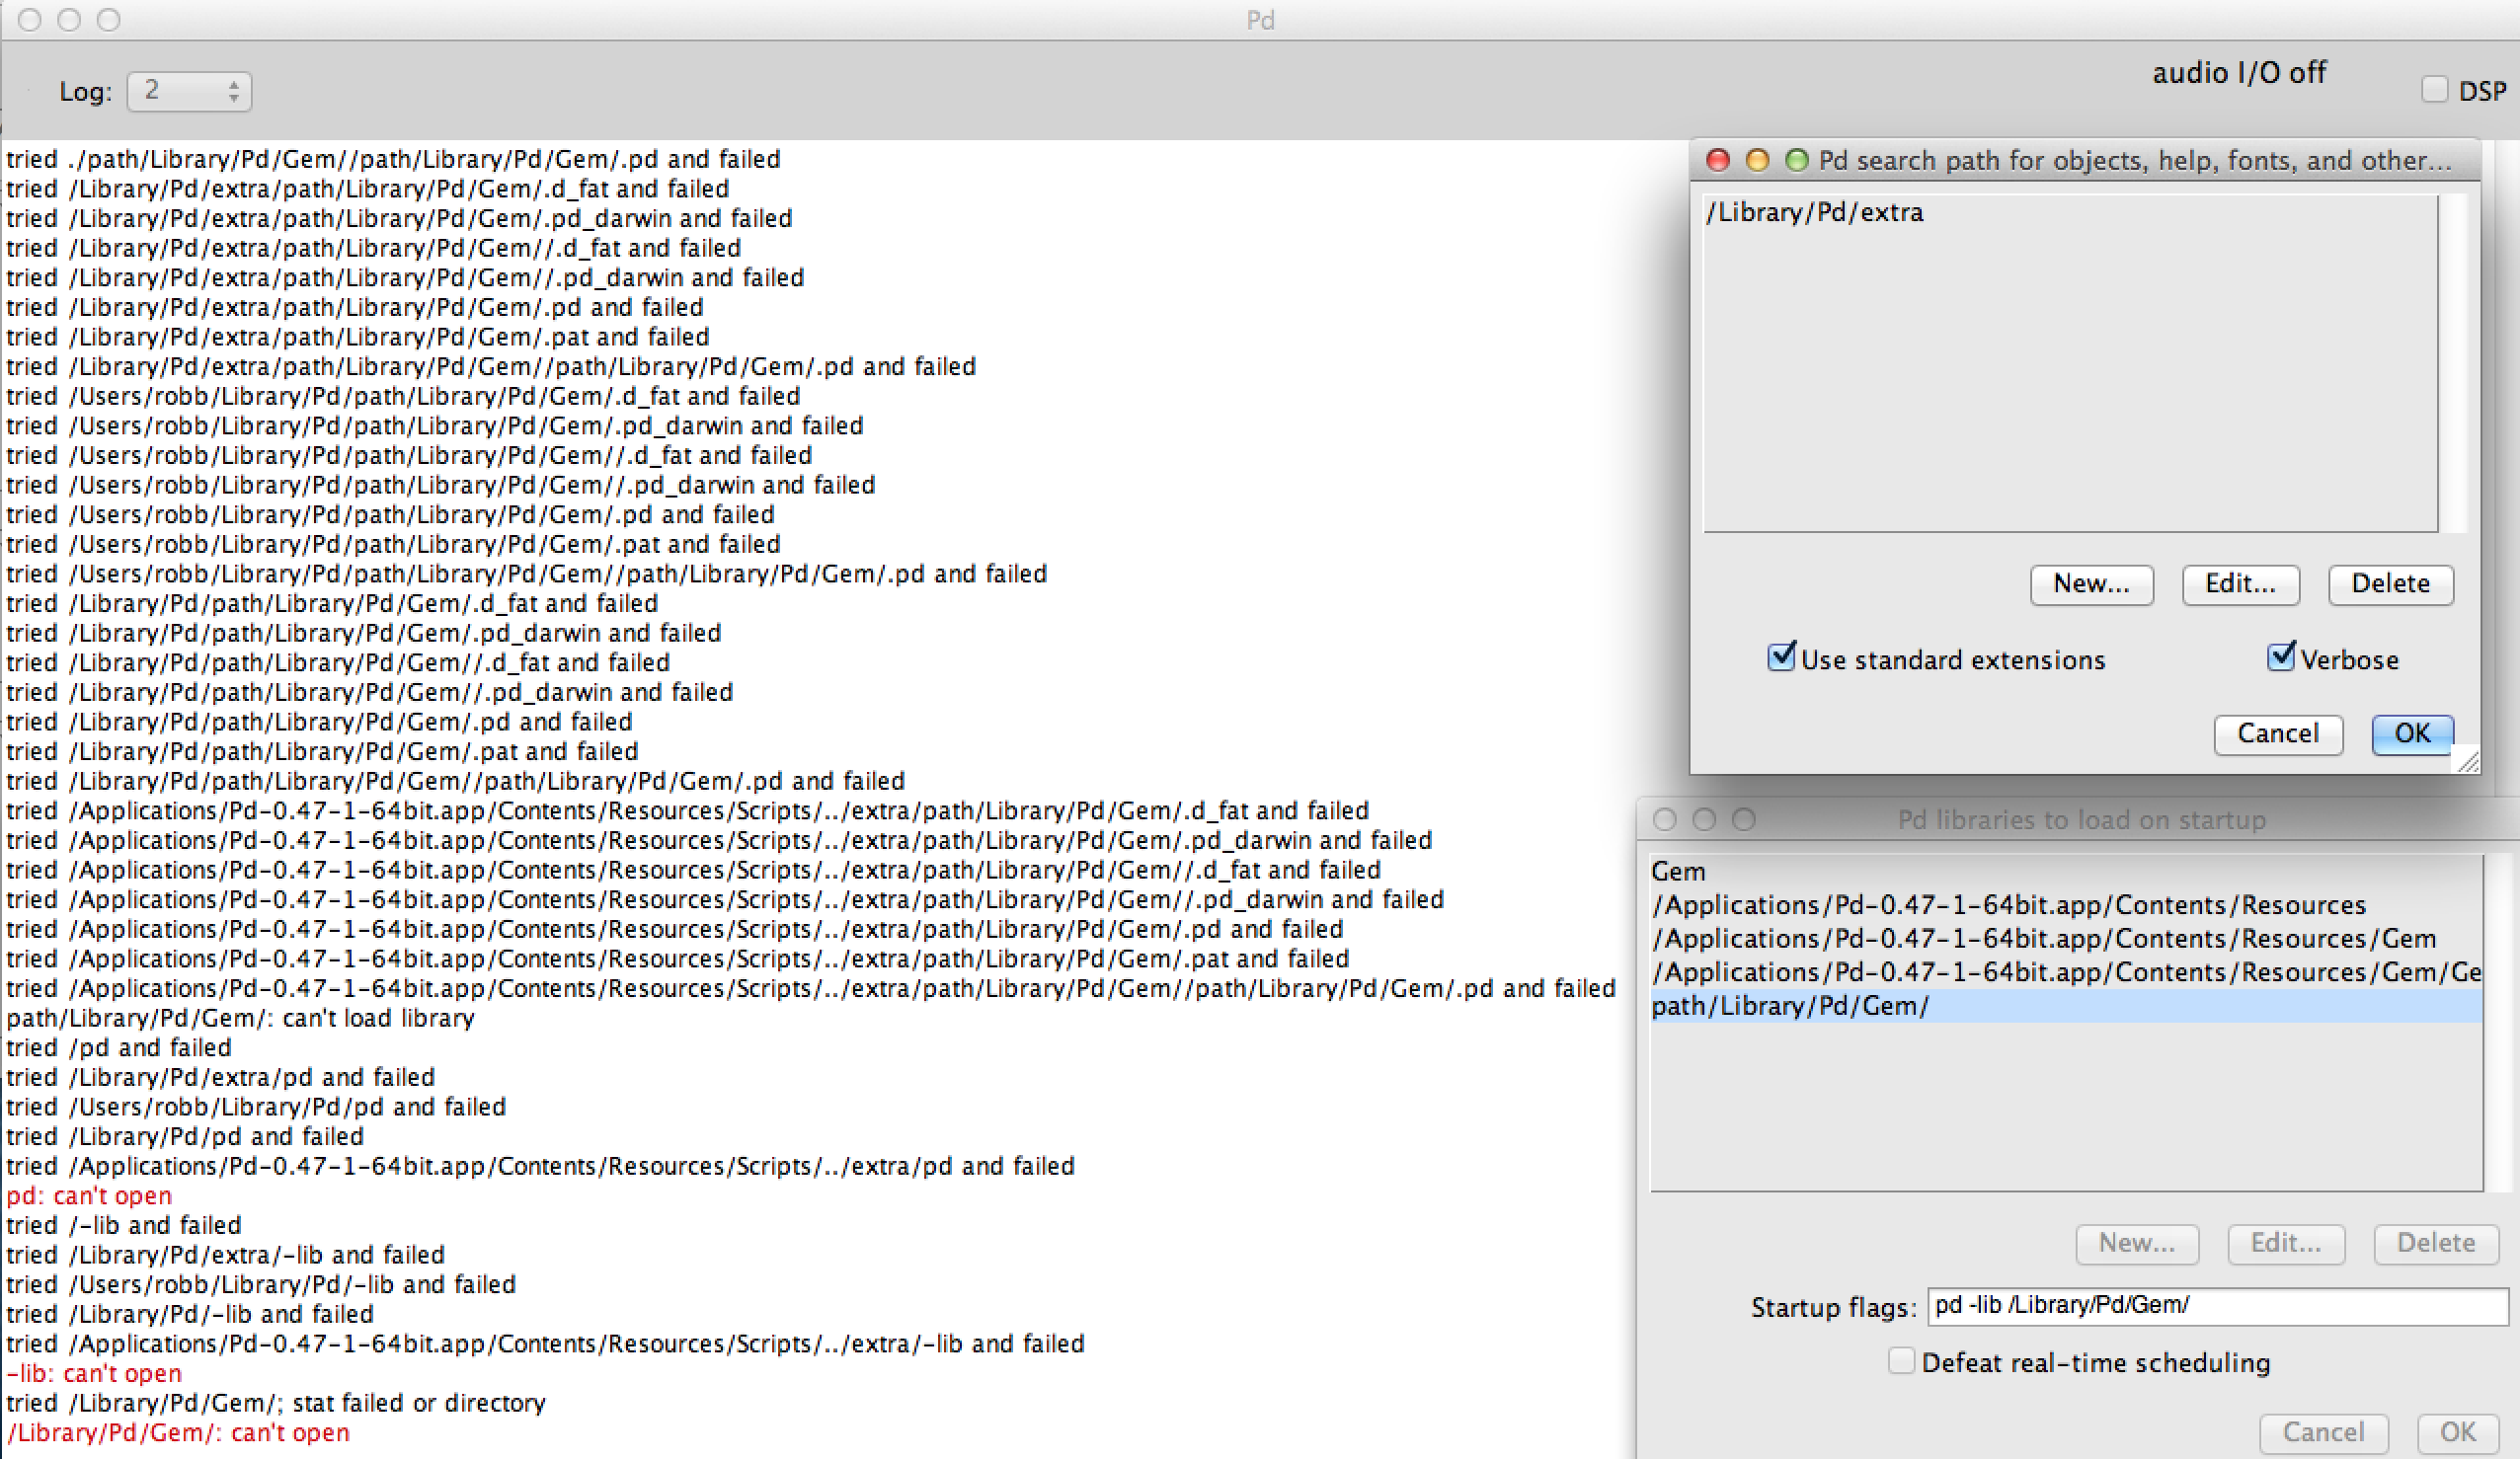
I have tried place (and re-placing) the Gem files in various different locations, and several different ways of adding flags and paths and other start up instructions.
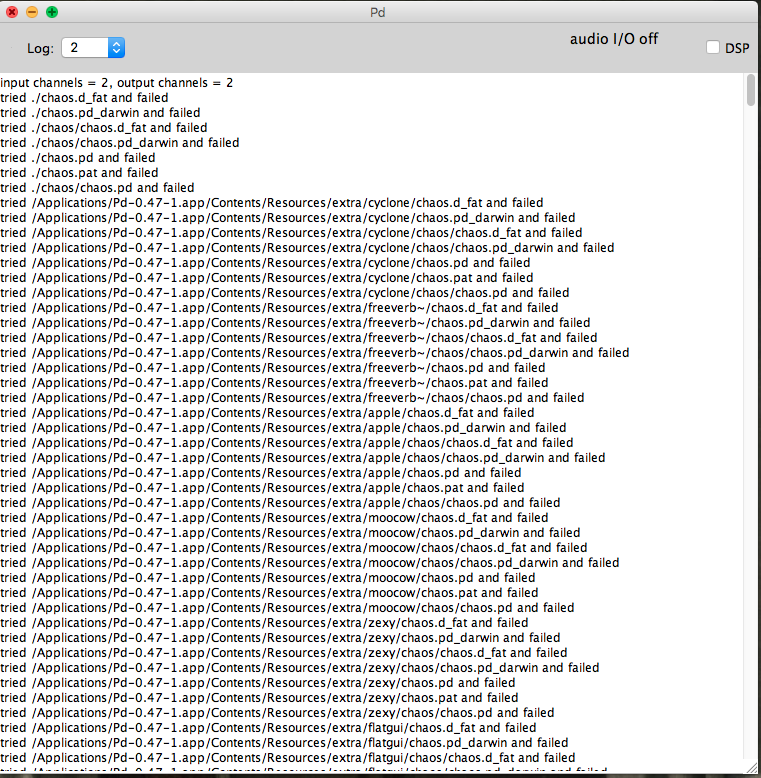
Maybe the closest I have got was yesterday when upon start up, the console wrote that Gem.d_fat "succeeded" but Gem.pd_darwin and the others failed.
Here are samples of the sort of thing I have been trying and the console messages received. Thanks in advance!

 posted in technical issues
PD vanilla on Windows 10 - coming from Mac
Hi lads and lasses,
I am an ex-mac user using pd 32 bit vanilla with zexy and gem libraries (manually installed).
I have recently changed to Windows 10 and in spite of efforts perusing forums and troubleshooting myself I can't seem to get the same kind of installation.
The problem (elaborated):
I want to install pd vanilla onto my windows 10 system, and then manually install zexy and gem libraries (and others in the future).
However, when I had my mac setup I had to install pd 32 bit (as gem was only fully functional on the 32 bit) and the library paths (folder locations for libraries, deken etc) were very different to what they are in windows. Currently I have no idea where to put files on my windows machine to make things work.
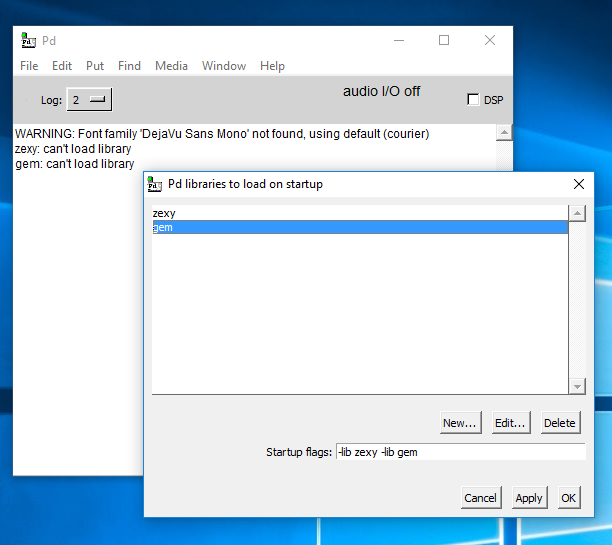
This is what it currently looks like at startup (on windows 10, pd vanilla, 0.47.1 64 bit) :

I am now faced with the following problems:
-I cannot find a 32 bit version of PD for my windows machine (so that I can run gem smoothly, assuming that is still the way it needs to be)
-I can't get deken to work, I have tried putting the deken plugin folder and master folder in various folders of program files but I keep getting error messages when I try and download a library (see yellow writing towards the bottom of the screenshot) when I go Help>Find Externals:
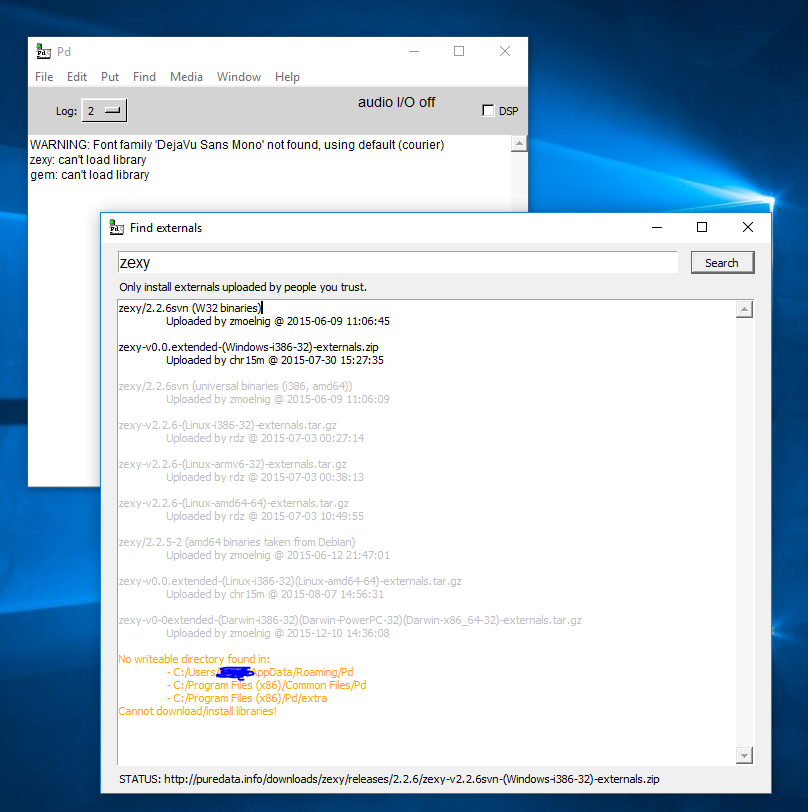
[that error followed the selection of a folder for the library to go:]
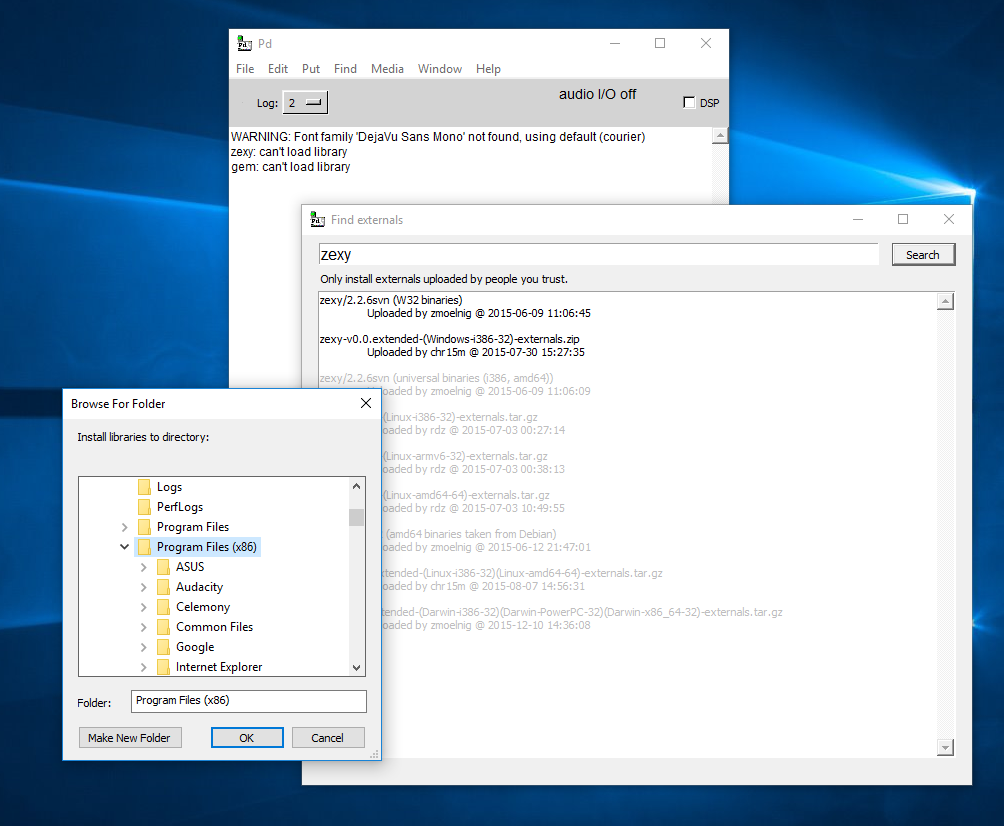
-Zexy and gem also won't load during startup with the startup flags (well that is because I can't find any place to save the library during the Find Externals command, but I have the startup flags in place for when deken does work).
So can anyone show me the error in my ways and better yet, the right path?
I need 32 bit pd for windows (I think for gem), the folder I need to put deken into , and the folders that I have to save the 'Get External' library downloads from.
Thanks in advance!
 posted in technical issues
GEM
Thx a lot,
Unfortunately there's another problem.The only Video I can load into pix_film seems to be with the following Codec:
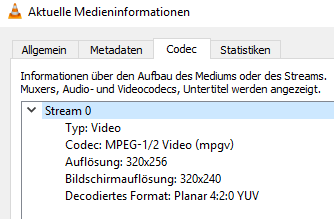
All the other formats I tried didn't work. But I need to play Videos from different smartphones.
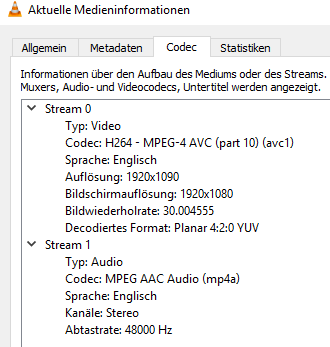
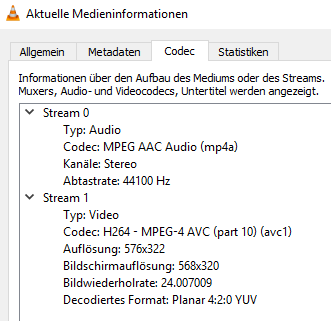

In the manuals I read it seems like it should be possible to play most formats which I can play back with VLC player.
How can I fix this problem?
Thx a lot!!!
 posted in technical issues