[pix_share_read] and [pix_share_write] under windows
@whale-av, here is a log running pd with -lib Gem -verbose.
tried both 32bit and 64bit pd 0.48-1...
tried ./Gem.m_i386 and failed
tried ./Gem.dll and failed
tried ./Gem/Gem.m_i386 and failed
tried ./Gem/Gem.dll and failed
tried ./Gem.pd and failed
tried ./Gem.pat and failed
tried ./Gem/Gem.pd and failed
tried C:/Users/Raphael Isdant/Documents/Pd/externals/Gem.m_i386 and failed
tried C:/Users/Raphael Isdant/Documents/Pd/externals/Gem.dll and failed
tried C:/Users/Raphael Isdant/Documents/Pd/externals/Gem/Gem.m_i386 and failed
tried C:/Users/Raphael Isdant/Documents/Pd/externals/Gem/Gem.dll and failed
tried C:/Users/Raphael Isdant/Documents/Pd/externals/Gem.pd and failed
tried C:/Users/Raphael Isdant/Documents/Pd/externals/Gem.pat and failed
tried C:/Users/Raphael Isdant/Documents/Pd/externals/Gem/Gem.pd and failed
tried C:/Users/Raphael Isdant/AppData/Roaming/Pd/Gem.m_i386 and failed
tried C:/Users/Raphael Isdant/AppData/Roaming/Pd/Gem.dll and failed
tried C:/Users/Raphael Isdant/AppData/Roaming/Pd/Gem/Gem.m_i386 and failed
tried C:/Users/Raphael Isdant/AppData/Roaming/Pd/Gem/Gem.dll and failed
tried C:/Users/Raphael Isdant/AppData/Roaming/Pd/Gem.pd and failed
tried C:/Users/Raphael Isdant/AppData/Roaming/Pd/Gem.pat and failed
tried C:/Users/Raphael Isdant/AppData/Roaming/Pd/Gem/Gem.pd and failed
tried C:/Program Files/Common Files/Pd/Gem.m_i386 and failed
tried C:/Program Files/Common Files/Pd/Gem.dll and failed
tried C:/Program Files/Common Files/Pd/Gem/Gem.m_i386 and failed
tried C:/Program Files/Common Files/Pd/Gem/Gem.dll and failed
tried C:/Program Files/Common Files/Pd/Gem.pd and failed
tried C:/Program Files/Common Files/Pd/Gem.pat and failed
tried C:/Program Files/Common Files/Pd/Gem/Gem.pd and failed
tried D:/pd-0.48-1.windows.64bit/extra/Gem.m_i386 and failed
tried D:/pd-0.48-1.windows.64bit/extra/Gem.dll and failed
tried D:/pd-0.48-1.windows.64bit/extra/Gem/Gem.m_i386 and failed
tried D:/pd-0.48-1.windows.64bit/extra/Gem/Gem.dll and succeeded
D:\\pd-0.48-1.windows.64bit\\extra\\Gem\\Gem.dll: couldn't load
tried D:/pd-0.48-1.windows.64bit/extra/Gem.pd and failed
tried D:/pd-0.48-1.windows.64bit/extra/Gem.pat and failed
tried D:/pd-0.48-1.windows.64bit/extra/Gem/Gem.pd and failed
tried D:/pd-0.48-1.windows.64bit/doc/5.reference/Gem.m_i386 and failed
tried D:/pd-0.48-1.windows.64bit/doc/5.reference/Gem.dll and failed
tried D:/pd-0.48-1.windows.64bit/doc/5.reference/Gem/Gem.m_i386 and failed
tried D:/pd-0.48-1.windows.64bit/doc/5.reference/Gem/Gem.dll and failed
tried D:/pd-0.48-1.windows.64bit/doc/5.reference/Gem.pd and failed
tried D:/pd-0.48-1.windows.64bit/doc/5.reference/Gem.pat and failed
tried D:/pd-0.48-1.windows.64bit/doc/5.reference/Gem/Gem.pd and failed
Gem: can't load library```
posted in pixel#
3 shader adaptions: sonogram / vectorscope and conway
I realized recently that Gem has some very similar (and nice) shader examples, like a game of life, or a multi pass rendering (I learned that this is what I am doing with the effect chain in the video player).
And the timbreID library has some nice Gem patches for visualizing audio.
And Gem has of course a video player.
I ask myself now, because I do not want to reinvent the wheel, what are the advantages and disadvantages if I compare Gem to Ofelia?
I did some experiments with Gem some time ago but at a certain point I got stuck, whether because of my lacking knowledge or because the patch was getting slow.
So it could be possible to do exactly the same with both libraries?
Here I found a very old paper about Gem that states Gem is using openGL up to 1.2.
https://puredata.info/downloads/gem/documentation/manual/pub/zmoelnig2004gem.pdf
Has that changed? Or could that be a difference? I think the openGL versions that Ofelia can use depend only on the hardware.
What I like about ofelia so far is (in comparison to Gem):
To compile the patch as a standalone application.
To make nice interfaces.
(but I think those points are not openGL related...)
That it gives access to lua and open frameworks (which could make it easier to do complex graphics calculations / interfaces?).
Is anyone else in the position to compare those libraries, or has an opinion about them?
 posted in patch~
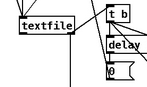
Add a new line to [textfile]. How?
@RetroMaximus Trigger is used to control the order of operations.
This is not good practice:
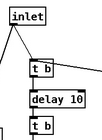
This is better:
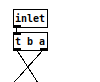
Not good:
Better:
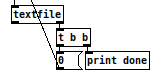
Not good:
Better:

")
 posted in technical issues
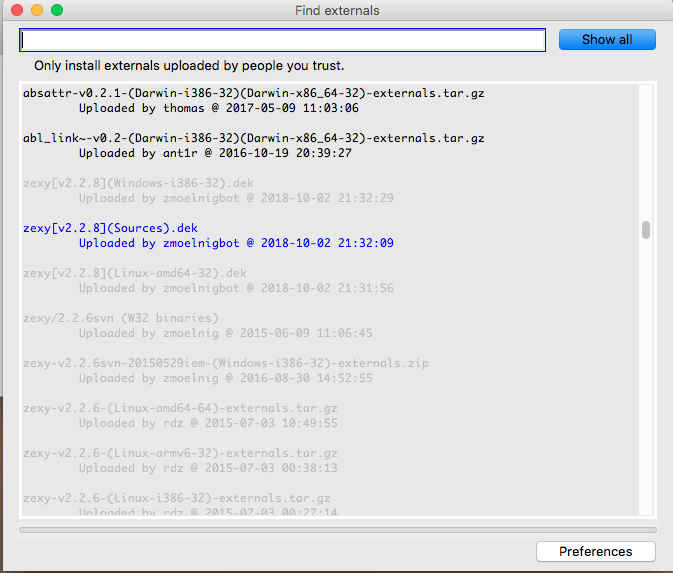
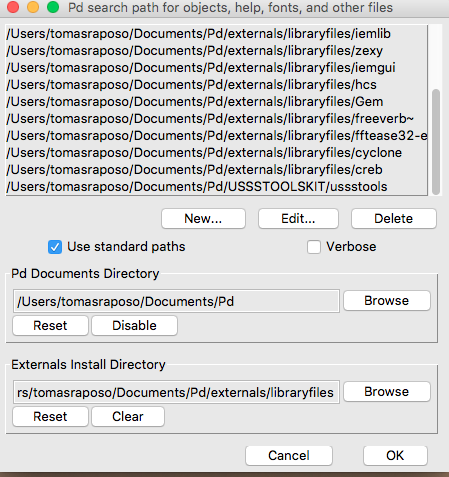
installing external libraries
hi @whale-av
sorry, i misspelled it. it's adrian moore's book "Sonic Art: an introduction to electroacoustic music composition". Here is the link for the external library: https://www.sheffield.ac.uk/usss/ussstools
i have the 64-bit Pd installed.
thank you for your help!
i have already set the paths and runned the 'find externals' option...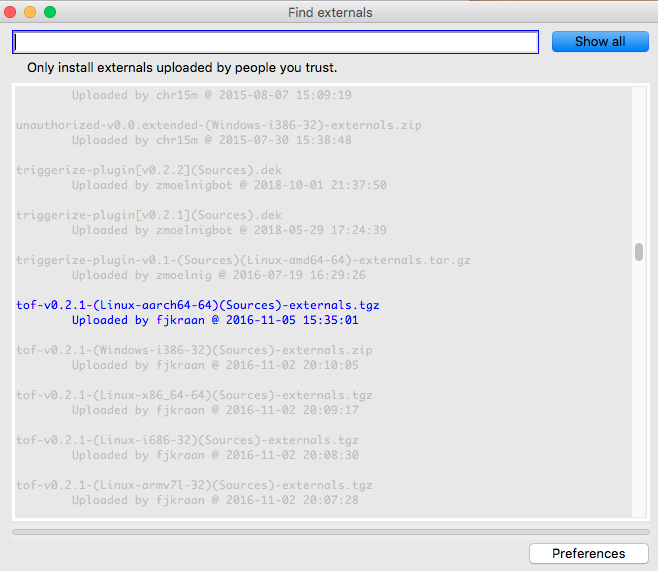

 posted in technical issues
New here
Mua Bán đất Đà Nẵng giá rẻ - Những điều bạn chưa biết
Đừng phớt lờ những điều này khi giao dịch mua Bán đất Đà Nẵng giá rẻ
Như chúng ta đã biết, giao dịch mua Bán đất tại Đà Nẵng - Tinbatdongsan247.net là một việc quan trọng. Bởi nó liên quan đến đầu tư, sinh sống lâu dài cũng như phải chi một khoản tiền lớn. Vì vậy việc cẩn trọng trong những phi vụ như thế này không bao giờ là thừa. Và dưới đây là những điều bạn cần quan tâm để có những giao dịch thành công nhất.
Những giấy tờ cần thiết khi mua bán đất Đà Nẵng giá rẻ
Bất kỳ giao dịch nào, việc chuẩn bị những giấy tờ, hồ sơ cần thiết là vô cùng quan trọng. Nó không chỉ giúp bạn tiết kiệm thời gian, mà còn thể hiện uy tín của bản thân bạn. Và giao dịch mua bán đất rẻ ở Đà Nẵng lại càng phải như vậy. Vì giao dịch này có thể sẽ còn tiếp tục sau này, hoặc bạn muốn giới thiệu cho bạn bè. Để không đến lúc tìm được mối mới bắt đầu chuẩn bị sẽ lỡ nhiều cơ hội tốt.

Khi mua bán đất Đà Nẵng giá rẻ cần chuẩn bị thật kỹ giấy tờ
Những giấy tờ mà bạn cần quan tâm đến bao gồm: Hợp đồng chuyển nhượng quyền sử dụng nhà đất. Đây là văn bản quan trọng thể hiện giao dịch Mua bán đất tại Đà Nẵng của bạn thành công. Cùng với đó là giấy chứng nhận quyền sử dụng nhà đất. Tài liệu này chứng minh người bán là chủ sở hữu thực sự của miếng đất bạn mua. Để hiểu rõ những văn bản này bạn có thể tham khảo các khoản 1, 2 và 5 Điều 50 Luật đất đai.
Cách tiếp cận khách hàng nhanh nhất cho người bán đất Đà Nẵng giá rẻ
Đối với một nhà bán đất, thì việc tiếp cận bước đầu với khách hàng là rất quan trọng. Tuy nhiên đây vẫn chưa phải là bước đầu tiên bạn cần làm. Mà bước đầu chính là định giá đất cần bán đất rẻ ở Đà Nẵng. Bạn có thể tự định giá dựa theo kinh nghiệm của bản thân. Nhưng nếu không chắc chắn hãy nhờ đến các chuyên gia môi giới.
Sau khi đã xác định được giá nên bán, bạn sẽ tiến hành đăng tin rao bán đất rẻ tại Đà Nẵng đất trên các trang online. Mạng xã hội luôn được nhiều người quan tâm, và sẽ dễ tiếp cận khách hàng hơn. Bạn nên lựa chọn những trang web có lượng truy cập lớn để rao bán. Đồng thời biên tập nội dung hấp dẫn, thêm hình ảnh rõ nét về lô đất để thu hút khách hàng.

Đừng quên tham khảo giá trước khi mua bán
Cách mua được những lô đất tốt theo ý muốn của mình
Còn nếu là người mua, bạn hãy thể hiện mình là một người vui vẻ, khéo léo trong thương lượng. Thể hiện ấn tượng tốt sẽ tạo nên không khí thoải mái, dễ giao dịch. Về lựa chọn đất tốt, bạn cần chú ý đến giao thông khu vực, thuận tiện đi lại. Đồng thời để ý các tiện ích xung quanh cũng như tìm hiểu về người Ban dat tai Da Nang gia re thật kỹ.
Bạn nên mua từ những người đang cần tiền gấp, họ dễ thương lượng và bán đất rẻ tại Đà Nẵng nhanh. Còn nếu không xác định được liệu họ cần bán gấp hay không thì hãy chú trọng những yếu tố khác. Bước tiếp theo là khảo sát giá đất xung quanh, để tránh bị mua hớ.
Đó là những lưu ý khi mua bán đất Đà Nẵng giá rẻ dành cho người bán lẫn người mua. Vì vậy, đừng phớt lờ những lời khuyên hữu ích này nhé! Chúc bạn sẽ có những giao dịch thành công.
 posted in Off topic
pix and geometric objects not being loaded in pd vanilla
Hello,
Altough Gem is not being loaded, as in this screenshot
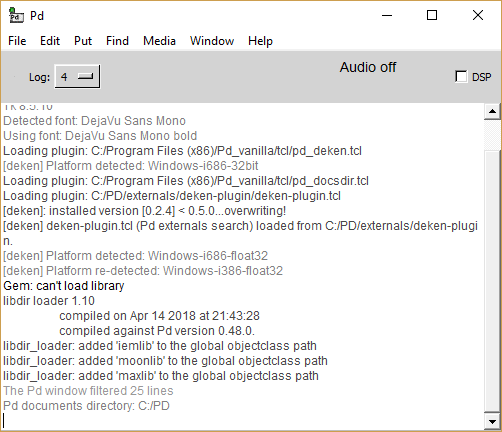
some gem objects are, but some aren't
"pix_film" "mix" and "texture" are missing, just as "rectangle" and any other "geometric" I try to add

the console shows a lot missing stuff whenever I open a GEM patch.
thanks for reading this.
(everything is up to date, tried Gem installation through deken and manually thorugh pd site, with the same results)
 posted in technical issues
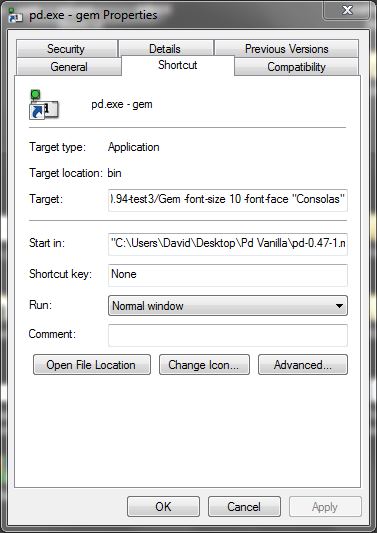
Trying to run Gem for Pd Windows 10 64 bit
@jeffgrips I have it running with vanilla in Windows7.... but it was hard...... and it's a long story....
I cannot see any reason that it would not work for widows10.
I have not found any other easier better solution.
(((SEE below though for the fact that the -lib needs to be declared...!
That could be your only problem? But I doubt it..!!! )))
I used the 64-bit GEM from here (0.94-test3.zip)..... https://github.com/avilleret/Gem/releases/
I unzipped it and put it in a folder (which I called "dot") on my desktop.
Because I am using many different versions of Pure Data I left it there, and I start Pd with a shortcut that also points to the GEM folder and loads it as a library (It has to be loaded at startup as a library...... and that could be why you don't have it working.... but probably not...).
This is the contents of the line "target" in the shortcut.......
"C:\Users\David\Desktop\Pd Vanilla\pd-0.47-1.msw\pd\bin\pd.exe" -lib C:\Users\David\Desktop\dot\0.94-test3/Gem -font-size 10 -font-face "Consolas"
Be careful with forward / backward slashes.
I am pretty sure that I tipped the contents of the "QT" folder out into the "0.94-test3 folder" where gem.dll is (from within the "QT" folder inside "0.94-test3").
If you find some .dlls are missing then post back with a list, and I can upload them....... but you might not have the correct C++ redistributables from Microsoft.
But if you want to start Pd normally by double-clicking a patch then you will need to declare the library in Pd.. edit....preferences.... startup......
If you have GEM in the extra folder you should only need to put "-lib Gem" where you see that I have put "-noautopatch".......
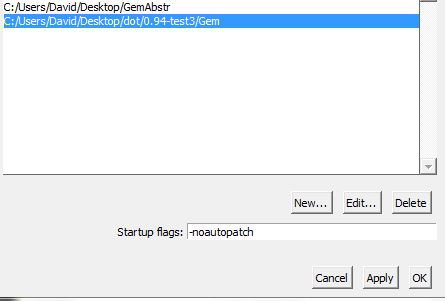
The gem abstractions could not be found though (the "parts of Gem... .like [pix_image] pix_video] [gemwin] etc. worked fine) I copied the contents of the Gem folder from "extended" into a folder on the desktop called "GemAbstr" and set a path to it in Pd preferences.
I removed gem.dll from that folder (no conflicts....!).
The abstractions now create, but the help files for embedded objects cannot be found (different "search" for embedded objects) so I have to open my "GemAbstr" folder and open them manually.
Everything works. All the patches from https://puredata.info/downloads/extended-view-toolkit create and run correctly. The camera on my computer even works (I had never had it working before).
And it works with Spout.
If you go this route then I wish you good luck.......
@zerino has confirmed that it can work with widows10........ https://forum.pdpatchrepo.info/topic/11450/pix-and-geometric-objects-not-being-loaded-in-pd-vanilla/7
........and resolved the "help" file problem.....
For the time being you are lucky that you are using Windows.
This solution is not available for other systems.
David.
 posted in technical issues
Purr Data Linux-64 and GEM?
Ok, here in Puppy-Linux apt-get is not installed.
Now I installed libftgl2_2.1.3 successfully with the package manager.
Doing the same as before
[Gem] creates! Yes!
In the commandline (linux-console) [shortened]:
pd-l2ork -noprefs -nostdpath -nrt -verbose
Pd-L2Ork version 2.4.6 (20171213-rev.46ffba3)
compiled 22:30:53 Dec 13 2017
port 5401
guidir is /usr/lib/pd-l2ork/bin
"/usr/lib/pd-l2ork/bin"/nw/nw --user-data-dir="/root/.config/purr-data" "/usr/lib/pd-l2ork/bin" 5401 localhost pd-l2ork "/usr/lib/pd-l2ork/bin" xf3c100Waiting for connection request...
[0426/002010.733670:WARNING:chrome_main_delegate.cc(565)] final extension:
... connected
/etc/pd/gem.conf: No such file or directory
/root/.config/pure-data/gem.conf: No such file or directory
./gem.conf: No such file or directory
load plugins 'film' in '/usr/lib/pd-l2ork/extra/Gem/'
pattern : /usr/lib/pd-l2ork/extra/Gem/gem_film*.so
dylib loading file '/usr/lib/pd-l2ork/extra/Gem/gem_filmAVIPLAY.so'!
library loading returned: dlerror 'libaviplay-0.7.so.0: cannot open shared object file: No such file or directory'
dylib loading file '/usr/lib/pd-l2ork/extra/Gem/gem_filmGMERLIN.so'!
library loading returned: dlerror 'libgmerlin_avdec.so.1: cannot open shared object file: No such file or directory'
dylib loading file '/usr/lib/pd-l2ork/extra/Gem/gem_filmMPEG3.so'!
library loading returned: dlerror 'libmpeg3.so.2: cannot open shared object file: No such file or directory'
dylib loading file '/usr/lib/pd-l2ork/extra/Gem/gem_filmQT4L.so'!
library loading returned: dlerror 'libquicktime.so.2: cannot open shared object file: No such file or directory'
[...]
dylib loading file '/usr/lib/pd-l2ork/extra/Gem/gem_imageMAGICK.so'!
library loading returned: dlerror 'libMagick++-6.Q16.so.5: cannot open shared object file: No such file or directory'
[...]
dylib loading file '/usr/lib/pd-l2ork/extra/Gem/gem_imageMAGICK.so'!
library loading returned: dlerror 'libMagick++-6.Q16.so.5: cannot open shared object file: No such file or directory'


[...]
dylib loading file '/usr/lib/pd-l2ork/extra/Gem/gem_recordQT4L.so'!
library loading returned: dlerror 'libquicktime.so.2: cannot open shared object file: No such file or directory'
[...]
There are some more libs missing, maybe I should install them too?
All the examples of Gem seem to work now!
Even the teapod and openGL stuff.
And my final patches, also work. So nice!
Now I will review what those flags actually do:
https://puredata.info/docs/faq/commandline
But I am wondering, if I was lucky, that Gem is programmed for printing messages in the commandline and other non-working libraries probably won't do so?
Thank you so much
 posted in technical issues
Purr Data Linux-64 and GEM?
Welcome to Purr Data
warning: your system's font stack is not optimal
Pd has started the GUI
canvasinfo: v0.1
stable canvasinfo methods: args dir dirty editmode vis
pdinfo: v.0.1
stable pdinfo methods: dir dsp version
classinfo: v.0.1
stable classinfo methods: size
objectinfo: v.0.1
stable objectinfo methods: class
[import] $Revision: 1.2 $
    [import] is still in development, the interface could change!
    compiled against Pd-l2ork version 2.4.6 (20171213-rev.46ffba3)
input channels = 2, output channels = 2
working directory is /usr/lib/pd-l2ork/extra/Gem
input channels = 2, output channels = 2
audio buffer set to 50
opened input device name hw:0
configuring sound input...
Sample width set to 4 bytes
configuring sound output...
Sample width set to 4 bytes
error: audio I/O dropout
tried but couldn't sync A/D/A
tried /usr/lib/pd-l2ork/extra/Gem/Gem.l_ia64 and failed
tried /usr/lib/pd-l2ork/extra/Gem/Gem.pd_linux and succeeded
verbose( 1):/usr/lib/pd-l2ork/extra/Gem/Gem.pd_linux: libftgl.so.2: cannot open shared object file: No such file or directory
tried /usr/lib/pd-l2ork/extra/Gem/Gem.pd and failed
tried /usr/lib/pd-l2ork/extra/Gem/Gem.pat and failed
tried /usr/lib/pd-l2ork/extra/Gem/Gem/Gem.pd and failed
 Gem
... couldn't create
libftgl is missing?
posted in technical issues
Purr Data Linux-64 and GEM?
@jancsika said:
ls /usr/lib/pd-l2ork/extra/Gem/Gem*
ls /usr/lib/pd-l2ork/extra/Gem/Gem*
/usr/lib/pd-l2ork/extra/Gem/Gem.la
/usr/lib/pd-l2ork/extra/Gem/Gem-meta.pd
/usr/lib/pd-l2ork/extra/Gem/Gem.pd_linux
/usr/lib/pd-l2ork/extra/Gem/GemPrimer.pdf
du -h /usr/lib/pd-l2ork/extra/Gem/Gem*
du -h /usr/lib/pd-l2ork/extra/Gem/Gem*
4.0K /usr/lib/pd-l2ork/extra/Gem/Gem.la
4.0K /usr/lib/pd-l2ork/extra/Gem/Gem-meta.pd
5.6M /usr/lib/pd-l2ork/extra/Gem/Gem.pd_linux
568K /usr/lib/pd-l2ork/extra/Gem/GemPrimer.pdf
posted in technical issues