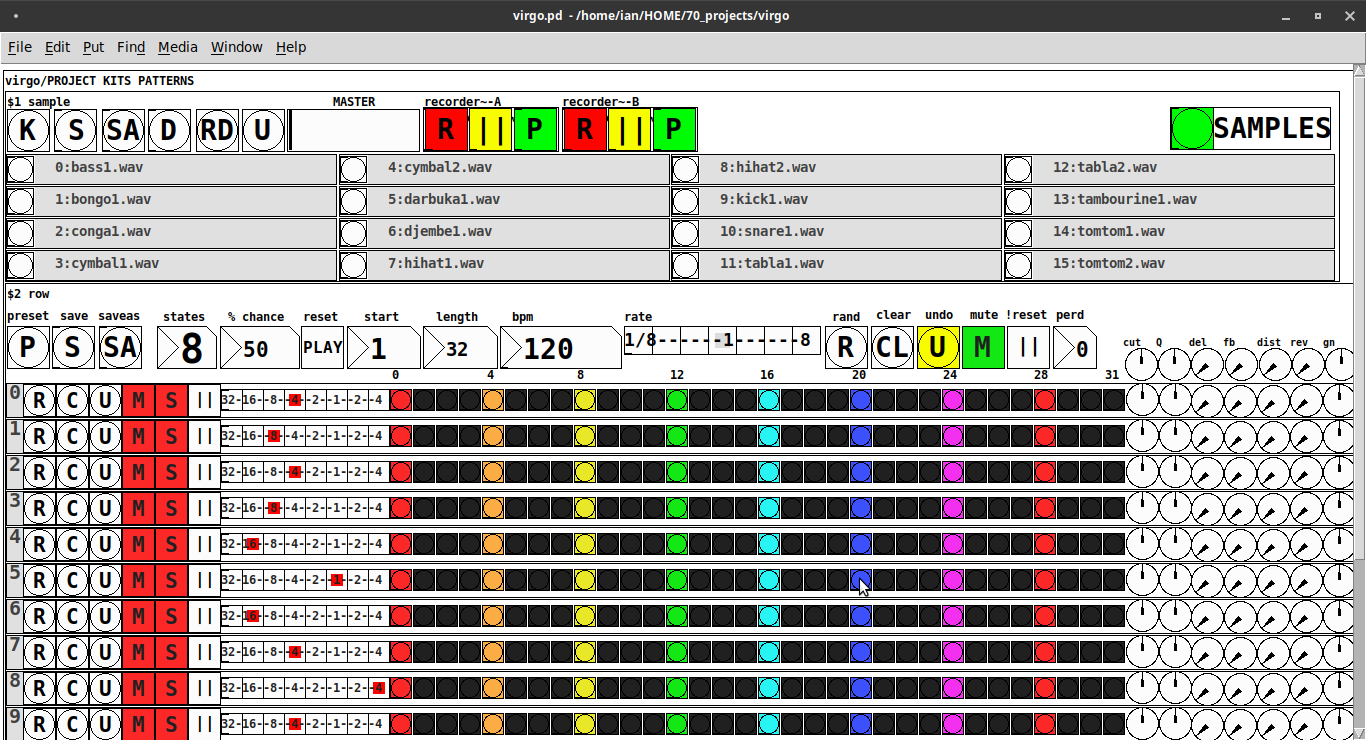
Just Another (Drum) Sequencer...SortOf, codename: Virgo
Just Another (Drum) Sequencer...SortOf, codename: Virgo
REQUIRES: zexy, moonlib, tof (as of Pd 0.50.2, all of which are in deken) and hcs (which comes by default with Pd 0.50.2 and is in deken (for extended))
Special Features
- Unique playhead per row; each with their own metro (beat)
- Up to 8 Volume states-per-beat (by clicking multiple times on the bang; where an rms=1 is divide among the states (2 states:0=rms=0(black), 1=rms=1(red); 3 states:rms=[0|0.5|1])
- Design approach: using creation arguments to alias abstractions, so subsequently they are referred to by their creation arguments, ex. in [KITS sample] sample is referred to as [$1]; which is how they are listed below)
(notes: what I learned experimenting with this design approach, I will share as a separate post. Currently, it does not include cut-copy-paste (of regions of the pattern)). I good way to start trying it out is clicking the "R" to get a random kit and a random pattern).
virgo:[virgo/PROJECT KITS PATTERNS]
- PROJECT[KITS PATTERNS]
- $1:[KITS sample]
- GUI
- K: openpanel to load a previously saved *.txt (text object) kit of samples; on loadbang the default.txt kit is loaded
- S: save the current set of samples to the most recently opened *.txt (kit) preset
- SA: saveas a *.txt of the current set of samples
- D: foldererpanel a sample directory to load the first (alphabetically) 16 samples into the 16 slots
- RD: load a random kit from the [text samples] object where the samples where previously loaded via the "SAMPLES" bang on the right
- U: undo; return to the previously opened or saved *.txt kit, so not the previously randomized
- MASTER: master gain
- (recorder~: of the total audio~ out)
- record
- ||: pause; either recording or play;
- play: output is combined with the sequencer output just before MASTER out to [dac~]
- SAMPLES: folderpanel to load a (recursive) directory of samples for generating random kits
- ABSTRACTIONS
- $1: sample
- bang: openpanel to locate and load a sample for a track
- canvas: filename of the opened sample; filenames are indexed in alignment with track indices in the PATTERNS section
- $1: sample
- GUI
- $2:[PATTERNS row]
- GUI
- P: openpanel to load a previously saved *.txt (pattern) preset file; on loadbang the default.txt pattern is loaded; the preset file includes the beat, pattern, and effect settings for the row
- S: save the current pattern to the most recently opened pattern .txt
- SA: save as (self-explanatory)
- states: the number of possible states [2..8] of each beat;
- %: weight; chance of a beat being randomized; not chance of what it will result in; ex. 100% implies all beats are randomized ; random beats result in a value)gain) between 1 and states-1
- PLAY(reset): play the pattern from "start" or on stop reset all playheads to start
- start: which beat to start the playheads on
- length: how many beats to play [+/-32]; if negative the playheads will play in reverse/from right to left
- bpm: beats-per-minute
- rate: to change the rate of play (ie metro times) by the listed factor for all playheads
- R: randomize the total pattern (incl period and beats, but not the effect settings; beats of 1/32 are not included in the possibilities)
- CL: clear, set all beats to "0", i.e. off
- U: undo random; return to the previously opened or saved preset, ie. not the previous random one
- M: mute all tracks; the playheads continue moving but audio does not come out of any track
- ||:pause all playheads; play will resume from that location when un-paused
- per: period; if 0=randomizes the period, >0 sets the period to be used for all beats
- Edit Mode
- Check the [E] to enter edit mode (to cut, copy, or paste selected regions of the pattern)
- Entering edit mode will pause the playing of the pattern
- Play, if doing so beforehand, will resume on leavng edit mode
- The top-left most beat of the pattern grid will be selected when first entering edit mode
- Single-click a beat to select the top-left corner of the region you wish to cut or copy
- Double-click a beat to select the bottom-right corner
- You may not double-click a beat "less than" the single-clicked (top-left) beat and vice-versa
- Click [CL] to clear your selection (i.e. start over)
- The selected region will turn to dark colors
- If only one beat is selected it will be the only one darkened
- Click the operation (bang) you wish to perform, either cut [CU] or copy [CP]
- Then, hold down the CTRL key and click the top-left corner of where you want to paste the region
- The clicked cell will turn white
- And click [P] to paste the region
- Cut and copied regions may both be pasted multiple times
- The difference being, cutting sets the values (gains) for the originating region to "0"
- Click [UN] to undo either the cut, copy, or paste operation
- Undoing cut will return the gains from 0s to their original value
- Check the [E] to enter edit mode (to cut, copy, or paste selected regions of the pattern)
- (effect settings applied to all tracks)
- co: vcf-cutoff
- Q: vcf-q
- del: delay-time
- fb: delay-feedback
- dist: distortion
- reverb
- gn: gain
- ABSTRACTIONS
- $1: [row (idx) b8] (()=a property not an abstraction)
- GUI
- (index): aligns with the track number in the KITS section
- R: randomize the row; same as above, but for the row
- C: clear the row, i.e. set all beats to 0
- U: undo the randomize; return to the originally opened one, ie. not the previous random one
- M: mute the row, so no audio plays, but the playhead continues to play
- S: solo the row
- (beat): unit of the beat(period); implying metro length (as calculated with the various other parameters);1/32,1/16,1/8, etc.
- (pattern): the pattern for the row; single-click on a beat from 0 to 8 times to increment the gain of that beat as a fraction of 1 rms, where resulting rms=value/states; black is rms=0; if all beats for a row =0 (are black) then the switch for that track is turned off; double-click it to decrement it
- (effects-per-row): same as above, but per-row, ex. first column is vcf-cutoff, second is vcf-q, etc.
- ABSTRACTIONS
- $1: b8 (properties:row column)
- 8-state bang: black, red, orange, yellow, green, light-blue, blue, purple; representing a fraction of rms(gain) for the beat
- $1: b8 (properties:row column)
- GUI
- $1: [row (idx) b8] (()=a property not an abstraction)
- GUI
- $1:[KITS sample]
Credits: The included drum samples are from: https://www.musicradar.com/news/sampleradar-494-free-essential-drum-kit-samples
p.s. Though I began working on cut-copy-paste, it began to pose a Huge challenge, so backed off, in order to query the community as to 1) its utility in the current state (w/o that) and 2) just how important including it really is.
p.p.s. Please, report any inconsistencies (between the instructions as listed and what it does) and/or bugs you may find, and I will try to get an update posted as soon as enough of those have collect.
Love and Peace through sharing,
Scott
 posted in patch~
Querying whether an array exists or not
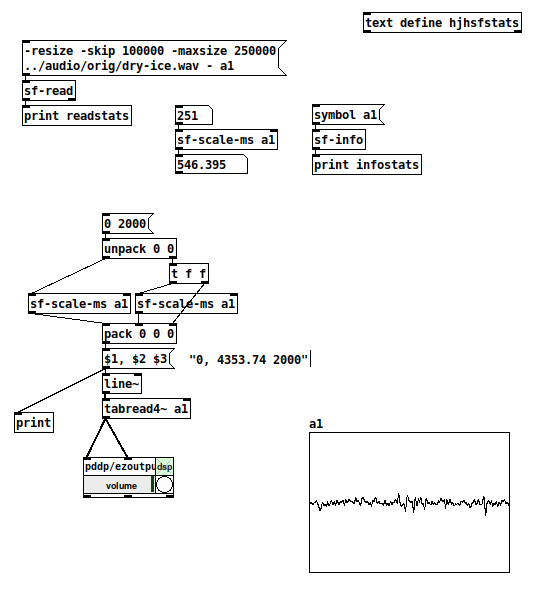
To play a sound file with [tabread4~], you need to know the frame count (line end point) and duration in ms (line time). (Or, if you use an accumulator, you need to know the rate at which to increment the phase index.) This is trivial if the sound file's sample rate matches the Pd environment.
If I am giving demo patches to students, I have control over the sample rate of audio sources, but I don't necessarily have control over whether they are running at 44.1 or 48 kHz. So the patch must adapt to the environment's sample rate.
Also, when students do their own patches, it would be nice if the patch could adapt to any sound file sample rate transparently -- so, instead of giving start and endpoints in samples, give them in ms and let the software do the conversion.
Unfortunately Pd arrays know only their size in frames. There would be a good rationale to have a subclass of array, say, [audiobuf] with a sample rate property. Then it could implement methods such as duration, mstoframes, msscale etc. (or [audiobuf duration a1] etc.).
I could create an abstraction containing the array and the stats, but you're very likely to need to pass the stats out to different parts of the patch at different times = function call/return problem.
I've gotten this far. It's not 100% transparent in that the user needs to define the text (within the abstractions, it's "multiply defined").
Inspiration here is from (of course) SuperCollider, where it's:
b = Buffer.read(s, "path/to/96kHz.wav");
b.sampleRate;  // 96000
b.duration;  // sensible

a = {
    // also here you have BufFrames and BufDur
    PlayBuf.ar(1, b, rate: BufRateScale.ir(b), ...)
}.play;
So it's really really easy. The buffer knows all of its properties and any part of the code can query at any time (and the result goes back to the part of the code that asked, transparently, no fuss).
I know, "you can get the numbers from [soundfiler] and save them where you need them" -- but why is it good to have to rebuild this design every time?
Huh... or maybe a better way is to have an abstraction that sets a number of [value] objects ([value a1ms], [value a1ratescale]...) and then the containing patch just uses the [value]s. (That sounds like normal software development... need to go through a few iterations before finding the right thing.)
hjh
 posted in technical issues
Closing patches without Pd crashing, hopefully in an elegant way...
EUREKA! I solved the following problem:
Problem: provide a mechanism for allowing patches to self-close without Pd crashing.
Requirements: (1) uses only Pd vanilla; (2) action to close patch starts on the very patch that will be closed.
Solution: copy patch killer.pd in the same folder as the patch to be closed, and send a message containing ";pd open killer.pd <dir>;kill_me symbol patch_to_be_closed.pd":
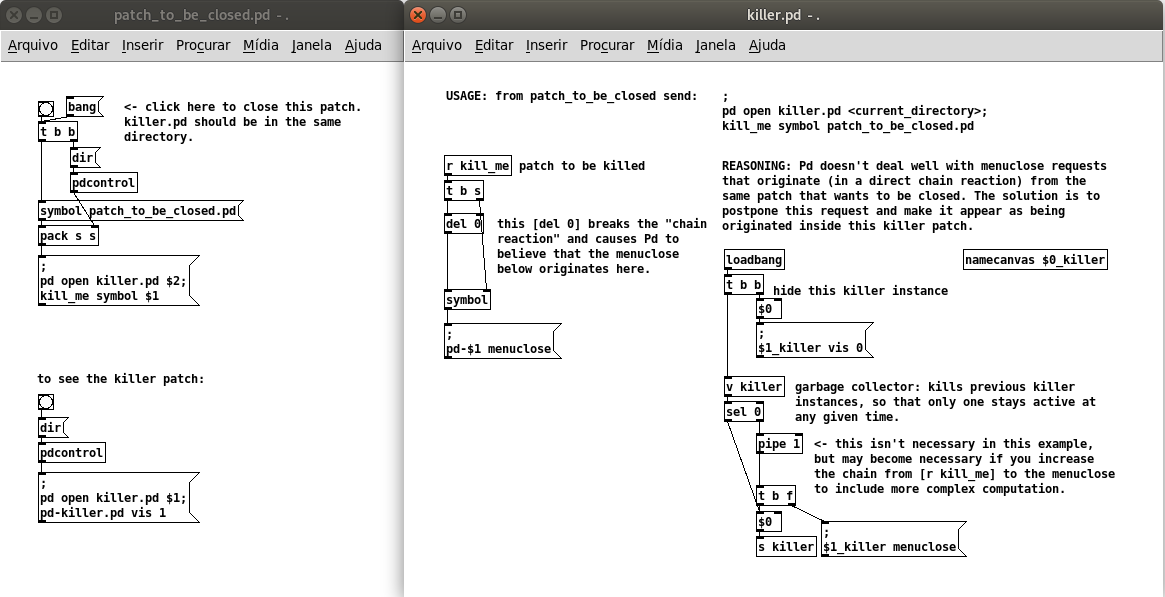
killer.pd
patch_to_be_closed.pd
Comments: (documented in the killer patch) Pd doesn't deal well with menuclose requests that originate (in a direct chain reaction) from the same patch that wants to be closed, so a separate killer patch is needed, which can be opened by the same patch requesting to be closed. In order to break the direct chain reaction, the solution is to postpone this request and make it appear as being originated inside the killer patch. This is done by storing the received symbol and delaying the message menuclose by 0 ms, which is enough to issue a new chain of events. The killer patch stays alive (but invisible), and any new instances of the killer patch will silently kill the previous instances so that only one killer patch is alive at any given time. [EDIT: I included a safeguard [pipe 1] in the killer patch, check the inline comments]. This implementation fixes the problems with my previous solution and also with the 3-patches method by @ingox, both of which didn't work through a send/receive pair. It also does not depend on dynamic patching.
This has been tested in Pd 0.50-2 and Ubuntu 20.04. I appreciate feedback to confirm if it works in other platforms/versions.
@whale-av Thanks again David for the suggestions (hcs, mouse clicks)! I wasn't too keen on the idea of depending on external libraries, and I also had to abandom the idea of having the killer patch embedded in the patch to be closed.
 posted in technical issues
[bang~] bangs before the end of a dsp block at startup
@Nicolas-Danet OK, I think I get it. 1024 samples have "passed" (according to the phasor~ counter) inside the reblocked subpatch because sample processing lurches forward 1024 samples once every 16 64 sample blocks processed by the enclosing patch. My error is in thinking that sample counters should all progress at the same rate, like two different wall clocks would. When dsp processing starts, PD arranges all subpatches regardless of blocking to immediately start generating audio if necessary, so in the case of a 1024 sample reblocking, it just fills the first 960 samples with 0's so it can start outputting them. But it has to wait for the first 64 real samples before it has a complete 1024 vector to process.
RE the array, you can force the drawing by either clicking on it somewhere (and ignoring the point you just created), or by just leaving the subpatch closed and opening it when you want to take a look. There is also list view, which is the only way I knew that the discontinuities were on 64 sample boundaries. So it's less the array GUI element that I'm concerned with, and more the behavior of [tabsend~]. [tabreceive~] is used to implement things like Hann windows, so it has to enforce a 1-1 ordered correspondence between the source table and the current vector. I assume that [tabsend~] makes similar guarantees, but I was wondering if the switch~ was messing things up. The message to turn on dsp can come between any 64 sample block, could that be related to the timing of the discontinuity I'm seeing? When dsp is off, does PD stop accumulating the 1024 block for the subpatch? The discontinuity goes away when I declare [switch~ 1024 16 1], and it also causes the phasor~ counter to report approx 64 (because phasor~ is configured in cycles per second and so has to adjust to the current blocking, overlap, and oversampling). <BS in last sentence corrected/>
 posted in technical issues
[writesf~] problem
A couple of illustrations.
Let's say we want a sine wave covering 16.5 samples. To illustrate, I used SuperCollider to put two sine wave cycles into 33 samples.
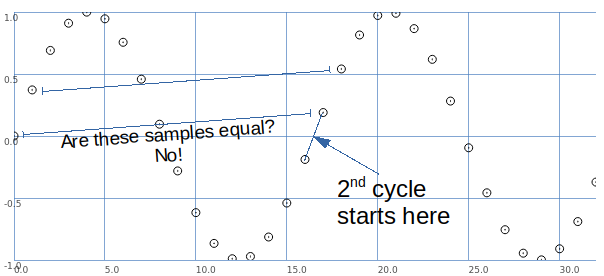
The second cycle begins when the wave crosses the 0 line in the middle.
This is between samples.
So, the second cycle must be represented by sample values that are different from the sample values for the first cycle.
That is, it is possible to have that zero crossing between samples -- but the sampling process produces different values.
Let's look at it a different way: blue samples = one sine wave cycle covering 33 samples; green samples = 2 cycles in 33 samples.
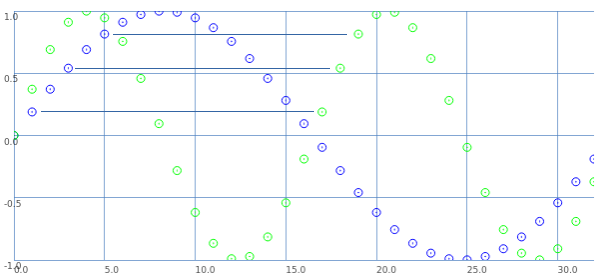
If we start counting samples at 0:
- Blue 0 = Green 0.
- Blue 2 = Green 1.
- Blue 4 = Green 2. etc.
That is: read through the blue samples at double speed, and you get the 16.5 wavelength. (This is exactly what David said.)
What about the second cycle starting at 16.5?
- Blue 1 = Green 17.
- Blue 3 = Green 18. etc.
These are the sample values that were skipped the first time.
So, Green 17 (the first concrete sample value after the second cycle begins) is the value in between Green 0 and Green 1. Green 18 is in between Green 1 and Green 2.
This is interpolation.
Interpolation is the mathematically correct way to represent fractional cycles in a sampled signal.
You can try to say that this "isn't the real problem," but... this is the problem, and interpolation is the solution.
hjh
posted in technical issues
[writesf~] problem
Hi
It is not easy for me to explain why I need maximum precision, either because of the complexity that would be explained to me and because my English is not entirely good. Although if I can try to explain a simple example (although it is far from the real purpose)
Suppose I have 2 audio samples. The first sample lasts exactly 1000ms (44100 samples) and I loop it every 1000ms.
If I had another exactly 125ms sample and looped it back at its exact time (125ms) alongside the first 1000ms sample, the beat would be perfectly in sync since it's the exact eighth part of 1000.
On the other hand, if I can only get a sample of 5512 samples (124.988..ms) and I loop it along with the 1000ms sample, as time progresses and the 124.988 sample is repeated more times ... ms, the desynchronization of time will increase ... (rhythm)
I know you can tell me that I can solve the "desynchronization" by repeating the sample every exact 125ms, but I have already said that this is just a simple example to try to explain and does not address the real problem.
As I have understood from your explanations, that sometimes it will be impossible for me to record samples to the exact duration that you want, but I can reproduce them within Pd exactly with the desired duration using the examples that you have given me. What invites me to think about the idea of not using any other means than Pd to get closer to my purpose, even if it takes more time and effort at first; But it is what I will do ..
Thank you
A greeting!!
 posted in technical issues
PD's scheduler, timing, control-rate, audio-rate, block-size, (sub)sample accuracy,
@lacuna The whole patch is recompiled within Pd and I think that although the data flow model is fantastic it makes it harder to understand the workings.
The blocks (of audio) are read, or generated, and all of the stuff that the patch needs to do to the block is done all at once to every sample in the block, and then the block is sent onwards.
So if you put [x~ 2] >> [/~ 2] then nothing is done..... the code that Pd is running has done the math and the result is "multiply sample values by one".......... so "do nothing". A complex patch will have been boiled down to "subtract x from sample1" "add y to sample2" etc...... up to sample 64, rinse, calculate the next set of additions and subtractions to apply, and do it to the next block.
Those operations..... add to sample value... or subtract from sample value.... are the only possible operations on a sample value.......
Interpolation uses adjacent sample values for the calculation, but adding or subtracting to / from the sample values is what happens when the calculations have been done.
Some objects like [x~] can be controlled by a control signal, and so the new value can only be applied at block boundaries as the control calculations are done between boundaries. The addition will be the same for every sample in the block. Pd didn't know in advance what it's next value might be, so a ramp cannot be applied across the samples in this block.
Some objects though, like [vline~] are scheduling changes of value that will happen across the block, and future blocks, and may finish at sample 43 within a block. Programmatically it is saying, as part of the whole patch "add a bit to sample 1 (if it has a +ve value or subtract if -ve)) and a bit more to sample 2 etc..... etc... and then for the next block, when the audio program runs again add even more to the 1st sample etc..... until.
So it is sample accurate.
And of course if [x~] is controlled by [vline~] it will do as it is told and be sample accurate too.
You can add a start delay to [vline~] so that it's start point is sample accurate too.
 posted in technical issues
abl_link~ midi and audio sync setup
Hi Folks,
I thought I’d share this patch in the hopes that someone might be able to help improve upon it. I am by no means even semi competent with PD and jumped into this task without actually bothering to learn the basics of PD or RPi, but nevertheless here we are: maybe you can share a better implementation.
Mods/experienced folks, if I am sharing irrelevant/wrong/confusing info, mea culpa and please correct me.
I wanted to make a patch for PD in Raspberry Pi that would do 3 things:
- Get the abl_link~ temp data over wifi
- Create a midi clock output using a 5-pin midi adapter (I have one of the cheapo usb-to-midi cable things here)
-simultaneously create an audio pulse ‘clock’ output such as those used by volcas, Teenage Engineering Pocket operators, and the like (I am not sure if such an audio signal over a 3.5mm jack would be hot enough to be considered a CV pulse too, maybe you can help clear that up?)
As I say, after much struggles I have globbed something together that sort of does this.
A couple of things for newcomers like myself:
The abl_link~ object in the patch isn’t initially part of the standard pure data install as I write. I was able to use deken (ie the code that powers the ‘help/find externals’ bit of PD) to look for abl_link~. Search for it. At the time of writing there is a version for Arm7 devices like the Raspberry Pi 3 which was put together by the illustrious mzero with code from antlr. Go ahead and install the abl_link~ object. (Possibly you may have to uncheck the ‘hide foreign architectures’ box to get the arm7 version to show up. This is usually a safeguard to stop users from trying to install versions of externals that won’t work on their systems. So long as you see ‘arm7’ in the description it should hopefully be the one you want) PD will ask where you want to store the external, and I would just leave it at the default unless you have a special reason to do otherwise.
To get the patch to hook up to your preferred audio and midi outputs by default you may have to take certain steps. In my version of it I have deemed the built in audio and my cheapo USB midi output to be good enough for this task.
[As part of my troubleshooting process I ended up installing amidiauto which is linked to here: https://community.blokas.io/t/script-for-launching-pd-patch-with-midi-without-aconnect/1010/2
I undertook several installations in support of amidiauto which may be helping my system to see and link up my USB midi and PD, but nothing worked until I took the step in the following paragraph about startup flags in PD. (It may also be that I did not need to put in amidiauto at all. Maybe I’ll try that on another card to see if it simplifies the process. I’m saying you might want to try it without amidiauto first to see).]
Midi: - (ALSA is the onboard audio and midi solution that is part of Raspbian). To have PD use ALSA midi at the start I made the following setting in the preferences/startup dialog - within that window there is a section (initially blank) for startup flags. Here you can set instructions for PD to take note of when it starts up. I put in -alsamidi to tell it that alsamidi will be my preferred midi output. (I also took the step of going to file/preferences/midi settings, then ‘apply’ and ‘ok’ to confirm the Alsa midi ports that showed up. Then I went back to file/preferences/save all preferences. This seems to have (fingers crossed) saved the connection to my USB midi output.
Audio: I used the terminal and sudo raspi-config to set my audio out to the internal sound card (advanced options/audio/3.5mm jack). Since I had a fairly unused installation of PD I’d never asked it to do anything but work with the system defaults so getting audio out was fairly simple.
[nb I initially stuck this patch together on my Mac where everything worked pretty trouble free in terms of audio and midi selection]
About the patch. Obviously it is sort of horrible but there it is. It is a combination of stuff I cribbed from the demo example of abl_link~ in the example, and two example patches created by users NoDSP and jpg in this forum post https://forum.pdpatchrepo.info/topic/9545/generate-midi-clock-messages-from-pd/2
As well as some basic synthesis to make the bip bip noises I learned from LWMs youtube channel
https://www.youtube.com/channel/UCw5MbnaoDDuRPFsqaQpU9ig
Any and all errors and bad practice are mine alone.
The patch has some comments in it that doubtless expose my own lack of understanding more than anything. Undoubtedly many users can do a better job than I can.
Some observations on limitations/screwups of the patch:
-
If you disconnect from the stream for a bit, it will attempt to catch up. There will be a massive flurry of notes and/or audio bips as it plays all the intervening notes.
-
It doesn’t seem to be too fussy about where in the bar it is getting started (It will be "on" the beat but sometimes the ‘1’will be the ‘2’ etc. This is okay if I’m using internal sequencers from scratch (in the volca, say) but not if there is an existing pattern that I am trying to have come in 'on the 1'.
-
My solution to more detailed subdivision of bars was to make a big old list of numbers up to 32 so that abl_link~ can count up to more than 4. There’s probably a better solution for this. If you find that you need even more subdivisions because you are making some sort of inhumanly manic speed gabba, add even yet more numbers and connections.
I haven’t tested this much. And since it’s taken me the better part of 18 months to do this at all, I’m really not your guy to make it work any better. I’m posting here so that wiser souls can do a better job and maybe share what I think has the potential to be a useful midi sync tool.
I plan to revisit https://community.blokas.io/t/script-for-launching-pd-patch-with-midi-without-aconnect/1010/3
for some pointers on setting this up to launch the patch at startup to give me a small, portable midi Link sync device for 5-pin and audio-pulse clocked devices.
This is my first ever bit of quasi productive input to any technical community (mostly I just hang around asking dumb questions… So be kind and please use your giant brains to make it better) I look forward to spending some time learning the basics now. ") link-sync.pd
link-sync.pd
 posted in patch~
Possible audio file playback methods
@Transcend Ahh..... that is where the confusion arises. What is being read is individual samples.... at 44100Hz sample rate there are 44100 every second. The pitch is heard because of the rate at which they rise and fall in value.
In Pd a sine wave at 100 Hz would have a sample value of zero (maybe, it depends at what time the wave starts) at index 0, and then rising sample values to a value of 1 at sample number 110 (more or less) falling back to a sample value of 0 at sample 220, continuing to fall to -1 at sample 330 and then rising back to a value of zero at sample number 441....... etc. etc.
When those values are read by [tabread4~] the output would....... eventually, once it gets to your speakers..... push and pull the speaker smoothly 100 times a second, and be heard as 100Hz. Depending on the bit-depth of the dac the actual sample values later in the chain will be much larger, but Pd max/min values are +1/-1 at the output to the [dac~]. Your soundcard and Pd take care of that automatically.
If there is another sound, say at 1KHz., that would modulate that 100Hz wave..... it would look like a ripple on the 100Hz wave........ and so on. A music track will look a real mess when you look at it, with only loud / quiet parts really recognisable. But our ears, or more especially our brains, can make total sense of it.
Samplerate (audio) objects are used to set the indexes because they send a value at the samplerate...... so 44100 times a second...... so every single index is sent to [tabread4~]
Digital audio (FFT) is fiendishly complicated to understand, but this gets you quite a long way into it in only a few minutes........ https://medium.com/@djtech42/explanation-of-sample-rate-in-digital-audio-and-breakdown-of-misconceptions-38f912fb3b1f
Actually it gets you a very long way toward a good understanding in just a few minutes.......
David.
posted in Off topic
Little help with pitshifter.
oh shoot! okay. I use a vline~ to feed tabread4~ so the method is a little different
The mtof part is designed to calculate a ratio - so if you input a zero into the left part, the result is one. If you input something like -5, it will give you a value that is less than one. You can multiply that value by the length of the sample in ms to get how long the sample would play back if you wanted it to play at 5 semitones above(?) the base pitch of the sample. You have to choose a midi note to start at. Above that note, the sample will play faster, below that note the sample will play slower. I think I calculate this value by taking the base note and subtracting from that the note from the midi keyboard.
You want to use the tabread4~ method from the (3.7.1.1.) example, but instead of feeding it with a phasor~, try feeding it with a vline~. Then you can calculate the length in samples of your sample. That's the left output of soundfiler. Dividing length in samples by the samplerate~ gives you the lenght of the sample in seconds. Multiply that by 1000 and you have the the length in milliseconds. vline~ takes input in milliseconds. Send it a message to ramp from 0 to the number of samples in your sample in the number of milliseconds you just calculated. If you want to repitch it, also multiply by the midi ratio from above.
If you want to use phasor~ instead, you're setting frequency in Hz. So instead of multiplying the sample length by 1000, you might want to multiply it by the ratio and then get the reciprocal of it with this:

Then feed that to the phasor~
Are you going to use phasor~ in your design? I could double check that there's not a better transposing method with phasor.
Actually, it might be way easier with phasor, You could convert your current input to phasor to midi with ftom, then add transposition in semitones and then convert back to a frequency...
 posted in abstract~