Help with audio patch on off based on some condition
@jameslo said:
I really wish Pd was at least this regular--it would've been much easier for me to learn. [timer] is a counter example.
AFAICS [timer] does not break the rule about one input to a hot inlet producing one output.
It does put the hot inlet on the right -- agreed that this is a strange decision. Probably the only reason for that is that it's very common to request a value from the timer and immediately reset it. If the hot inlet were on the left, you would have to cross the wires coming out of the preceding [t b b]. So it's a bit prettier at the expense of regularity (kind of like irregular verbs).
But I didn't say anything about the position of the hot inlet -- only that the hot inlet, wherever it is, produces one output for one input. Admittedly I haven't been around Pd as long as some members here, but the only exceptions I'm aware of are [spigot] (where the user can explicitly disable output), and method calls sent to hot inlets (which may not produce output, e.g. set xxx).
hjh
 posted in technical issues
No sound. Failed install?
HI,
a newbie, I am trying to install and use Pd 0.53.0 on a Fedora 35 machine.
I think I installed (from source) fine, but I do not get any sound.
I am not sure what I am supposed to check and do.
Some info on my install below.
Thanks for your help.
Below, I doubt line audio APIs: PortAudio ALSA OSS is how it should be, but I am not sure how to fix.
pd 0.53.0 is now configured
Platform:             Linux
Debug build:          no
Universal build:      no
Localizations:        yes
Source directory:     .
Installation prefix:  /usr/local

Compiler:             gcc
CPPFLAGS:             -DNDEBUG
CFLAGS:               -ffast-math -fno-finite-math-only -funroll-loops -fomit-frame-pointer -O3  -g -O2
LDFLAGS:
INCLUDES:
LIBS:                 -lpthread -ldl

External extension:   pd_linux
External CFLAGS:      -fPIC
External LDFLAGS:     -Wl,--export-dynamic -fPIC

fftw:                 no
wish(tcl/tk):         wish
audio APIs:           PortAudio ALSA OSS
midi APIs:            ALSA OSS
libpd:                no
$ ./pd -listdev
audio input devices:
0. USB Device 0x46d:0x825 (hardware)
1. USB Device 0x46d:0x825 (plug-in)
2. HDA Intel PCH (hardware)
3. HDA Intel PCH (plug-in)
4. HDA NVidia (hardware)
5. HDA NVidia (plug-in)
6. Trust PC Headset (hardware)
7. Trust PC Headset (plug-in)
audio output devices:
0. USB Device 0x46d:0x825 (hardware)
1. USB Device 0x46d:0x825 (plug-in)
2. HDA Intel PCH (hardware)
3. HDA Intel PCH (plug-in)
4. HDA NVidia (hardware)
5. HDA NVidia (plug-in)
6. Trust PC Headset (hardware)
7. Trust PC Headset (plug-in)
API number 1

MIDI input devices:
1. ALSA MIDI device #1
MIDI output devices:
1. ALSA MIDI device #1
priority 94 scheduling failed.```
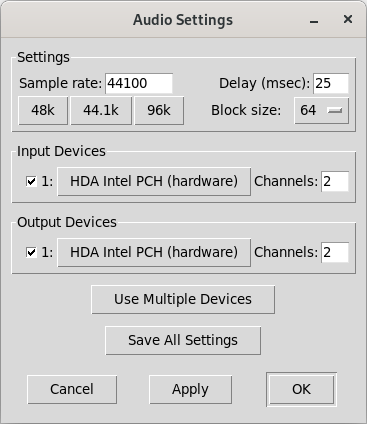
If I try to set to something different from HDA Intel, I get
ALSA input error (snd_pcm_open): Device or resource busy
ALSA output error (snd_pcm_open): No such file or directory
`
 posted in technical issues
Arduino->Pd with Open Sound Control
@jameslo Thanks a lot!
I can send messages locally between Pd, Processing and Unity. But not Arduino.
oscProcessing.pd
oscUnity.pd
oscP5sendReceive.pde
These works but I can still not for example replace Processing with Arduino.
@jameslo said in [Arduino->Pd with Open Sound Control] do you need bidirectional messaging? What data are you passing (if any)? What Arduino library would you prefer to use (I see there are more now than when I started)? is it over WiFi or ethernet or something else?
-bidirectional is good. Type of data, analog float, and digital. I have no preference for what library I use. I just want to make it work locally on a single computer.
I would like to use the Arduino as a controller for Pd through OSC.
For example, 5 analog ins on the Arduino that I after som treatment (smoothing and more) send locally to Pd, with custom osc addresses: /myArduino/analog-0
 posted in I/O hardware diy
Having lots of switches into Pd
Here is the working Arduino code, (which is basically a straight copy from "project 8", but I wrote it while reading the tutorial)
// setup for 6 analog in och 12 digital in (pullup to be added).
//intended as experimental template. use pd patch
//made with tutorial Arduino for Pd'ers, project 8

byte myArray[25];

void setup()
{
  for(int i = 2; i < 14; i++)
  pinMode(i, INPUT);
  Serial.begin(9600);
}

void loop()
{
  myArray[0] = 0xc0;
  int index = 1;

  for(int i = 0; i < 6; i++){
    unsigned int knob = analogRead (i);
    myArray[index++] = knob & 0x007f;
    myArray[index++] = knob >> 7;
  }
  for(int i = 2; i < 14; i++)
  myArray[index++] = digitalRead(i);

  Serial.write(myArray, 25);
}
Then I tried to incorporate project 1 (blink):
// set a variable to hold the ledddddddz pin number
int led = 13;

void setup()
{
//  st pin 13 as output, to light up the LED
// whenever it is told so from Pd
pinMode(led, OUTPUT);
// start the serial communication o the Arduino
// and Pd can communicate with each other
Serial.begin(9600);
}

void loop()
{
 while(Serial.available()){
  byte ledState = Serial.read() - '0';
  digitalWrite(led, ledState);
 }
}
but when I tried to edit "blink" to work with several outputs and merge this in the project 8 code, I decided that I do not have enough understanding of the arduino code to pull it through. What is needed is, I think, another "for()" combined with digitalWrite() inside void loop()
Note: My plan now is to (still) use several Arduinos but with your code and abstractions (instead of the Pdunio). I will wait with the matrix switch setup since I have to take this in steps in order to have control of it.
This means that I am up and running, unless I want to use digital input and output from the same Arduino at the same time. I figure it would be great to have that sorted out beforehand so it works when I need it.
Thanks a lot.
posted in I/O hardware diy
[SOLVED]video still remains after disconnecting [ofelia d] script
I've modified some abstractions created by @60hz for prototyping fast with ofelia (BTW, thanks a million for your abstractions they're great! And of course a million thanks to @cuinjune for creating Ofelia!). Things seem to work OK, but there's this happening. I have the following patch (I've changed the names from [gl.draw] to [ofelia.draw] for this and other abstractions)
[ofelia.draw]
|
[ofelia.cube]
and I see a white cube in the Ofelia window. Then I make the following connections:
[ofelia.draw]
|
[ofelia.movie]
|
[ofelia.cube]
and I get a video playing in the same cube. Till now everything is fine. But if I go back to the first patch, I don't get a white cube anymore but a still from the video file from [ofelia.movie]. Here are the scripts of the abstractions (almost identical to @60hz abstractions):
[ofelia.draw] (I'm returning ofColor because I want to have all abstractions output pointers and not bangs, maybe there's a better solution for this):
ofelia d draw$0;
local c = ofCanvas(this);
local args = c:getArgs();
local depth = true;
local screenwidth;
local screenheigh;
local widthHeigh;
;
function M.new();
  if args[2] == nil then depth = true;
  else;
  M.depth(args[2]);
  end;
  if ofWindow.exists then;
  screenwidth = ofGetWidth();
  screenheight = ofGetHeight();
  end;
end;
;
function M.screensize(list);
  screenwidth, screenheight = list[1], list[2];
end;
;
function M.depth(string);
  if string == "3d" then;
  depth = true;
  else;
  depth = false;
  end;
end;
function M.bang();
  ofSetDepthTest(depth);
  ofTranslate(screenwidth*0.5, screenheight*0.5);
  return ofColor(255, 255, 255);
end;
[ofelia.movie]:
ofelia d -c17 videoplayer-$0;
local canvas = ofCanvas(this);
local args = canvas:getArgs();
local videoplayer = ofVideoPlayer();
local filename, start, loop = args[1], args[2], args[3];
local loaded = 0;
;
function M.new();
  ofWindow.addListener("setup", this);
  if args[1] == nil then print("No file found");
  else M.open(filename);
  end;
  if args[2] == 1 then M.play();
  end;
  if args[3] == nil then loop = 0;
  end;
end;
;
function M.free();
  ofWindow.removeListener("setup", this);
end;
;
function M.setup();
  M.open(filename);
end;
;
function M.open(string);
  if ofWindow.exists then;
    videoplayer:close();
    videoplayer:load(string);
    if (videoplayer:isLoaded()) then;
    print("loaded " .. string);
    videoplayer:update();
    end;
  end;
end;
function M.url(string);
  if ofWindow.exists then;
    videoplayer:close();
    videoplayer:load(string);
    if (videoplayer:isLoaded()) then;
      print("loaded " .. string);
      videoplayer:update();
    end;
  end;
end;
function M.play() videoplayer:play() end;
function M.stop() videoplayer:stop() end;
function M.pause() videoplayer:setPaused(true) end;
function M.speed(float) videoplayer:setSpeed(float) end;
function M.frame(float) videoplayer:setFrame(float) end;
function M.volume(float) videoplayer:setVolume(float) end;
function M.loop(float);
  if float == 0 then videoplayer:setLoopState(OF_LOOP_NONE);
  elseif float == 1 then videoplayer:setLoopState(OF_LOOP_NORMAL);
  elseif float == 2 then videoplayer:setLoopState(OF_LOOP_PALINDROME);
  end;
end;
function M.get()
  return ofTable (videoplayer, videoplayer:isLoaded(), videoplayer:isPlaying(), videoplayer:getCurrentFrame(), videoplayer:getTotalNumFrames(), videoplayer:getWidth(), videoplayer:getHeight());
end;
;
function M.pointer(p);
  videoplayer:update();
  videoplayer:bind();
  return videoplayer;
end;
function M.bang();
  videoplayer:update();
  videoplayer:bind();
  return videoplayer;
end;
Inside [ofelia.movie] there's this patch:
[ofelia d movie_script] <- this is the ofelia object that loads the script above
|
[t a a]
|    |
|    [outlet]
|
[ofelia d videoplayer_unbind;] <- this is one object
[function M.pointer(p);      ]
[p:unbind;                   ]
[end;                        ]
and this is [ofelia.cube]:
ofelia d $0-box;
local c = ofCanvas(this);
local args = c:getArgs();
local width, height, depth, resw, resh, resd, drawmode, strokeweight = args[1], args[2], args[3], args[4], args[5], args[6], args[7], args[8];
local position, orientation, scale = ofVec3f(0, 0, 0), ofVec3f(0, 0, 0), ofVec3f(1, 1, 1);
;
function M.new();
  ofWindow.addListener("setup", this);
  if args[1] == nil then width = 100 end;
  if args[2] == nil then height = 100 end;
  if args[3] == nil then depth = 100 end;
  if args[4] == nil then resw = 5 end;
  if args[5] == nil then resh = 5 end;
  if args[6] == nil then resd = 5 end;
  if args[7] == nil then drawmode = "fill" end;
  if args[8] == nil then strokeweight = 1 end;
  M.setup();
end;
;
function M.free();
  ofWindow.removeListener("setup", this)
end;
;
function M.setup();
  box$0 = ofBoxPrimitive();
end;
;
function M.resw(float) resw = float end;
function M.resh(float) resh = float end;
function M.resd(float) resd = float end;
function M.width(float) width = float end;
function M.height(float) height = float end;
function M.depth(float) depth = float end;
function M.draw(string) drawmode = string end;
function M.stroke(float) strokeweight = float end;
function M.position(list) position = ofVec3f(list[1], list[2], list[3]) end;
function M.orientation(list) orientation = ofVec3f(list[1], list[2], list[3]) end;
function M.scale(list) scale = ofVec3f(list[1], list[2], list[3]) end;
;
function M.pointer(p);
  ofSetLineWidth(strokeweight);
  box$0:setPosition (position:vec3());
  box$0:setOrientation (orientation:vec3());
  box$0:setScale (scale:vec3());
  box$0:set(width, height, depth, math.abs(resw), math.abs(resh), math.abs(resd));
  if drawmode == "fill" then box$0:drawFaces() end;
  if drawmode == "point" then box$0:drawVertices() end;
  if drawmode == "line" then box$0:drawWireframe() end;
  return p;
end;
function M.bang();
  ofSetLineWidth(strokeweight);
  box$0:setPosition (position:vec3());
  box$0:setOrientation (orientation:vec3());
  box$0:setScale (scale:vec3());
  box$0:set(width, height, depth, math.abs(resw), math.abs(resh), math.abs(resd));
  if drawmode == "fill" then box$0:drawFaces() end;
  if drawmode == "point" then box$0:drawVertices() end;
  if drawmode == "line" then box$0:drawWireframe() end;
  return anything;
end;
This is a bit too much information but I think it's necessary if anyone can help. There's probably stuff I'm ignorant of. @cuinjune any hints?
 posted in pixel#
64 bit alternative to [hid]?
@CalBassist If you are using osx or Linux you could try compiling hid from source, although there might be api and memory issues that could be difficult to resolve. At least a quick try will be easy.
For windows.... not so easy. In fact it didn't work in windows as a 32-bit external.
HID Source..... https://github.com/avilleret/hid
or it is in the complete source tarball for extended here.... http://puredata.info/downloads/pd-extended in pd/extra/hid
Or try a different approach......
https://forum.pdpatchrepo.info/topic/11674/hid-mousestate-in-pd-vanilla
David
 posted in technical issues
pduino for Vanilla or how to control arduino outputs from PD
[arduino] is the Pduino abstraction that communicates with Arduino via Firmata, and I think it's vanilla. Any way, if all you want is to control Arduino pins from Pd, you just need to send the correct bytes to Arduino through [comport].
I've written a tutorial on the communication between Pd and Arduino which you can find here, under "Tutorials", it's called "Arduino for Pd'ers".
After I wrote the tutorial I also wrote some abstractions to facilitate this communication, which are not used in the tutorial. You can get them here. Though, these are meant to receive data from the Arduino, not send. Sending data is covered in the tutorial.
posted in technical issues
error: maximum object loading depth 1000 reached
Hi
I am struggling to get [hid] external installed and running on Purr Data. I downloaded and unzipped this, https://puredata.info/downloads/hid/?searchterm=hid and placed the folder (renamed to hid) inside /Plugins, and the console says:
libdir_loader: added 'hid' to the canvas-local objectclass path
error: maximum object loading depth 1000 reached
Wth? Is it safe to delete an unused/unwanted external, to see if I can FINALLY get [hid] working?
Thanks
Brendan
 posted in technical issues
Build a MIDI controller with the Arduino, Firmata and Pure Data
Time to start contributing some knowledge back to the wonderful world that is the internet; today, a step by step nice and easy tutorial on getting started to building your own MIDI controllers with the arduino.
When researching for my ableton controller project, I didn’t find much out there about using firmata on an arduino to send data to software. The standard approach just seemed to be create the code in the arduino language, upload it to your board and hack one of those MIDI to USB cables as a bodge job way of getting the MIDI out of the arduino.
So why firmata and pure data? Well the whole idea of firmata is that you flash it to your arduino, and it throws out serial about whats going on with the arduino inputs and outputs, then you decide how the software treats the readings coming in and going out.
Theory out the way, lets build some controllers. You’ll need a few things…
HARDWARE:
An arduino and something to wire into it (for this i’ll be using a pot)
A USB cable for your arduino
SOFTWARE:
Arduino – http://arduino.cc/en/Main/Software
Pure Data – http://puredata.info/downloads
Firmata – http://at.or.at/hans/pd/objects.html#pduino
Something to patch your new controller into; like Reason or Ableton Live
- SETTING UP FIRMATA AND PURE DATA
Install Pure Data and create a folder to store all your patches somewhere. Unzip Firmata and add the files ‘arduino.pd’, ‘arduino-test.pd’ and ‘arduino-help.pd’ to your new Pure Data folder. The ‘arduino.pd’ file is the object that we use in PD for opening up communication with your arduino and routing it to PD. Done? Awesome, your software is almost set up.
- FLASHING FIRMATA TO YOUR ARDUINO
Install the latest version of arduino and open it up. Connect your arduino with the USB cable to your laptop (i’m using a macbook for this by the way). In the example patches, open up “Standard Firmata”, select your board (im using an arduino mega), and your serial port (look for tty.usbserial for use with a USB cable). Then compile and hit the upload button and your arduino is now ready to use firmata and communicate with Pure Data!
- WIRING UP A POT

Potentiometers are cool, and theres a great arduino tutorial of how to wire one up here: http://www.arduino.cc/en/Tutorial/Potentiometer
Basically, all you need to know is that there are three pins; your two outer pins govern voltage flow across the pot, meaning one has to be 5V and the other has to be ground. It doesn’t matter which, but your 5v pin is going to be where your pot reads maximum, so convention dictates this should be the right hand pin. The center pin needs to be connected to an analog in on the arduino and will read the value of the pot as it sweeps from ground (0v) to 5v.
All wired up? Plug it into your laptop and open Pure Data, we’re ready to get things talking.
- SETTING UP OUR PATCH
Open the example “arduino-test.pd” Pure Data patch you copied over earlier. It should look like this one…

The test patch has everything we need to open a connection and enable pins. Firstly, lets delete a bunch of stuff and make our window a bit bigger. Hit Command + E to enter edit mode in Pure Data.

Ok a quick explaination; the key component here is the ‘arduino’ object. This is being drawn from the file you copied in earlier, and is what communicated with your arduino. Here we can do everything to control the arduino from opening a connection, to receiving data.
The large grid allows us to set the mode of each pin on the arduino. Remember pins 0 and 1 are reserved for Rx and Tx. I’m using analog pin 4 for this demo, so I’ve set my pin mode for pin 4 to ‘analog’.
Now we can plug our arduino in and get a reading from the potentiometer.
- ARDUINO INTO PURE DATA
With your arduino plugged in, hit command and E to bring us out of edit mode. In our patch, click on ‘Devices’ above the arduino object and open up the pure data terminal. (That other thing that loads with PD that has all the scary code in)

The “Devices” message connected to the arduino object pings your computer to find what devices are connected and on what serial ports. Since we’re using a USB cable to connect our arduino, we’re looking for something with ‘usbserial’ in it, in this case; port 2.
Select the relevent port in the green box at the top (remember the first box is ‘0’, second is ‘1’ and so forth) and hit ‘Open’ to establish a connection. Check the terminal to see if the connection was sucessful.

Now lets check we’re getting something in. Create a number box (Command + 3) and connect it to the relevent pin on the ‘Route analog’ box at the bottom. In this case, pin 4.
One more thing; if you’re not getting any readings in, you’ll need to click on ‘pd old analog/digital controls’ and enable your pins here too. What I tend to do in my patches is just not include the large grid but make my own ‘old pd’ controls custom to what i’m enabling/disabling to save space.
Here’s what the ‘old analog/digital controls’ subpatch looks like (pin 4 enabled)…

Come out of edit mode and check that you’ve got readings. If so congratulations! If not, troubleshoot, start with making sure your usb connection is opened, make sure all the correct pins are enabled (remember you’re counting from 0 not 1 on most of these buttons in PD, it’s just the way computers work).
- SCALING READINGS TO MIDI
So we’ve got a reading and chances are it’s to 3 decimal places between 0 to 1. No problem, create a new object (Command + 1) and type “autoscale 0 127”. This allows us to scale the input to a min and max value, in this case 0 to 127 of MIDI. Next, lets get things looking nice, create a new object and type “knob”. Connect this AFTER the autoscale object. (the knob is default set to read inputs from 0 to 127. Then create another number to display the scaled MIDI data coming out, and finally a new object and type “ctlout 1”.
It should look something like this…

The second box should be outputing values from 0 – 127 now, and the knob giving a visual representation of your potentiometer.
Now lets patch it into ableton…
- PURE DATA TO ABLETON LIVE
Firstly, you’ll need to set up your macs IAC driver if you’ve not done this. Basically you’ll need to go into Audio/MIDI preferences and enable your IAC driver. Then create a new input and output. One for input to DAW and one for output from DAW. Google around for a tutorial on this, its really simple, a 30 second job.
After you’ve set up your IAC driver, go back to PD and go to preferences > MIDI Settings, and connect your IAC driver.

Open ableton and go to its MIDI preferences. Create a device listing for your IAC driver and enable its ins and outs into ableton like so…


And thats it! Create an instrument and try to assign something! I’ve got it controlling the brightness of a bass sound here.
Shout out for Facu who requested this tutorial. Hopefully it’ll help some of you looking to get into this stuff and start building things but with no idea where to start.
 posted in tutorials
Ubuntu - Browsers and Puredata wont share audio output device. [SOLVED]
I found this solution and it worked ")
@sdaau_ml said:
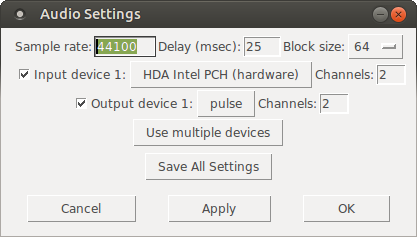
Sorry to necro this thread, but I finally found out how to run PureData under Pulseaudio (which otherwise results with "ALSA output error (snd_pcm_open): Device or resource busy").
First of all, run:
pd -alsa -listdevPD will start, and in the message window you'll see:
audio input devices:
1. HDA Intel PCH (hardware)
2. HDA Intel PCH (plug-in)
audio output devices:
1. HDA Intel PCH (hardware)
2. HDA Intel PCH (plug-in)
API number 1

no midi input devices found
no midi output devices found
... or something similar.
Now, let's add the
pulseALSA device, and run-listdevagain:pd -alsa -alsaadd pulse -listdevThe output is now:
audio input devices:
1. HDA Intel PCH (hardware)
2. HDA Intel PCH (plug-in)
3. pulse
audio output devices:
1. HDA Intel PCH (hardware)
2. HDA Intel PCH (plug-in)
3. pulse
API number 1

no midi input devices found
no midi output devices found
Notice, how from the original two ALSA devices, now we got three - where the third one is
pulse!Now, the only thing we want to do, is that at startup (so, via the command line), we set
pdto run in ALSA mode, we add thepulseALSA device, and then we choose the third (3) device (which is to say,pulse) as the audio output device - and the command line argument for that inpdis-audiooutdev:pd -alsa -alsaadd pulse -audiooutdev 3 ~/Desktop/mypatch.pdYup, now when you enable DSP, the patch
mypatch.pdshould play through Pulseaudio, which means it will play (and mix) with other applications that may be playing sound at the time! You can confirm that the correct output device has been selected from the command line, if you open Media/Audio Settings... oncepdstarts:
As the screenshot shows, now "Output device 1" is set to "pulse", which is what we needed.
Hope this helps someone!
EDIT: I had also done changes to
/etc/pulse/default.paas per https://wiki.archlinux.org/index.php/PulseAudio#ALSA.2Fdmix_without_grabbing_hardware_device beforehand, not sure whether that makes a difference or not (in any case, trying to adddmixas a PD device and playing through it, doesn't work on my Ubuntu 14.04)
 posted in technical issues