[gme~] / [gmes~] - Game Music Emu
Allows you to play various game music formats, including:
AY - ZX Spectrum/Amstrad CPC
GBS - Nintendo Game Boy
GYM - Sega Genesis/Mega Drive
HES - NEC TurboGrafx-16/PC Engine
KSS - MSX Home Computer/other Z80 systems (doesn't support FM sound)
NSF/NSFE - Nintendo NES/Famicom (with VRC 6, Namco 106, and FME-7 sound)
SAP - Atari systems using POKEY sound chip
SPC - Super Nintendo/Super Famicom
VGM/VGZ - Sega Master System/Mark III, Sega Genesis/Mega Drive,BBC Micro
The externals use the game-music-emu library, which can be found here: https://bitbucket.org/mpyne/game-music-emu/wiki/Home
[gme~] has 2 outlets for left and right audio channels, while [gmes~] is a multi-channel variant that has 16 outlets for 8 voices, times 2 for stereo.
[gmes~] only works for certain emulator types that have implemented a special class called Classic_Emu. These types include AY, GBS, HES, KSS, NSF, SAP, and sometimes VGM. You can try loading other formats into [gmes~] but most likely all you'll get is a very sped-up version of the song and the voices will not be separated into their individual channels. Under Linux, [gmes~] doesn't appear to work even for those file types.
Luckily, there's a workaround which involves creating multiple instances of [gme~] and dedicating each one to a specific voice/channel. I've included an example of how that works in the zip file.
Methods
- [ info ( - Post game and song info, and track number in the case of multi-track formats
- this currently does not include .rsn files, though I plan to make that possible in the future. Since .rsn is essentially a .rar file, you'll need to first extract the .spc's and open them individually.
- [ path ( - Post the file's full path
- [ read $1 ( - Reads the path of a file
- To get gme~ to play music, start by reading in a file, then send either a bang or a number indicating a specific track.
- [ goto $1 ( - Seeks to a time in the track in milliseconds
- Still very buggy. It works well for some formats and not so well for others. My guess is it has something to do with emulators that implement Classic_Emu.
- [ tempo $1 ( - Sets the tempo
- 0.5 is half speed, while 2 is double. It caps at 4, though I might eventually remove or increase the cap if it's safe to do so.
- [ track $1 ( - Sets the track without playing it
- sending a float to gme~ will cause that track number to start playing if a file has been loaded.
- [ mute $1 ... ( - Mutes the channels specified.
- can be either one value or a list of values.
- [ solo $1 ... ( - Mutes all channels except the ones specified.
- it toggles between solo and unmute-all if it's the same channel(s) being solo'd.
- [ mask ($1) ( - Sets the muting mask directly, or posts its current state if no argument is given.
- muting actually works by reading an integer and interpreting each bit as an on/off switch for a channel.
- -1 mutes all channels, 0 unmutes all channels, 5 would mute the 1st and 3nd channels since 5 in binary is 0101.
- [ stop ( - Stops playback.
- start playback again by sending a bang or "play" message, or a float value
- [ play | bang ( - Starts playback or pauses/unpauses when playback has already started, or restarts playback if it has been stopped.
- "play" is just an alias for bang in the event that it needs to be interpreted as its own unique message.
Creation args
Both externals optionally take a list of numbers, indicating the channels that should be played, while the rest get muted. If there are no creation arguments, all channels will play normally.
Note: included in the zip are libgme.* files. These files, depending on which OS you're running, might need to accompany the externals. In the case of Windows, libgme.dll almost definitely needs to accompany gme(s)~.dll
Also, gme can read m3u's, but not directly. When you read a file like .nsf, gme will look for a file that has the exact same name but with the extension m3u, then use that file to determine track names and in which order the tracks are to be played.
 posted in extra~
netsend
@youaresound This seems to happen because no format is given. If you give the "format si" for the message "alive 9" you get the same result as with packOSC. "format si" means the message contains one string (s) and one integer (i).
 posted in technical issues
netsend
if i use packOSC to format the messages netsend works
messages
|
[packOSC]
|
[list prepend set]
|
[list trim]
|
[netsend -u -b]
but not using oscformat
although adding list did take care of the error messages.
i am sending messages to [packOSC] without creation arguments.
i have tried setting different arguments to [oscformat] by sending format messages to the object as described in the help files.
[format(
[format b(
[format fiiib(
[format ifisf( (this one causes pd to shutdown.)
from the printout it looks like the [format( argument is correct
but for some reason is not registering correctly
 posted in technical issues
Build a MIDI controller with the Arduino, Firmata and Pure Data
Time to start contributing some knowledge back to the wonderful world that is the internet; today, a step by step nice and easy tutorial on getting started to building your own MIDI controllers with the arduino.
When researching for my ableton controller project, I didn’t find much out there about using firmata on an arduino to send data to software. The standard approach just seemed to be create the code in the arduino language, upload it to your board and hack one of those MIDI to USB cables as a bodge job way of getting the MIDI out of the arduino.
So why firmata and pure data? Well the whole idea of firmata is that you flash it to your arduino, and it throws out serial about whats going on with the arduino inputs and outputs, then you decide how the software treats the readings coming in and going out.
Theory out the way, lets build some controllers. You’ll need a few things…
HARDWARE:
An arduino and something to wire into it (for this i’ll be using a pot)
A USB cable for your arduino
SOFTWARE:
Arduino – http://arduino.cc/en/Main/Software
Pure Data – http://puredata.info/downloads
Firmata – http://at.or.at/hans/pd/objects.html#pduino
Something to patch your new controller into; like Reason or Ableton Live
- SETTING UP FIRMATA AND PURE DATA
Install Pure Data and create a folder to store all your patches somewhere. Unzip Firmata and add the files ‘arduino.pd’, ‘arduino-test.pd’ and ‘arduino-help.pd’ to your new Pure Data folder. The ‘arduino.pd’ file is the object that we use in PD for opening up communication with your arduino and routing it to PD. Done? Awesome, your software is almost set up.
- FLASHING FIRMATA TO YOUR ARDUINO
Install the latest version of arduino and open it up. Connect your arduino with the USB cable to your laptop (i’m using a macbook for this by the way). In the example patches, open up “Standard Firmata”, select your board (im using an arduino mega), and your serial port (look for tty.usbserial for use with a USB cable). Then compile and hit the upload button and your arduino is now ready to use firmata and communicate with Pure Data!
- WIRING UP A POT

Potentiometers are cool, and theres a great arduino tutorial of how to wire one up here: http://www.arduino.cc/en/Tutorial/Potentiometer
Basically, all you need to know is that there are three pins; your two outer pins govern voltage flow across the pot, meaning one has to be 5V and the other has to be ground. It doesn’t matter which, but your 5v pin is going to be where your pot reads maximum, so convention dictates this should be the right hand pin. The center pin needs to be connected to an analog in on the arduino and will read the value of the pot as it sweeps from ground (0v) to 5v.
All wired up? Plug it into your laptop and open Pure Data, we’re ready to get things talking.
- SETTING UP OUR PATCH
Open the example “arduino-test.pd” Pure Data patch you copied over earlier. It should look like this one…

The test patch has everything we need to open a connection and enable pins. Firstly, lets delete a bunch of stuff and make our window a bit bigger. Hit Command + E to enter edit mode in Pure Data.

Ok a quick explaination; the key component here is the ‘arduino’ object. This is being drawn from the file you copied in earlier, and is what communicated with your arduino. Here we can do everything to control the arduino from opening a connection, to receiving data.
The large grid allows us to set the mode of each pin on the arduino. Remember pins 0 and 1 are reserved for Rx and Tx. I’m using analog pin 4 for this demo, so I’ve set my pin mode for pin 4 to ‘analog’.
Now we can plug our arduino in and get a reading from the potentiometer.
- ARDUINO INTO PURE DATA
With your arduino plugged in, hit command and E to bring us out of edit mode. In our patch, click on ‘Devices’ above the arduino object and open up the pure data terminal. (That other thing that loads with PD that has all the scary code in)

The “Devices” message connected to the arduino object pings your computer to find what devices are connected and on what serial ports. Since we’re using a USB cable to connect our arduino, we’re looking for something with ‘usbserial’ in it, in this case; port 2.
Select the relevent port in the green box at the top (remember the first box is ‘0’, second is ‘1’ and so forth) and hit ‘Open’ to establish a connection. Check the terminal to see if the connection was sucessful.

Now lets check we’re getting something in. Create a number box (Command + 3) and connect it to the relevent pin on the ‘Route analog’ box at the bottom. In this case, pin 4.
One more thing; if you’re not getting any readings in, you’ll need to click on ‘pd old analog/digital controls’ and enable your pins here too. What I tend to do in my patches is just not include the large grid but make my own ‘old pd’ controls custom to what i’m enabling/disabling to save space.
Here’s what the ‘old analog/digital controls’ subpatch looks like (pin 4 enabled)…

Come out of edit mode and check that you’ve got readings. If so congratulations! If not, troubleshoot, start with making sure your usb connection is opened, make sure all the correct pins are enabled (remember you’re counting from 0 not 1 on most of these buttons in PD, it’s just the way computers work).
- SCALING READINGS TO MIDI
So we’ve got a reading and chances are it’s to 3 decimal places between 0 to 1. No problem, create a new object (Command + 1) and type “autoscale 0 127”. This allows us to scale the input to a min and max value, in this case 0 to 127 of MIDI. Next, lets get things looking nice, create a new object and type “knob”. Connect this AFTER the autoscale object. (the knob is default set to read inputs from 0 to 127. Then create another number to display the scaled MIDI data coming out, and finally a new object and type “ctlout 1”.
It should look something like this…

The second box should be outputing values from 0 – 127 now, and the knob giving a visual representation of your potentiometer.
Now lets patch it into ableton…
- PURE DATA TO ABLETON LIVE
Firstly, you’ll need to set up your macs IAC driver if you’ve not done this. Basically you’ll need to go into Audio/MIDI preferences and enable your IAC driver. Then create a new input and output. One for input to DAW and one for output from DAW. Google around for a tutorial on this, its really simple, a 30 second job.
After you’ve set up your IAC driver, go back to PD and go to preferences > MIDI Settings, and connect your IAC driver.

Open ableton and go to its MIDI preferences. Create a device listing for your IAC driver and enable its ins and outs into ableton like so…


And thats it! Create an instrument and try to assign something! I’ve got it controlling the brightness of a bass sound here.
Shout out for Facu who requested this tutorial. Hopefully it’ll help some of you looking to get into this stuff and start building things but with no idea where to start.
 posted in tutorials
Issues uploading firmata for pduino
Hello all,
I'm working my way through the process for uploading firmata onto my arduino uno, using the Floss guide
(http://write.flossmanuals.net/pure-data/starting-pduino/)
I just downloaded the latest version of the arduino program from the arduino website, and then went through the process of deleting the old 'firmata' folder, and replacing it with the new one downloaded from: https://at.or.at/hans/pd/objects.html (running mac os 10.9,5).
However when I try and open the the arduino application, it comes up with an error that reads '"Arduino" is damaged and can't be opened. You should move it to the trash'."
I assume it has to be that specific Firmata in order to work with the Pduino objects? And is there any other way to upload it ? Or am I missing something obvious here?
I did think about rather than deleting the older firmata folder completely, just deleting the individual files and replacing them with those from the downloaded folder, but not sure if that's a good idea or not....
 posted in I/O hardware diy
Purr Data 2.3.3
thanks for your reply
here I copy the result of the terminal window after continuing with its indications:
PLUTIL(1) BSD General Commands Manual PLUTIL(1)
NAME
plutil -- property list utility
SYNOPSIS
plutil [command_option] [other_options] file
...
DESCRIPTION
plutil can be used to check the syntax of property list files, or convert
a plist file from one format to another. Specifying - as an input file
reads from stdin.
 The first argument indicates the operation to perform, one of:

 -help         Show the usage information for the command and exit.

 -p            Print the property list in a human-readable fashion. The
               output format is not stable and not designed for machine
               parsing. The purpose of this command is to be able to eas-
               ily read the contents of a plist file, no matter what for-
               mat it is in.

 -lint         Check the named property list files for syntax errors.
               This is the default command option if none is specified.

 -convert fmt  Convert the named file to the indicated format and write
               back to the file system.  If the file can't be loaded due
               to invalid syntax, the operation fails.

               fmt is one of:  xml1, for version 1 of the XML plist format
                               binary1, for version 1 of the binary plist
                               format json, for the JSON format
There are a few additional options:
 --            Specifies that all further arguments are file names

 -s            Don't print anything on success.

 -r            For JSON, add whitespace and indentation to make the output
               more human-readable.

 -o path       Specify an alternate path name for the result of the -con-
               vert operation; this option is only useful with a single
               file to be converted.  Specifying - as the path outputs to
               stdout.

 -e extension  Specify an alternate extension for converted files, and the
               output file names are otherwise the same.
DIAGNOSTICS
The plutil command exits 0 on success, and 1 on failure.
SEE ALSO
plist(5)
STANDARDS
The plutil command obeys no one's rules but its own.
HISTORY
The plutil command first appeared in Mac OS X 10.2.
Mac OS X August 30, 2002 Mac OS X
 posted in news
Merge Audio
It depends, if the sound itself is distorted perhaps the problem comes from the sample rate (or the bit depth...). If the space image is distorted, the problem must be the ambisonics format. Now, since Youtube chose this, the standard seems to be the ambiX format - SN3D (semi-normalization 3D) & ACN (ambisonic channel number). This is the format that is supposed to be used in the last version of the HOA library but I made a mistake. Lately, I published a patch to correct it, it's available on the download page, or here the direct link.
 posted in technical issues
Carriage return in messages from Pd to Arduino?
Hello. I'm working on an Arduino code and accompanying Pd patch, sending values from Pd to Arduino to control the PWM value sent to certain digital pins.
As of now, the code parses incoming strings in the format int,int and ends with a carriage return. This works just fine when sending the string from the Arduino software's own serial monitor, but I cannot seem to get it work when sending messages to the [comport] object. Right now I'm just using a single banged message box (ex. [3,80]) sent to [comport], so I suspect that I need to end the message with a carriage return in some format.
How would I go about doing this? I know \ is not allowed in Pd messages. What format does the Arduino understand in this situation? Ascii?
In the code below, I suppose I could change the string terminating character to something other than a carriage return, but I would be unsure of how to execute it properly.
I'm quite new to the Arduino platform, so if anything looks and sounds completely off, please do tell me.
void setup()
{
  Serial.begin(9600);

}

String command;

void loop()
{
 if (Serial.available() > 0)
 {
  char c = Serial.read();

  if(c == '\n')
  {
    parseCommand(command);
    command = "";
  }
  else
  {
    command += c;
  }
 }
}

void parseCommand(String com)
{
  String part1;
  String part2;

  //int SPACE int
  part1 = com.substring(0, com.indexOf(","));
  part2 = com.substring(com.indexOf(",") + 1);

  int pin = part1.toInt();
  int pwmval = part2.toInt();

  analogWrite(pin, pwmval);

}
Thank you.
 posted in I/O hardware diy
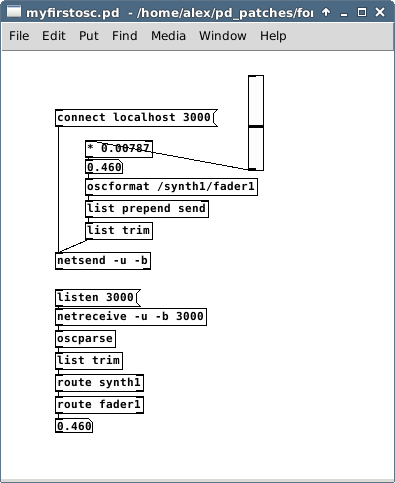
Parsing OSC format udp list - [SOLVED]
Youd patch used only a UDP connection, no OSC format in messages sent. Even though you typed an OSC-style address in a message, that's not an OSC format. OSC format is bytes that are not so human-readable. You need to incorporate the native OSC objects that come with vanilla, [oscformat] and [oscparse].
Here's a screenshot that does what you probably want (note that the OSC address in [oscformat] can omit the forward slashes, but since this is a standard OSC-style address, I kept them there):
 posted in technical issues
Writing to LCD using PD and Arduino
@alexandros Attached are the preset Arduino sketches for Firmata - my sketch is made using the one named 'SimpleAnalogFirmata'. Thanks ") Firmata.zip
Firmata.zip
 posted in technical issues