Installing PureData 32 bits on 64 bits host for the life of a project
Hi everyone,
I am comming to you today because i want to make a project live !.
This project work with pureData and some external pd object :
fluid~ , freeverb~..
My objectiv is to install a 32 bits version of pureData to make external pd work.
I tried these solutions :
Multi arch ubuntu 64 bits host
- On a 64 bits ubuntu
- add i386 arch
- update , dist-upgrade..
Then when installing : $> apt-get install puredata:i386
This package is no more available :
These packet a replacing it :
puredata-utils puredata-utils:i386 puredata-extra:i386 puredata-core:i386
puredata-core puredata-dev puredata-doc puredata-extra puredata-gui
So i installed
$> apt-get install puredata-utils:i386 puredata-extra:i386 puredata-core:i386 puredata-gui
pureData is now installed. But when i run it i have this message :
ALSA lib conf.c:3357:(snd_config_hooks_call) Cannot open shared library libasound_module_conf_pulse.so
ALSA lib control.c:954:(snd_ctl_open_noupdate) Invalid CTL hw:0
ALSA card scan error
Still i can use the debugger and hear sound..
When running my stido project using some object like :
udpReceive or udpSend...
i got this on the initialisation (you can see also all the pd objects used) :
import mrpeach/routeOSC
... couldn't create
 import mrpeach/udpreceive
... couldn't create
 import mrpeach/udpsend
... couldn't create
 import mrpeach/packOSC
... couldn't create
 import mrpeach/unpackOSC
... couldn't create
 import flatspace/prepend
... couldn't create
 import flatspace/prepend
... couldn't create
 import moocow/sprinkler
... couldn't create
 import cyclone/speedlim
... couldn't create
./libs/fluid~.pd_linux: libreadline.so.5: cannot open shared object file: No such file or directory
 fluid~
... couldn't create
 freeverb~
... couldn't create
beware! this is xeq 0.1, 3rd beta build... it may bite!
./
So its not working ^^
Solution 2 - Docker
I was thinking : maybe i can just make a puredata container with all the 32 bits libs, So i tried to find some puredata 32 bits image. But nothing.. And Docker is a little tricky with 32 bits container as he didn't provide any support yet.
Still its possible to run 32 bits linux on it .. i found some 32 bits images on the net, but no way how to create one..
If someone has a solution please..
I am working as a volunteer on this project because i believe on it. I have no time yet to update the pd engine for 64 bits..
This project is helping disabled people and your respons will help me so much to provide them a long term support for this software
If you wanna take a look at the project http://orguesensoriel.com
Thank you a lot,
Damien
 posted in technical issues
Build a MIDI controller with the Arduino, Firmata and Pure Data
Time to start contributing some knowledge back to the wonderful world that is the internet; today, a step by step nice and easy tutorial on getting started to building your own MIDI controllers with the arduino.
When researching for my ableton controller project, I didn’t find much out there about using firmata on an arduino to send data to software. The standard approach just seemed to be create the code in the arduino language, upload it to your board and hack one of those MIDI to USB cables as a bodge job way of getting the MIDI out of the arduino.
So why firmata and pure data? Well the whole idea of firmata is that you flash it to your arduino, and it throws out serial about whats going on with the arduino inputs and outputs, then you decide how the software treats the readings coming in and going out.
Theory out the way, lets build some controllers. You’ll need a few things…
HARDWARE:
An arduino and something to wire into it (for this i’ll be using a pot)
A USB cable for your arduino
SOFTWARE:
Arduino – http://arduino.cc/en/Main/Software
Pure Data – http://puredata.info/downloads
Firmata – http://at.or.at/hans/pd/objects.html#pduino
Something to patch your new controller into; like Reason or Ableton Live
- SETTING UP FIRMATA AND PURE DATA
Install Pure Data and create a folder to store all your patches somewhere. Unzip Firmata and add the files ‘arduino.pd’, ‘arduino-test.pd’ and ‘arduino-help.pd’ to your new Pure Data folder. The ‘arduino.pd’ file is the object that we use in PD for opening up communication with your arduino and routing it to PD. Done? Awesome, your software is almost set up.
- FLASHING FIRMATA TO YOUR ARDUINO
Install the latest version of arduino and open it up. Connect your arduino with the USB cable to your laptop (i’m using a macbook for this by the way). In the example patches, open up “Standard Firmata”, select your board (im using an arduino mega), and your serial port (look for tty.usbserial for use with a USB cable). Then compile and hit the upload button and your arduino is now ready to use firmata and communicate with Pure Data!
- WIRING UP A POT

Potentiometers are cool, and theres a great arduino tutorial of how to wire one up here: http://www.arduino.cc/en/Tutorial/Potentiometer
Basically, all you need to know is that there are three pins; your two outer pins govern voltage flow across the pot, meaning one has to be 5V and the other has to be ground. It doesn’t matter which, but your 5v pin is going to be where your pot reads maximum, so convention dictates this should be the right hand pin. The center pin needs to be connected to an analog in on the arduino and will read the value of the pot as it sweeps from ground (0v) to 5v.
All wired up? Plug it into your laptop and open Pure Data, we’re ready to get things talking.
- SETTING UP OUR PATCH
Open the example “arduino-test.pd” Pure Data patch you copied over earlier. It should look like this one…

The test patch has everything we need to open a connection and enable pins. Firstly, lets delete a bunch of stuff and make our window a bit bigger. Hit Command + E to enter edit mode in Pure Data.

Ok a quick explaination; the key component here is the ‘arduino’ object. This is being drawn from the file you copied in earlier, and is what communicated with your arduino. Here we can do everything to control the arduino from opening a connection, to receiving data.
The large grid allows us to set the mode of each pin on the arduino. Remember pins 0 and 1 are reserved for Rx and Tx. I’m using analog pin 4 for this demo, so I’ve set my pin mode for pin 4 to ‘analog’.
Now we can plug our arduino in and get a reading from the potentiometer.
- ARDUINO INTO PURE DATA
With your arduino plugged in, hit command and E to bring us out of edit mode. In our patch, click on ‘Devices’ above the arduino object and open up the pure data terminal. (That other thing that loads with PD that has all the scary code in)

The “Devices” message connected to the arduino object pings your computer to find what devices are connected and on what serial ports. Since we’re using a USB cable to connect our arduino, we’re looking for something with ‘usbserial’ in it, in this case; port 2.
Select the relevent port in the green box at the top (remember the first box is ‘0’, second is ‘1’ and so forth) and hit ‘Open’ to establish a connection. Check the terminal to see if the connection was sucessful.

Now lets check we’re getting something in. Create a number box (Command + 3) and connect it to the relevent pin on the ‘Route analog’ box at the bottom. In this case, pin 4.
One more thing; if you’re not getting any readings in, you’ll need to click on ‘pd old analog/digital controls’ and enable your pins here too. What I tend to do in my patches is just not include the large grid but make my own ‘old pd’ controls custom to what i’m enabling/disabling to save space.
Here’s what the ‘old analog/digital controls’ subpatch looks like (pin 4 enabled)…

Come out of edit mode and check that you’ve got readings. If so congratulations! If not, troubleshoot, start with making sure your usb connection is opened, make sure all the correct pins are enabled (remember you’re counting from 0 not 1 on most of these buttons in PD, it’s just the way computers work).
- SCALING READINGS TO MIDI
So we’ve got a reading and chances are it’s to 3 decimal places between 0 to 1. No problem, create a new object (Command + 1) and type “autoscale 0 127”. This allows us to scale the input to a min and max value, in this case 0 to 127 of MIDI. Next, lets get things looking nice, create a new object and type “knob”. Connect this AFTER the autoscale object. (the knob is default set to read inputs from 0 to 127. Then create another number to display the scaled MIDI data coming out, and finally a new object and type “ctlout 1”.
It should look something like this…

The second box should be outputing values from 0 – 127 now, and the knob giving a visual representation of your potentiometer.
Now lets patch it into ableton…
- PURE DATA TO ABLETON LIVE
Firstly, you’ll need to set up your macs IAC driver if you’ve not done this. Basically you’ll need to go into Audio/MIDI preferences and enable your IAC driver. Then create a new input and output. One for input to DAW and one for output from DAW. Google around for a tutorial on this, its really simple, a 30 second job.
After you’ve set up your IAC driver, go back to PD and go to preferences > MIDI Settings, and connect your IAC driver.

Open ableton and go to its MIDI preferences. Create a device listing for your IAC driver and enable its ins and outs into ableton like so…


And thats it! Create an instrument and try to assign something! I’ve got it controlling the brightness of a bass sound here.
Shout out for Facu who requested this tutorial. Hopefully it’ll help some of you looking to get into this stuff and start building things but with no idea where to start.
 posted in tutorials
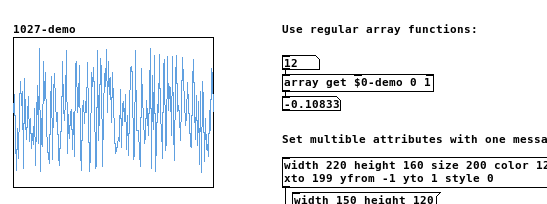
colarray: a graphical array where color and line width can be set
This abstraction creates a regular Pd graphical array, where color and line width can be set.
Download: colarray.zip
The attributes of the array can be dynamically set by messages. As it is a regular array, it can be accessed by the usual array functions like [array get], [array set] etc. Save contents is the only feature [colarray] doesn't support, as the array is within the abstraction.
[colarray] makes use of the undocumented (?) fields for color and line width, that are hidden in the Pd source code. The regular graphical array is made from a data structure template, that is defined in a hidden patch, which is opened in the background on startup. [colarray] adds a send object to that patch to get messages from the [struct] object there. After creating the array, a mouse message to that array triggers a click message from the [struct] with the pointer to the array. This pointer is used to set color and line width.
To see the hidden patch that holds the template, you can use this patch: show-hidden-template.pd
 posted in abstract~
Pduino + Arduino Output to Pins
Unfortunately, snapshot~ doesn't seem to send data at a rate which enables clean signaling of arduino pins. When it comes to audio anything, I find that outputting signal is necessary, as outputting control values just cannot keep up with audio. If you are looking to make a square wave generator that is controllable from puredata, the best way that I have found to do this is by using a combination of arduino, a DAC chip and an op-amp chip. Also, you'll want to use at least a 12 bit DAC, such as mcp4921 or mcp4725, as 8 bit DAC lacks the ability to tune the output fine enough to stay in tune with standard tuning. For opamp choices, you can pretty much take your pick. They all do pretty much the same thing, though you will find that every opamp has it's own unique sound quality. I really love the gritty sound of the CA313. A very good and popular sound for opamp VCO is the tl072 or tl075. There are tons of schematics out there for how to configure a square wave vco with opamps. You would just modify the components to fit the output of your DAC.
Next, you would send your controller values from PD to the arduino and have some code in the ar'dweener to handle communicating with the DAC. You can then add all sorts of fun stuff to your board like digipots, opamp buffers, VCAs and so on to make envelopes, LFOs etc.
If you don't want to track down additional chips (usually ordered from china being the only way to find them, cheap though they tend to be,) but want to have square waves being output directly from the arduino, then you would still be better off having pd send control values to the arduino and then let the arduino handle the signal generation to it's pins. For this purpose, you may want to look at the tone library or the mozzi library. Teensy boards have some expanded audio capabilities as well, but teensy boards are a bit expensive for my taste, as you can get a freakin raspberry pi with a full linux operating system on it for a fraction of what it costs. Still, teensies are great and extremely handy for these types of applications if you dont mind dropping some extra money. I try to build everything to work on cheap arduino clones just for financial and practicality sake.
I have code and patches that I have written to control these types of circuits for many DACs and digipots with SPI and I2C protocalls... let me know if you'd like to check them out for some guidance.
 posted in technical issues
Bang only when input changes
Hello,
first let me discripe my project in short way:
Im using a wii nunchuk-controller with an arduino to controll short wav-files(small soundfiles like a drumkick) played in pd.
I want to use an array to store which file shell be played (0 for none, 1, 2, 3, etc.). With a [select] pd choose the rhight file. The Arduino sents messages every 125ms.
This is working so far...
But now my problem: By pressing the "C"-Button the user decides to not play from the array but from his interaction-input. And by pressing the "Z"-Button the user decides to override the old array with his interaction-input. But the Array shell only have the length depending of the users-input (so that their is no pause in the loop or the array is to small).
So in my thougt I need to "reset" the array if the user hit the Z-Button and than resize the array +1 each intervall the Z-Button is pressed. But I can't find a way how to detect if the "1" from Arduino-input is sent the first time or in a row, so PD don't knows if it should count up or reset.
So is there a object or a construction giving the following logic:
bang if you got a 1 the first time, but do not bang if it is the second time without getting a 0 before?
I hope you understand me and have a solution. If not please ask or help me to explain better ")
 posted in technical issues
Uninstall from Ubuntu 16.04
@EEight It doesn't work, because it says that "El paquete «puredata» no está instalado", that puredata is not installed... isn't it rare?
anibal@anibal-ubuntu:~$ sudo apt-get purge pd
[sudo] password for anibal:
Leyendo lista de paquetes... Hecho
Creando árbol de dependencias
Leyendo la información de estado... Hecho
Nota, seleccionando «puredata-core» en lugar de «pd»
Los paquetes indicados a continuación se instalaron de forma automática y ya no son necesarios.
  libgsl0ldbl ttf-dejavu-core
Utilice «sudo apt autoremove» para eliminarlos.
0 actualizados, 0 nuevos se instalarán, 0 para eliminar y 2 no actualizados.
anibal@anibal-ubuntu:~$ sudo apt-get purge puredata
Leyendo lista de paquetes... Hecho
Creando árbol de dependencias
Leyendo la información de estado... Hecho
El paquete «puredata» no está instalado, no se eliminará
Los paquetes indicados a continuación se instalaron de forma automática y ya no son necesarios.
  libgsl0ldbl ttf-dejavu-core
Utilice «sudo apt autoremove» para eliminarlos.
0 actualizados, 0 nuevos se instalarán, 0 para eliminar y 2 no actualizados.
anibal@anibal-ubuntu:~$
Then I did:
anibal@anibal-ubuntu:~$ sudo apt-get purge puredata-core
Leyendo lista de paquetes... Hecho
Creando árbol de dependencias
Leyendo la información de estado... Hecho
Los paquetes indicados a continuación se instalaron de forma automática y ya no son necesarios.
  libgsl0ldbl ttf-dejavu-core
Utilice «sudo apt autoremove» para eliminarlos.
Los siguientes paquetes se ELIMINARÁN:
  puredata-core*
0 actualizados, 0 nuevos se instalarán, 1 para eliminar y 2 no actualizados.
Se liberarán 2.680 kB después de esta operación.
¿Desea continuar? [S/n] s
(Leyendo la base de datos ... 242946 ficheros o directorios instalados actualmente.)
Desinstalando puredata-core (0.46.7-3) ...
Purgando ficheros de configuración de puredata-core (0.46.7-3) ...
Procesando disparadores para man-db (2.7.5-1) ...
anibal@anibal-ubuntu:~$ pd
anibal@anibal-ubuntu:~$
...and I launched pd fine... The puredata-core corresponded to an earlier installation. Thanks!
 posted in technical issues
Purr Data rc5
Purr Data release candidate 5!
- small fixes to OSX app bundle name and build instructions
- fixed OSX app bundle name
- fixed GUI errors with some GUI objects on GOP
- use cat icon for patches
- fixed a [grid] crasher with binding symbol leak
- fixed [grid] line drawing bug and GOP xlet display
- added dialog and scale handle for [grid]
- ported moonlib/knob
- get rid of some extraneous debugging messages
- allow to install Purr Data alongside Pd-l2ork
- Scope~ code cleanup
- fixes for arm build
- added some OSX app bundle dependencies for [fluid~] and others
- fix saving preferences under OSX
- added startup paths and libs to preferences dialog
- use "Purr Data" in OSX menu app
- help browser fixes
- fixed MIDI preference saving on OSX and Windows
- added a "Recent Files" menu to the "File" menu
- get consistent behavior for present working directory when opening/saving files
- fix Volume name for OSX dmg installer
- try to standardize a deterministic package name when compiling Purr Data
- add a Pd-l2ork-specific version number
- add command line open args to "Recent Files" list
- fixed crasher with ds "canvas" field
- allow saving the zoom level per canvas
please report lots of bugs to
https://git.purrdata.net/jwilkes/purr-data/issues
Binaries:
 posted in news
Purr Data rc4
Edit: Windows binary is now up
Purr Data release candidate 4!
- fixed race when opening pd file in OSX
- partial fix for midi prefs not getting saved under Windows
- fixed #194: saving a loaded abstraction gives errors
- fixed for #201: new subcanvas position isn't saved with patch
- sync the ALSA sequencer port state with the GUI
- reset ALSA MIDI device handles and event buffers when closing
- got rid of more debugging output
- go ahead and allow curly braces in Pd messages
- replace the Pd-extended output~ abstraction with Alexandre Porres' improved version
- report userful value for "dsp-status" method of [pdinfo] by ignorning suspend/resume
- fixed display of dollar signs in properties dialogs
- fixed loading of lyonpotpourri and disis libraries
please report lots of bugs to
https://git.purrdata.net/jwilkes/purr-data/issues
Binaries:
posted in news
Purr Data rc3
Purr Data release candidate 3!
- fixed race with [dsp-state(--[pdinfo]
- fixed preference saving on Windows 10
- small fix to the prepend.pd abstraction for cyclone to take variable number
- fixed receive symbol in number box
- fixed help menu links
- fixed vu scale font size
- fixed [table] default array display
- improved canvas find
- fixed problem with resizing [cnv] label
- fixed scalar bbox calculation for [plot] et al
- fixed stray errors with ds fields
- fixed openpanel/savepanel GUI errors
please report lots of bugs to
https://git.purrdata.net/jwilkes/purr-data/issues
Binaries:
posted in news
Purr Data rc2
Purr Data release candidate 2!
- add delread4~ alias for vd~
- load Gem dependencies properly under Windows
- add help menu item for list of internal classes
- various help patch cleanups and fixes
- change zoom/fit keyboard shortcuts so they work on all platforms
- localize the canvas right-click menu
- small fixes to prefs menu and edit menu
- fix bug with color updates for iemguis
- zoom correctly on OSX 10.8
please report lots of bugs to
https://git.purrdata.net/jwilkes/purr-data/issues
Binaries:
OSX 64-bit Caught in a Trap Edition (10.8)
[Edit: typo in the name of the Elvis tune]
posted in news