what can a blender make? the best blenders are incredible kitchen appliances
Most families have a kitchen blender of certain sorts. A portion of those blenders are more remarkable than others. A few clients are more proficient than others with regards to recognizing what a blender can do. Recognizing what your blender can do can set aside you cash and enhance your cooking experience just as spare you https://goodfoodblogph.com/ time in the kitchen.
Mixed Drinks
Each child realizes that blenders are remarkably acceptable at making mixed beverages. Blenders can make milk shakes, smoothies, natural product shakes, solidified beverages, and the more remarkable blenders can make squashed ice for margaritas and daiquiris. These beverages can be made with and without liquor. Blenders are ideal for family social occasions, local gatherings or for the each morning power drink.
The blender's capacity decides how smooth your beverage will be. On the off chance that for instance you are including almonds or carrots they will be separated into a lot littler parts the more remarkable your blender is. What's more, in the event that you do like lumps in your beverage and you have an exceptionally ground-breaking blender then you simply need to decrease the mixing time. Anyway it doesn't work the reverse way around. In the event that your blender comes up short on the force it will always be unable to deliver a truly smooth mixed beverage, particularly when utilizing more strong things.
Purees, Dips, Salsas and Soups
Blenders are the ideal kitchen apparatuses with regards to making purees, plunges, salsas and soups. You can make any kind of soup you need, simply include 1 cup of cooked vegetable, some cooked boneless chicken on the off chance that you like, and a ¼ cup of water to your blender. At that point mix until it is smooth enough for you.
You can without much of a stretch mix any of the accompanying: avocado cream, guacamole, cream of mushroom/tomato, Mexican salsa, dark bean plunge, new organic product yogurt, new pesto sauce, fruit purée, and some more. Numerous sound and fun suppers and bites can without much of a stretch be made with the correct blender, frequently setting aside you time and cash all the while.
Infant Foods
Who would not like to take care of its infant new and solid food. Blenders are a simple method to make a variety of various enhanced and supporting infant nourishments. From fruit purée to carrot puree to verdant green squeezes, all can be newly made and individualized to give you 100% control of what you feed your child. This will likewise spare you a great deal of cash as well.
Pounded Spices and Fresh Grinded Coffee
Envision pounding your own new espresso each morning, or on the ends of the week. Envision the smell and the full flavor that you get from newly crushed espresso. There is then no requirement for you to stop by a coffeehouse on your approach to work and drop $4 or more dollars each time you need great new espresso. The more impressive blenders can crush espresso beans as fine as you might want them to be.
Make your own newly ground pepper from peppercorns. You can even make your own pepper mix by combining various kinds of peppercorns. Do likewise with nutmeg, cinnamon and other dried flavors. Whenever you have visitors over for supper or BBQ dazzle them by revealing to them that you made the flavor blend yourself.
Crushed/Shred Meat
Make your own burger patties from lean cut meats and set aside cash all the while. Additionally, another preferred position is that you know precisely what meat is truly in your patty. Shred cooked meats for sandwiches, e.g., chicken or pork. For this Best Blenders suggests an incredible blender.
Cleaved Vegetables
Do you scorn cleaving onions? Why not utilize your blender? You need hacked carrots as well? Not an issue, utilize your blender. Utilize a low setting or the beat highlight on your blender https://www.flickr.com/people/blenderforsmoothiesreviews/ and the activity will be done right away. It doesn't make a difference on the off chance that they are dry or wet, a decent blender will cleave them to an ideal serving size in no time flat, sparing you time and tears.
Ground Cheese
You like including ground cheddar your pasta or making new pizza or meal? At that point why not utilize newly ground cheddar? It is exceptionally easy to do - cut your cheddar into 3D squares, throw into your blender and utilize your blender's heartbeat include until you have the cheddar ground to your ideal size. Newly ground cheddar consistently tastes better!
Serving of mixed greens Dressings and Mayonnaise
Practically any blender can make serving of mixed greens dressing. Pick your dressing fixings and mix until smooth. At that point bottle it for next time or to take it to the workplace or cookout.
For mayonnaise the fundamental formula is two eggs, 1 tsp. mustard and ½ crushed lemon (whenever liked), mix at fast until foamy, at that point gradually include 1 ¼ cup cooking oil and keep on mixing at rapid until thick and rich. Spot not utilized segment into a container and store in cooler. All new and scrumptious, and everything is without additives.
Crushed Whole Grains
You like eating entire grains? What about creation entire grain flapjacks? It is without a doubt less expensive than locally acquired blends, and truly easy to do as well. Most don't know that a blender can deliver a fine powder from entire grains. The blender ought to have more force than a normal home blender for this errand.
Frozen yogurt
Make the most extravagant seasoned frozen yogurts ever with your blender. Ideal for birthday celebrations or home film evenings. Truly easy to do as well, as relatively few fixings are required. It is additionally remarkably simple to store your newly made frozen yogurt in the cooler until one week from now or the end of the week after. With a bit of testing your companions will before long be advising you to bundle your frozen yogurt and sell it. To make frozen yogurt your blender will require enough mixing capacity to have the option to deal with solidified products of the soil in the event that you decide to utilize them. The more remarkable the blender the creamier and smoother the frozen yogurt.
Additive Free Fresh Nut Butters
Make your own new nutty spread, or almond or cashew margarine. Ideal for snacks, picnics or bites. This can be a solid and reasonable choice to locally acquired items. Envision the expression on your companions faces when you disclose to them that you make it yourself. Here is the way to make new nutty spread https://gab.com/topbestblenderreviews without any preparation utilizing your blender.
First mix 2 cups of cooked peanuts and ½ tablespoon of vegetable or nut oil until it becomes glue like. At that point taste and if necessary include minuscule amounts of earthy colored sugar, nectar or salt to fit individual taste. On the off chance that you like your nut spread crunchy, include some more peanuts at the end and mix just for a couple of moments. Best Blenders suggests the more remarkable blenders for this kind of mixing.
 posted in Off topic
PD .48 on Raspberry Pi 3? [EDIT: updated to PD .51]
Tutorial to compile Pure-data 0.51-4 on Raspberry Pi with Jack support:
STEP1. Open Terminal:
Ctrl+Alt+T
STEP2. Creating folder to organize compilation (optional):
mkdir src
STEP3. Enter in src folder / install dependencies / download pd source code / unpack downloaded file:
cd src
sudo apt install build-essential autoconf automake libtool gettext git libasound2-dev libjack-jackd2-dev libfftw3-3 libfftw3-dev tcl tk
wget http://msp.ucsd.edu/Software/pd-0.51-4.src.tar.gz
tar -xzf pd-0.51-4.src.tar.gz
STEP4. Compiling Pd:
cd pd-0.51-4
./autogen.sh
./configure --enable-jack --enable-fftw
make
STEP5. Confirming if compilation are ok:
cd bin
./pd
STEP6. If it run, you can install Pd in your raspbian:
cd ..
sudo make install
It don't install fancy icons with desktop integration, if you need that, you need to do it manually.
hope it help!
Changelog:
2021.05.24
- update to compile newest Pd version (Pd-0.51-4)
2020.09.16
- update to compile newest Pd version (Pd-0.51-2)
2020.06.17
- update tutorial to compile newest Pd version (Pd-0.51-0)
2018.09.25
-
remove clone pure-data git repository step to download Pd-0.49 from miller's site in STEP3.
-
unpack file downlaoded via command line in STEP3
 posted in technical issues
Purr Data 2.5.0
@jancsika failed buid...here's attached the super long log in .txt and .sh formatspurr-data-w64-build-log.txt purr-data-w64-build-log.sh
but basically the last lines are critical (i guess other stuff is related to external libraries troubles with win64 platform...is GEN ready for win64 i.e.?)
make[2]: *** [Makefile:106: /c/purr-data/purr-data/externals/creb/modules/dynwav~.o] Error 1
make[2]: Leaving directory '/c/purr-data/purr-data/externals'
make[1]: *** [Makefile:209: externals_install] Error 2
make[1]: Leaving directory '/c/purr-data/purr-data/packages'
make: *** [Makefile:69: prebuilt_install] Error 2
copying pd-l2ork-specific externals...
done with l2ork addons.
mv: cannot stat 'packages/win32_inno/Output/Purr*.exe': No such file or directory
./tar_em_up.sh: 397: command failed with exit code 1, exiting now.
./tar_em_up.sh: 397: mv packages/win32_inno/Output/Purr*.exe .
 posted in news
Foot Pedal Behaviours Abstraction
@image_engine I have absolutely no idea why it should be the case...... but the GUI will be laggy if the audio settings are too tight........ even when the DSP is not in use AND IS TURNED OFF. It makes no sense, but it is so. Maybe an audio chain is built as the patch is built, even when there are no audio objects?
[input_event]...... I might be wrong, but my foggy old brain is trying to tell me that [input_event] was not part of extended. If you have made a fresh installation on W10 it might be missing.
Here it is again from my "pd/extra" folder........ in.zip
The two files were in "extra"...... not in a sub-folder.... which makes me a little more certain that they were not included in extended.
Of course the Win 10 api might have been re-written and the .dll might be deprecated.
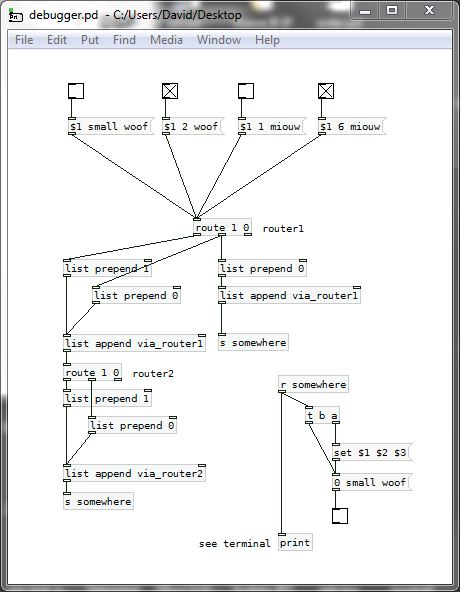
I don't know if the execution order is critical for the pedal up flag...... but that would be the first place to look if the patch behaved badly. It could matter if you changed something else for some reason. But on the left side the send_ped_up can send [0( from the box above when banged by [sel 1 3] and [1(...[1( or [0(....[1( depending on the order from [sel 1 2 3 4]. Can that cause problems because of the arrival of a new input in the middle of a pedal input? I don't know...... but it could be best to "fix" the order so that there is no doubt about the logic.
Yes, I inserted the two bangs to get rid of the double cords from the select object...... but also, as you say, it helps with a de-bug...... as it reminds the reader that outputs 2 and 4 are getting only bangs, while outputs 1 and 3 are getting logic (0/1).......
I would use logic (0/1) as you have done....... as the patch is all about logic. Number 0 is logical false and so "means" "off" and is a natural reset. You could create tags for messages using symbols and then [route] instead of [select]. I had never thought about that, but it is a very interesting idea  . It serves no purpose in a running patch, and creates extra work building the patch........ BUT......
..... In the past I have set a slow [metro] to make such a patch "live" and used "magic glass" or labelled [print] objects for debugging. In a very complex logic patch it could be very useful to tag the messages. It can be hard to spot message ordering problems just using the terminal window and even harder with "magic glass". With symbol tags you would easily see where the messages originated. It's a very good idea! Up-vote deserved!
Sorry...... that sparked some ideas.
Tagging and routing by symbols will be a bad idea because the logic decisions need to be taken by 1/0 true/false and so the value needs to head up the list.
But tags could be appended....... to show the route taken.
[route] would always be used instead of [select]...... so that the appended message is preserved...... and then the logical value re"-"placed using [list prepend].
I might start a new thread I think..... to gather ideas and criticism.
A set of specific "normal" and "debugging" objects would be useful, as, for example [myselect 0 1] (which contained values to "send onwards" unlike [sel] ) could be renamed to [myrouter 0 1 router5].
Aarrgh...... probably a huge hole in which to stop digging......
..... and I bet it exists in extended already........?????
P.S.
Is your patch working as you wish?
And reading again.... after all that!..... I think you meant "message or float" and not "symbol or float" to send the zero.
I don't know of any difference, and they send exactly the same data, but the message [1( is more useful for debugging than the float [1] because you can click it and send the message.......
David.
debugger.pd
 posted in technical issues
Build a MIDI controller with the Arduino, Firmata and Pure Data
Time to start contributing some knowledge back to the wonderful world that is the internet; today, a step by step nice and easy tutorial on getting started to building your own MIDI controllers with the arduino.
When researching for my ableton controller project, I didn’t find much out there about using firmata on an arduino to send data to software. The standard approach just seemed to be create the code in the arduino language, upload it to your board and hack one of those MIDI to USB cables as a bodge job way of getting the MIDI out of the arduino.
So why firmata and pure data? Well the whole idea of firmata is that you flash it to your arduino, and it throws out serial about whats going on with the arduino inputs and outputs, then you decide how the software treats the readings coming in and going out.
Theory out the way, lets build some controllers. You’ll need a few things…
HARDWARE:
An arduino and something to wire into it (for this i’ll be using a pot)
A USB cable for your arduino
SOFTWARE:
Arduino – http://arduino.cc/en/Main/Software
Pure Data – http://puredata.info/downloads
Firmata – http://at.or.at/hans/pd/objects.html#pduino
Something to patch your new controller into; like Reason or Ableton Live
- SETTING UP FIRMATA AND PURE DATA
Install Pure Data and create a folder to store all your patches somewhere. Unzip Firmata and add the files ‘arduino.pd’, ‘arduino-test.pd’ and ‘arduino-help.pd’ to your new Pure Data folder. The ‘arduino.pd’ file is the object that we use in PD for opening up communication with your arduino and routing it to PD. Done? Awesome, your software is almost set up.
- FLASHING FIRMATA TO YOUR ARDUINO
Install the latest version of arduino and open it up. Connect your arduino with the USB cable to your laptop (i’m using a macbook for this by the way). In the example patches, open up “Standard Firmata”, select your board (im using an arduino mega), and your serial port (look for tty.usbserial for use with a USB cable). Then compile and hit the upload button and your arduino is now ready to use firmata and communicate with Pure Data!
- WIRING UP A POT

Potentiometers are cool, and theres a great arduino tutorial of how to wire one up here: http://www.arduino.cc/en/Tutorial/Potentiometer
Basically, all you need to know is that there are three pins; your two outer pins govern voltage flow across the pot, meaning one has to be 5V and the other has to be ground. It doesn’t matter which, but your 5v pin is going to be where your pot reads maximum, so convention dictates this should be the right hand pin. The center pin needs to be connected to an analog in on the arduino and will read the value of the pot as it sweeps from ground (0v) to 5v.
All wired up? Plug it into your laptop and open Pure Data, we’re ready to get things talking.
- SETTING UP OUR PATCH
Open the example “arduino-test.pd” Pure Data patch you copied over earlier. It should look like this one…

The test patch has everything we need to open a connection and enable pins. Firstly, lets delete a bunch of stuff and make our window a bit bigger. Hit Command + E to enter edit mode in Pure Data.

Ok a quick explaination; the key component here is the ‘arduino’ object. This is being drawn from the file you copied in earlier, and is what communicated with your arduino. Here we can do everything to control the arduino from opening a connection, to receiving data.
The large grid allows us to set the mode of each pin on the arduino. Remember pins 0 and 1 are reserved for Rx and Tx. I’m using analog pin 4 for this demo, so I’ve set my pin mode for pin 4 to ‘analog’.
Now we can plug our arduino in and get a reading from the potentiometer.
- ARDUINO INTO PURE DATA
With your arduino plugged in, hit command and E to bring us out of edit mode. In our patch, click on ‘Devices’ above the arduino object and open up the pure data terminal. (That other thing that loads with PD that has all the scary code in)

The “Devices” message connected to the arduino object pings your computer to find what devices are connected and on what serial ports. Since we’re using a USB cable to connect our arduino, we’re looking for something with ‘usbserial’ in it, in this case; port 2.
Select the relevent port in the green box at the top (remember the first box is ‘0’, second is ‘1’ and so forth) and hit ‘Open’ to establish a connection. Check the terminal to see if the connection was sucessful.

Now lets check we’re getting something in. Create a number box (Command + 3) and connect it to the relevent pin on the ‘Route analog’ box at the bottom. In this case, pin 4.
One more thing; if you’re not getting any readings in, you’ll need to click on ‘pd old analog/digital controls’ and enable your pins here too. What I tend to do in my patches is just not include the large grid but make my own ‘old pd’ controls custom to what i’m enabling/disabling to save space.
Here’s what the ‘old analog/digital controls’ subpatch looks like (pin 4 enabled)…

Come out of edit mode and check that you’ve got readings. If so congratulations! If not, troubleshoot, start with making sure your usb connection is opened, make sure all the correct pins are enabled (remember you’re counting from 0 not 1 on most of these buttons in PD, it’s just the way computers work).
- SCALING READINGS TO MIDI
So we’ve got a reading and chances are it’s to 3 decimal places between 0 to 1. No problem, create a new object (Command + 1) and type “autoscale 0 127”. This allows us to scale the input to a min and max value, in this case 0 to 127 of MIDI. Next, lets get things looking nice, create a new object and type “knob”. Connect this AFTER the autoscale object. (the knob is default set to read inputs from 0 to 127. Then create another number to display the scaled MIDI data coming out, and finally a new object and type “ctlout 1”.
It should look something like this…

The second box should be outputing values from 0 – 127 now, and the knob giving a visual representation of your potentiometer.
Now lets patch it into ableton…
- PURE DATA TO ABLETON LIVE
Firstly, you’ll need to set up your macs IAC driver if you’ve not done this. Basically you’ll need to go into Audio/MIDI preferences and enable your IAC driver. Then create a new input and output. One for input to DAW and one for output from DAW. Google around for a tutorial on this, its really simple, a 30 second job.
After you’ve set up your IAC driver, go back to PD and go to preferences > MIDI Settings, and connect your IAC driver.

Open ableton and go to its MIDI preferences. Create a device listing for your IAC driver and enable its ins and outs into ableton like so…


And thats it! Create an instrument and try to assign something! I’ve got it controlling the brightness of a bass sound here.
Shout out for Facu who requested this tutorial. Hopefully it’ll help some of you looking to get into this stuff and start building things but with no idea where to start.
 posted in tutorials
Ubuntu - Browsers and Puredata wont share audio output device. [SOLVED]
I found this solution and it worked ")
@sdaau_ml said:
Sorry to necro this thread, but I finally found out how to run PureData under Pulseaudio (which otherwise results with "ALSA output error (snd_pcm_open): Device or resource busy").
First of all, run:
pd -alsa -listdevPD will start, and in the message window you'll see:
audio input devices:
1. HDA Intel PCH (hardware)
2. HDA Intel PCH (plug-in)
audio output devices:
1. HDA Intel PCH (hardware)
2. HDA Intel PCH (plug-in)
API number 1

no midi input devices found
no midi output devices found
... or something similar.
Now, let's add the
pulseALSA device, and run-listdevagain:pd -alsa -alsaadd pulse -listdevThe output is now:
audio input devices:
1. HDA Intel PCH (hardware)
2. HDA Intel PCH (plug-in)
3. pulse
audio output devices:
1. HDA Intel PCH (hardware)
2. HDA Intel PCH (plug-in)
3. pulse
API number 1

no midi input devices found
no midi output devices found
Notice, how from the original two ALSA devices, now we got three - where the third one is
pulse!Now, the only thing we want to do, is that at startup (so, via the command line), we set
pdto run in ALSA mode, we add thepulseALSA device, and then we choose the third (3) device (which is to say,pulse) as the audio output device - and the command line argument for that inpdis-audiooutdev:pd -alsa -alsaadd pulse -audiooutdev 3 ~/Desktop/mypatch.pdYup, now when you enable DSP, the patch
mypatch.pdshould play through Pulseaudio, which means it will play (and mix) with other applications that may be playing sound at the time! You can confirm that the correct output device has been selected from the command line, if you open Media/Audio Settings... oncepdstarts:
As the screenshot shows, now "Output device 1" is set to "pulse", which is what we needed.
Hope this helps someone!
EDIT: I had also done changes to
/etc/pulse/default.paas per https://wiki.archlinux.org/index.php/PulseAudio#ALSA.2Fdmix_without_grabbing_hardware_device beforehand, not sure whether that makes a difference or not (in any case, trying to adddmixas a PD device and playing through it, doesn't work on my Ubuntu 14.04)
 posted in technical issues
ALSA output error (snd\_pcm\_open) Device or resource busy
Sorry to necro this thread, but I finally found out how to run PureData under Pulseaudio (which otherwise results with "ALSA output error (snd_pcm_open): Device or resource busy").
First of all, run:
pd -alsa -listdev
PD will start, and in the message window you'll see:
audio input devices:
1. HDA Intel PCH (hardware)
2. HDA Intel PCH (plug-in)
audio output devices:
1. HDA Intel PCH (hardware)
2. HDA Intel PCH (plug-in)
API number 1

no midi input devices found
no midi output devices found
... or something similar.
Now, let's add the pulse ALSA device, and run -listdev again:
pd -alsa -alsaadd pulse -listdev
The output is now:
audio input devices:
1. HDA Intel PCH (hardware)
2. HDA Intel PCH (plug-in)
3. pulse
audio output devices:
1. HDA Intel PCH (hardware)
2. HDA Intel PCH (plug-in)
3. pulse
API number 1

no midi input devices found
no midi output devices found
Notice, how from the original two ALSA devices, now we got three - where the third one is pulse!
Now, the only thing we want to do, is that at startup (so, via the command line), we set pd to run in ALSA mode, we add the pulse ALSA device, and then we choose the third (3) device (which is to say, pulse) as the audio output device - and the command line argument for that in pd is -audiooutdev:
pd -alsa -alsaadd pulse -audiooutdev 3 ~/Desktop/mypatch.pd
Yup, now when you enable DSP, the patch mypatch.pd should play through Pulseaudio, which means it will play (and mix) with other applications that may be playing sound at the time! You can confirm that the correct output device has been selected from the command line, if you open Media/Audio Settings... once pd starts:
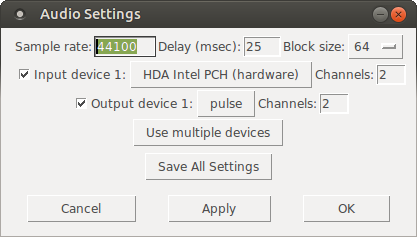
As the screenshot shows, now "Output device 1" is set to "pulse", which is what we needed.
Hope this helps someone!
EDIT: I had also done changes to /etc/pulse/default.pa as per https://wiki.archlinux.org/index.php/PulseAudio#ALSA.2Fdmix_without_grabbing_hardware_device beforehand, not sure whether that makes a difference or not (in any case, trying to add dmix as a PD device and playing through it, doesn't work on my Ubuntu 14.04)
 posted in technical issues
No sound from raspberry
I had the same difficulty. No sound cards were available according to
aplay --list-devices
I found somewhere (I forget where) the suggestion to add to
/boot/config.txt
the line:
dtparam=audio=on
and from then everything went swimmingly. I set up some (possibly pretty dangerous) values in
/etc/security/limits.conf
like this:
### realtime permission for audio
@audio   –  rtprio     99
@audio   –  memlock    unlimited
@audio   –  nice      -10
@audio   -  priority   8
# End of file
The audio priority of 8 seems to be necessary to stop annoying messages in the puredata console when it's started. I'm not an expert on these values, they might not be wise, safe or ideal but they worked for me.
And I made sure that my user is in the audio group:
usermod -a -G audio david
And I've had glitch free performance since out of the mini jack.
 posted in technical issues
Purr Data rc3
Purr Data release candidate 3!
- fixed race with [dsp-state(--[pdinfo]
- fixed preference saving on Windows 10
- small fix to the prepend.pd abstraction for cyclone to take variable number
- fixed receive symbol in number box
- fixed help menu links
- fixed vu scale font size
- fixed [table] default array display
- improved canvas find
- fixed problem with resizing [cnv] label
- fixed scalar bbox calculation for [plot] et al
- fixed stray errors with ds fields
- fixed openpanel/savepanel GUI errors
please report lots of bugs to
https://git.purrdata.net/jwilkes/purr-data/issues
Binaries:
 posted in news
Purr Data rc2
Purr Data release candidate 2!
- add delread4~ alias for vd~
- load Gem dependencies properly under Windows
- add help menu item for list of internal classes
- various help patch cleanups and fixes
- change zoom/fit keyboard shortcuts so they work on all platforms
- localize the canvas right-click menu
- small fixes to prefs menu and edit menu
- fix bug with color updates for iemguis
- zoom correctly on OSX 10.8
please report lots of bugs to
https://git.purrdata.net/jwilkes/purr-data/issues
Binaries:
OSX 64-bit Caught in a Trap Edition (10.8)
[Edit: typo in the name of the Elvis tune]
posted in news