Lissa Executable / ofxOfelia compile error (Solved)
@cuinjune I tried to compile the lissa seq patch. but when i open the executable it opens only a small empty window.
i also tried to compile a help patch for testing, with the same result.
but your example works fine(Win32Example).
 posted in libpd / webpd
Build a MIDI controller with the Arduino, Firmata and Pure Data
Time to start contributing some knowledge back to the wonderful world that is the internet; today, a step by step nice and easy tutorial on getting started to building your own MIDI controllers with the arduino.
When researching for my ableton controller project, I didn’t find much out there about using firmata on an arduino to send data to software. The standard approach just seemed to be create the code in the arduino language, upload it to your board and hack one of those MIDI to USB cables as a bodge job way of getting the MIDI out of the arduino.
So why firmata and pure data? Well the whole idea of firmata is that you flash it to your arduino, and it throws out serial about whats going on with the arduino inputs and outputs, then you decide how the software treats the readings coming in and going out.
Theory out the way, lets build some controllers. You’ll need a few things…
HARDWARE:
An arduino and something to wire into it (for this i’ll be using a pot)
A USB cable for your arduino
SOFTWARE:
Arduino – http://arduino.cc/en/Main/Software
Pure Data – http://puredata.info/downloads
Firmata – http://at.or.at/hans/pd/objects.html#pduino
Something to patch your new controller into; like Reason or Ableton Live
- SETTING UP FIRMATA AND PURE DATA
Install Pure Data and create a folder to store all your patches somewhere. Unzip Firmata and add the files ‘arduino.pd’, ‘arduino-test.pd’ and ‘arduino-help.pd’ to your new Pure Data folder. The ‘arduino.pd’ file is the object that we use in PD for opening up communication with your arduino and routing it to PD. Done? Awesome, your software is almost set up.
- FLASHING FIRMATA TO YOUR ARDUINO
Install the latest version of arduino and open it up. Connect your arduino with the USB cable to your laptop (i’m using a macbook for this by the way). In the example patches, open up “Standard Firmata”, select your board (im using an arduino mega), and your serial port (look for tty.usbserial for use with a USB cable). Then compile and hit the upload button and your arduino is now ready to use firmata and communicate with Pure Data!
- WIRING UP A POT

Potentiometers are cool, and theres a great arduino tutorial of how to wire one up here: http://www.arduino.cc/en/Tutorial/Potentiometer
Basically, all you need to know is that there are three pins; your two outer pins govern voltage flow across the pot, meaning one has to be 5V and the other has to be ground. It doesn’t matter which, but your 5v pin is going to be where your pot reads maximum, so convention dictates this should be the right hand pin. The center pin needs to be connected to an analog in on the arduino and will read the value of the pot as it sweeps from ground (0v) to 5v.
All wired up? Plug it into your laptop and open Pure Data, we’re ready to get things talking.
- SETTING UP OUR PATCH
Open the example “arduino-test.pd” Pure Data patch you copied over earlier. It should look like this one…

The test patch has everything we need to open a connection and enable pins. Firstly, lets delete a bunch of stuff and make our window a bit bigger. Hit Command + E to enter edit mode in Pure Data.

Ok a quick explaination; the key component here is the ‘arduino’ object. This is being drawn from the file you copied in earlier, and is what communicated with your arduino. Here we can do everything to control the arduino from opening a connection, to receiving data.
The large grid allows us to set the mode of each pin on the arduino. Remember pins 0 and 1 are reserved for Rx and Tx. I’m using analog pin 4 for this demo, so I’ve set my pin mode for pin 4 to ‘analog’.
Now we can plug our arduino in and get a reading from the potentiometer.
- ARDUINO INTO PURE DATA
With your arduino plugged in, hit command and E to bring us out of edit mode. In our patch, click on ‘Devices’ above the arduino object and open up the pure data terminal. (That other thing that loads with PD that has all the scary code in)

The “Devices” message connected to the arduino object pings your computer to find what devices are connected and on what serial ports. Since we’re using a USB cable to connect our arduino, we’re looking for something with ‘usbserial’ in it, in this case; port 2.
Select the relevent port in the green box at the top (remember the first box is ‘0’, second is ‘1’ and so forth) and hit ‘Open’ to establish a connection. Check the terminal to see if the connection was sucessful.

Now lets check we’re getting something in. Create a number box (Command + 3) and connect it to the relevent pin on the ‘Route analog’ box at the bottom. In this case, pin 4.
One more thing; if you’re not getting any readings in, you’ll need to click on ‘pd old analog/digital controls’ and enable your pins here too. What I tend to do in my patches is just not include the large grid but make my own ‘old pd’ controls custom to what i’m enabling/disabling to save space.
Here’s what the ‘old analog/digital controls’ subpatch looks like (pin 4 enabled)…

Come out of edit mode and check that you’ve got readings. If so congratulations! If not, troubleshoot, start with making sure your usb connection is opened, make sure all the correct pins are enabled (remember you’re counting from 0 not 1 on most of these buttons in PD, it’s just the way computers work).
- SCALING READINGS TO MIDI
So we’ve got a reading and chances are it’s to 3 decimal places between 0 to 1. No problem, create a new object (Command + 1) and type “autoscale 0 127”. This allows us to scale the input to a min and max value, in this case 0 to 127 of MIDI. Next, lets get things looking nice, create a new object and type “knob”. Connect this AFTER the autoscale object. (the knob is default set to read inputs from 0 to 127. Then create another number to display the scaled MIDI data coming out, and finally a new object and type “ctlout 1”.
It should look something like this…

The second box should be outputing values from 0 – 127 now, and the knob giving a visual representation of your potentiometer.
Now lets patch it into ableton…
- PURE DATA TO ABLETON LIVE
Firstly, you’ll need to set up your macs IAC driver if you’ve not done this. Basically you’ll need to go into Audio/MIDI preferences and enable your IAC driver. Then create a new input and output. One for input to DAW and one for output from DAW. Google around for a tutorial on this, its really simple, a 30 second job.
After you’ve set up your IAC driver, go back to PD and go to preferences > MIDI Settings, and connect your IAC driver.

Open ableton and go to its MIDI preferences. Create a device listing for your IAC driver and enable its ins and outs into ableton like so…


And thats it! Create an instrument and try to assign something! I’ve got it controlling the brightness of a bass sound here.
Shout out for Facu who requested this tutorial. Hopefully it’ll help some of you looking to get into this stuff and start building things but with no idea where to start.
 posted in tutorials
Ubuntu - Browsers and Puredata wont share audio output device. [SOLVED]
I found this solution and it worked ")
@sdaau_ml said:
Sorry to necro this thread, but I finally found out how to run PureData under Pulseaudio (which otherwise results with "ALSA output error (snd_pcm_open): Device or resource busy").
First of all, run:
pd -alsa -listdevPD will start, and in the message window you'll see:
audio input devices:
1. HDA Intel PCH (hardware)
2. HDA Intel PCH (plug-in)
audio output devices:
1. HDA Intel PCH (hardware)
2. HDA Intel PCH (plug-in)
API number 1

no midi input devices found
no midi output devices found
... or something similar.
Now, let's add the
pulseALSA device, and run-listdevagain:pd -alsa -alsaadd pulse -listdevThe output is now:
audio input devices:
1. HDA Intel PCH (hardware)
2. HDA Intel PCH (plug-in)
3. pulse
audio output devices:
1. HDA Intel PCH (hardware)
2. HDA Intel PCH (plug-in)
3. pulse
API number 1

no midi input devices found
no midi output devices found
Notice, how from the original two ALSA devices, now we got three - where the third one is
pulse!Now, the only thing we want to do, is that at startup (so, via the command line), we set
pdto run in ALSA mode, we add thepulseALSA device, and then we choose the third (3) device (which is to say,pulse) as the audio output device - and the command line argument for that inpdis-audiooutdev:pd -alsa -alsaadd pulse -audiooutdev 3 ~/Desktop/mypatch.pdYup, now when you enable DSP, the patch
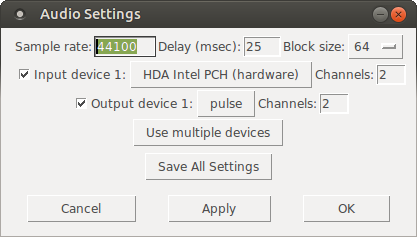
mypatch.pdshould play through Pulseaudio, which means it will play (and mix) with other applications that may be playing sound at the time! You can confirm that the correct output device has been selected from the command line, if you open Media/Audio Settings... oncepdstarts:
As the screenshot shows, now "Output device 1" is set to "pulse", which is what we needed.
Hope this helps someone!
EDIT: I had also done changes to
/etc/pulse/default.paas per https://wiki.archlinux.org/index.php/PulseAudio#ALSA.2Fdmix_without_grabbing_hardware_device beforehand, not sure whether that makes a difference or not (in any case, trying to adddmixas a PD device and playing through it, doesn't work on my Ubuntu 14.04)
 posted in technical issues
Easiest way to connect a MIDI keyboard to PD-l2ORK on Ubuntu 16.04
Pardon If I'm behind the curve here (I'm still using L2ork v1 most of the time) but last I checked Jack Midi was not an available option in any version of Pd. You can connect through the jack midi patcher in Qjackctl (the second tab in the connections dialogue box after audio) but only if you have the jack/alsa midi bridge running. That just lets you patch jack midi only apps through to alsa midi only apps and vise-versa. I personally always use the third tab (confusingly only labeled "alsa" when it should be "alsa midi") because jack midi presently has no way to handle the larger sysex messages I deal with and blocks them by default.
Anyway the point is that If you are using any Pd variant you are always using either Alsa midi or OSS midi (actually the OSS is just an alsa-based simulator now so you're really always using alsa, but I digress). There are a few other graphical audio/midi patcher programs such as Patchage or the similar Catia program from the KXStudio package but AFAIK they all require you to set up the connections manually at least once.
However, all of those programs allow you to save your patching setup for instant automatic recall the next time you need it. In Qjackctl this is done from the "Patchbay" dialogue box. I haven't used it in awhile but if you mess with it you'll find a way to save the current set of connections. Qjackctl is pretty messy and counter-intuitive thou so for beginners you might want to have a look at the other options mentioned above.
AFAIK there's no auto-midi patching options available. I know they tried implementing something like that in Pd some time ago but they disabled it because it ended up causing more problems than it solved. There's info about that buried in the Pd list somewhere....
 posted in technical issues
IAC Driver
I'm going to have to plead myself stumped once more I'm afraid. I really like the concept of MIDI routing without using Audio/MIDI setup, and MidiPatchbay is easy enough to use, but the patch is still not connecting as I had expected it to (somebody only barely understands the basics of computer science if claiming so isn't hubris on my part). My process is as follows:
-
Start MIDIPatchbay, create a single universal MIDI strip with both input and output - name "PD-Input"/"PD-Output" for reference. Allows all notes, allows all messages, clocks in real-time.
-
The patch itself doesn't show up in Audio/MIDI setup. That's fine, as I understand it the MIDI signal is traveling through MIDIPatchbay anyways. IAC is turned off and no software instruments are installed. I can close down Audio/MIDI setup and ignore it.
-
Start Mainstage, make sure that the volume is up, a patch is readied, and that Mainstage recognizes that there is a MIDI input available. Mainstage recognizes "1 MIDI input available"
-
Start PD-Extended and open the Sequencer patch.
-
Go through the process of making sure all components of the patch are functioning (it has a sequence tempo set, all the notes are active, volume is up, all the usual goodies).
-
Check DSP to on (I don't think it's necessary, but I tend to idiot proof my processes).
-
Set MIDI output from PD-Extended to "PD-Input" from MIDIPatchbay.
At this point I have all three pieces of software running, I believe in the correct order, and connected to one another with the only glitch being that I don't get a lick of audio. I'll dump the patch here for reference:
I try to keep things fairly self-explanatory in terms of sends/receives and with comments within the object arrangement, but here's hoping it's legible. If the problem is in the coding of the patch I can take it across to that section of the forum. That said, even making a simple patch to create a note with set number, velocity, and duration on manual bang and send through the midiout doesn't seem to be arriving to Mainstage. I suppose I could use one of my other programs capable of MIDI synthesis, but that seems superfluous.
I really appreciate the help, I've worked with PD less frequently over the past five years or so than when I was first learning the ropes; it always seems like I have to re-learn a few things as well as double check on my knowledge of possible objects to use... Always something new.
 posted in I/O hardware diy
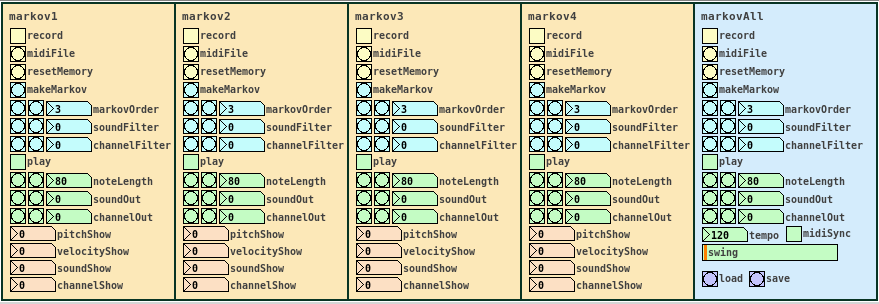
markovGenerator: A music generator based on Markov chains with variable length
Edit: There is a general [markov] abstraction now at https://forum.pdpatchrepo.info/topic/12147/midi-into-seq-and-markov-chains/45
This is one of the early projects by @Jona and me. Happy to finally release it.
markovGenerator
Generates music from learned material using Markov chains. It is polyphonic, plays endlessly and supports Markov chains with variable length.
markovGenerator.zip (updated)
Usage:
- Record midi notes or load midi files
- Make Markov system
- Play
-
Record midi notes or load midi files
Until you reset the memory, each new recording will be added to the memory. The recorded material is seen as a loop, so that the last note is followed by the the first note, for endless play. markovGenerator handles recording midi and loading midi files differently: When you record midi, it will record notes according to the midi clock every sixth midi tick. This is defined in the counter in [pd midiclock]. So that way, breaks are being recorded and the rhythm is preserved. When loading midi files, no breaks are being recorded, the notes are just recorded in order, so the rhythm will be lost. In any case, simultaneous notes will be recorded as chords, so polyphony is preserved. -
Make Markov system
Set markovOrder to specify the length of the Markov chain. The higher the order, the more musical information will be kept, the lower the order, the more random it gets. You can use soundFilter and channelFilter to only use notes of the specified sound or channel. This is especially useful when working with midi files. Note that if there are no notes of the specified sound or channel, the Markov system will be empty and nothing will be played. Set the filters to zero to disable them. If you change the settings for the Markov system, click makeMarkov again for them to take effect. You can make new Markov systems with different settings out of the same recorded material over and over again, even when playing. If you record additional notes, click makeMarkov again to incorporate them into the Markov system. -
Play
While playing, you can change the note length, sound and midi out channel. Set soundOut and channelOut to zero to use the sound and channel information of the original material. Playing starts with the Markov chain of the last recorded notes, so the first note might be played first.
Use the markovAll section on the right to control all Markov channels at once. Here you can also set tempo, swing and midiSync, and you can save the project or load previous projects.
Have fun!
If it does not play, make sure that
- you recorded some notes,
- you hit the makeMarkov button,
- soundFilter and channelFilter are not set to values where there are no notes. Try setting the filters to zero and hit makeMarkov again.
About the Markov system:
You can see the Markov system of each Markov channel in [text define $0markov]. Notes are stored as symbols, where the values are joined by "?". A note might look like 42?69?35?10 (pitch?velocity?sound?channel). Chords are joined by "=". A chord of two notes might look like 40?113?35?10=42?49?35?10. Notes and chords are joined to Markov chains by "-". The velocity values are not included in the chains. Sound and midi channel values are only included, if soundFilter or channelFilter are off, respectively. Markov chains of order three may look like 42?35?10-36?35?10=42?35?10-60?35?2 with filters off and simply like 42-37-40 with both filters active, only using the pitch value.
Requires Pd 0.47.1 with the libraries cyclone, zexy and list-abs.
 posted in patch~
ALSA output error (snd\_pcm\_open) Device or resource busy
Sorry to necro this thread, but I finally found out how to run PureData under Pulseaudio (which otherwise results with "ALSA output error (snd_pcm_open): Device or resource busy").
First of all, run:
pd -alsa -listdev
PD will start, and in the message window you'll see:
audio input devices:
1. HDA Intel PCH (hardware)
2. HDA Intel PCH (plug-in)
audio output devices:
1. HDA Intel PCH (hardware)
2. HDA Intel PCH (plug-in)
API number 1

no midi input devices found
no midi output devices found
... or something similar.
Now, let's add the pulse ALSA device, and run -listdev again:
pd -alsa -alsaadd pulse -listdev
The output is now:
audio input devices:
1. HDA Intel PCH (hardware)
2. HDA Intel PCH (plug-in)
3. pulse
audio output devices:
1. HDA Intel PCH (hardware)
2. HDA Intel PCH (plug-in)
3. pulse
API number 1

no midi input devices found
no midi output devices found
Notice, how from the original two ALSA devices, now we got three - where the third one is pulse!
Now, the only thing we want to do, is that at startup (so, via the command line), we set pd to run in ALSA mode, we add the pulse ALSA device, and then we choose the third (3) device (which is to say, pulse) as the audio output device - and the command line argument for that in pd is -audiooutdev:
pd -alsa -alsaadd pulse -audiooutdev 3 ~/Desktop/mypatch.pd
Yup, now when you enable DSP, the patch mypatch.pd should play through Pulseaudio, which means it will play (and mix) with other applications that may be playing sound at the time! You can confirm that the correct output device has been selected from the command line, if you open Media/Audio Settings... once pd starts:
As the screenshot shows, now "Output device 1" is set to "pulse", which is what we needed.
Hope this helps someone!
EDIT: I had also done changes to /etc/pulse/default.pa as per https://wiki.archlinux.org/index.php/PulseAudio#ALSA.2Fdmix_without_grabbing_hardware_device beforehand, not sure whether that makes a difference or not (in any case, trying to add dmix as a PD device and playing through it, doesn't work on my Ubuntu 14.04)
 posted in technical issues
pd 0.47.1 change audio settings will hang program both on Mac and Windows
@leowang Hello....... The audio settings should match the hardware of the computer. If you try to set the "wrong" settings it will hang Pd. but as every computer setup is different it is impossible to give advice. Beware.... Delay (ms) and Block Size are not called the same things always in asio and other drivers......
Also, setting too "tight"...... trying to set the latency too low will cause problems.
Here is a patch that will set the audio-settings back to a relaxed normal setup........ fix.pd ..... and then you can try again.
Open it and save the settings.......
It is useful if you get into a situation where Pd will not open properly either....... because of the audio settings...... or where in fact it has already hung as soon as you open the audio-settings....... which is why you cannot change them to the correct ones!
David.
 posted in technical issues
Pd quits when opening Midi settings
Which version of Pd and on which operating system?
Can't say for sure what's up, one long-standing issue with Mac and Windows PD is that PD has never had a proper software midi interface between the app and the system. What it does have is a hack-in that will connect PD midi to - at maximum - the first nine ports on the system's midi port list and nowhere else. ATM only ALSA MIDI on linux has anything close to a fully interfaced PD midi to system buss.
To get full access to the max available midi porting on Mac/Win you have to start with all midi ports on the system deactivated. You then have to use 3d party midi patching software such as Midi Patchbay on Mac (don't use IAC leave it deactivated) or an equivalent Windows program to create nine virtual midi ports to occupy those first eight slots on the system list. Start PD and connect it to the nine virtual ports. Activate all the other midi ports/devices that you need on the system, then use the patching software to do the actually midi routing to external software and devices.
If the above sounds ridiculous -- it is! Supposedly this is actually being worked on (finally) but it requires a major rewrite of badly botched coding. Most of the Pd coders don't really "get" midi and the few that do haven't been very active since they contributed the ALSA code. Take it from someone who has written multiple midi synth editors with Pd-- there's a reason I prefer PureData on linux.
posted in technical issues
libpd on mac: clarification requested on expected behavior of cpp sample
Hi! I am running Pd-0.47-1-64bit on Mac OS 10.11.6 and libpd 0.9.2. I am trying to work with the samples/cpp/pdtest. Here's the github repo. I currently have an app that takes video and spits out a 2D array of color values for regions of interest to file. I have a pd patch that then loads those into a table and plays the corresponding pitch. I need the two (patch, c++ app) to coordinate the IPC.
I compiled the cpp code in the samples directory however, when running pdtest executable there is no patch opened. Is this by design? I was not able to find a pd-vanilla to build from source so took the most recent (pd-0.47-1-64bit.mac.tar.gz). Does libpd need to have the pd built after libpd? If so, can anyone please point me to a src file?
Here is a truncated output from running the compiled pdtest. Could someone tell me if this is what is expected?
Thank you for your help.
BEGIN Patch Test
Patch: "pd/test.pd" $0: 1003 valid: 1
Patch: "pd/test.pd" $0: 0 valid: 0
Patch: "pd/test.pd" $0: 1005 valid: 1
PD: PATCH OPENED: 1003
print: 0
PD: PATCH OPENED: 1005
print: 0
FINISH Patch Test
BEGIN Message Test
FINISH Message Test
BEGIN MIDI Test
FINISH MIDI Test
BEGIN Array Test
array1 len: 10
array1 0.0857145 0.328572 0.500001 0.57143 0.514287 0.47143 0.357144 0.285715 0.057143 0
array1 0 1 2 3 4 5 6 7 8 9
array1 10 10 10 10 10 10 10 10 10 10
FINISH Array Test
BEGIN PD Test
FINISH PD Test
Processing PD
PD: bang
PD: 100
PD: symbol test string
PD: bang
PD: 100
PD: symbol test string
PD: 1.23 a symbol
PD dollar zero: 1.23 a symbol
PD: 1.23 sent from a List object
PD: msg 1.23 sent from a List object
PD: 1.23 sent from a streamed list
PD MIDI: notein 2 60 64
PD MIDI: ctlin 2 0 64
PD MIDI: pgm 2 101
PD MIDI: midiin 1 239
PD: symbol test
PD: START MSG TEST
CPP: bang toCPP
CPP: float toCPP: 100
CPP: symbol toCPP: kaaa
CPP: list toCPP: 100 2.3 test 1 2 3 ffsfff
CPP: message toCPP: kaa 1 2.3 test ffs
PD: MSG TEST FINISH
PD: START MIDI TEST
PD: MIDI TEST FINISHED
PD: START ARRAY TEST
PD array1: 10
PD array1: 10
PD array1: 10
PD array1: 10
PD array1: 10
PD array1: 10
PD array1: 10
PD array1: 10
PD array1: 10
PD array1: 10
PD: FINISH ARRAY TEST
PD: test_abs: Hello World!
CPP MIDI: note on: 0 0 127
CPP MIDI: note on: 0 0 127
CPP MIDI: note on: 0 60 64
CPP MIDI: control change: 0 64 100
CPP MIDI: program change: 0 99
CPP MIDI: pitch bend: 0 2000
CPP MIDI: aftertouch: 0 100
CPP MIDI: poly aftertouch: 0 64 100
CPP MIDI: midi byte: 0 239
CPP: float env: 75.5457
CPP: float env: 87.9506
CPP: float env: 93.5842
...
CPP: float env: 88.5503
CPP: float env: 87.7612
print: 1
CPP MIDI: note on: 0 0 0
CPP MIDI: note on: 0 1 127
CPP: float env: 86.8932
...
CPP: float env: 41.2584
CPP: float env: 0
print: 2
CPP MIDI: note on: 0 1 0
CPP MIDI: note on: 0 2 127
...
print: 20
CPP MIDI: note on: 0 19 0
CPP MIDI: note on: 0 20 127
 posted in libpd / webpd