Need help
Lời khuyên khi mua bán đất đường Trần Phú Điện Thắng dành cho khách hàng
Mỗi khách hàng tham gia vào mua bán đất đai luôn mong muốn có lợi nhuận và làm giàu. Tuy nhiên để đảm bảo an toàn khi đầu tư, bất kỳ khách hàng nào cũng cần có kinh nghiệm cho bản thân. Từ đó mới có thể mua bán đất đai có lợi nhuận cao và dễ dàng hơn. Qua đó, khi tham gia vào bán đất đường Trần Phú Điện Thắng cần có kiến thức và kinh nghiệm. Bởi vì,mua bán đất đường Trần Phú Điện Thắng có thuận lợi nhưng vẫn tồn tại những điều bất lợi. Do vậy, mỗi khách hàng cần trang bị kiến thức đầy đủ khi quyết định đầu tư vào đất đường Trần Phú Điện Thắng. Như vậy mới có thể đảm bảo an toàn khi đầu tư cũng như có lợi nhuận hấp dẫn.
Tìm hiểu thông tin trước khi đầu tư vào bán đất đường Trần Phú Điện Thắng
Trước khi quyết định đầu tư vào mua bán đất đường Trần Phú Điện Thắng phải xem xét kỹ lưỡng. Điều này nhằm đảo bảo an toàn khi có những trường hợp mảnh đất không đúng với giấy tờ. Bên cạnh đó, còn có trường hợp giấy tờ giả và mảnh đất đó trái phép. Qua đó nhận thấy rằng, việc mua bán đất có rất nhiều trường hợp rủi ro. Vì vậy, khách hàng cần cẩn trọng trong quá trình mua bán đất đường Trần Phú Điện Thắng. Như thế mới giúp khách hàng dễ dàng đầu tư mà không gặp những bất lợi không đáng có.
Bên cạnh đó, tìm hiểu rõ tình hình thị trường tại Đất đường Trần Phú Điện Thắng. Bởi vì, đất đường Trần Phú Điện Thắng trở nên sôi nổi gần đây nên có sự cạnh tranh rất mạnh. Chính vì thế, giá đất tại đây sẽ có nhiều thay đổi, thậm chí các cò đất thổi giá khi bán đất đường Trần Phú Điện Thắng. Do đó để hạn chế khi mua đất với giá quá cao so với thị trường thì khách hàng nên suy xét kỹ càng hơn. Như vậy khách hàng có cơ hội mua bán đất đường Trần Phú Điện Thắng và không gặp rủi ro.
Bán đất đường Trần Phú Điện Thắng phải có giấy tờ pháp lý đầy đủ
Giấy tờ luôn luôn quan trọng đối với trao đổi mua bán. Đặc biệt, trong mua bán đất đường Trần Phú Điện Thắng nó luôn quan trọng hơn cả. Bởi giấy tờ đất đảm bảo khi gặp bất lợi khi mua bán đất đường Trần Phú Điện Thắng. Tuy nhiên, giấy tờ đó phải chính xác và được công chứng của chính quyền địa phương mới được xem là mảnh đất đó hợp pháp. Do đất đường Trần Phú Điện Thắng đang trở thành khu vực được nhiều nhà đầu tư lựa chọn. Chính vì điều này, sẽ có nhiều đối tượng cò đất, môi giới hoạt động trái phép và tràn lan.Vì thế, khách hàng khi mua bán đất đường Trần Phú Điện Thắng giá rẻ phải có giấy tờ pháp lý đầy đủ. Từ đó giúp khách hàng yên tâm và tránh những lừa đảo của các đối tượng cò đất trái phép.
Qua những điều trên, khách hàng phải luôn tìm hiểu kỹ thông tin đồng thời có kinh nghiệm cũng là lợi thế. Vì vậy, mỗi khách hàng hãy trang bị cho mình đầy đủ trước khi quyết định mua bán đất đường Trần Phú Điện Thắng. Như thế mới tránh những rủi ro, bất lợi bên cạnh đó có được mảnh đất mong muốn và nguồn lợi nhuận hấp dẫn.
Xem thêm tin tức về bán đất đường Trần Phú Điện Thắng giá rẻ tại: https://datdienthang.com/mua-ban-dat-dien-thang/ban-dat-duong-tran-phu-dien-thang/
 posted in technical issues
Mobmuplat Help
Nhập cư Châu Âu vĩnh viễn thông qua chương trình định cư Síp
Đầu tư định cư Síp chính là con đường giúp nhà đầu tư nhập cư Châu Âu vĩnh viễn và sở hữu quốc tịch Châu Âu - Thẻ xanh Châu Âu nhanh nhất.
Đôi nét về quốc đảo Síp
Síp (Cyprus) là đảo quốc nằm giữa biển Địa Trung Hải với khí hậu nắng ấm quanh năm và những bãi biển tuyệt đẹp. Cộng hòa Síp nằm giữa các lục địa của châu Âu (phía đông Hy Lạp), Châu Phi (phía bắc Ai Cập), và Châu Á (phía nam Thổ Nhĩ Kỳ và phía tây Syria và Li băng). Với diện tích khoảng 9,251 kilomet vuông, đây là hòn đảo lớn thứ ba ở Địa Trung Hải.

Đảo Síp là hòn đảo lớn thứ 3 ở Địa Trung Hải
Đảo Síp là hòn đảo lớn thứ 3 ở Địa Trung Hải và là địa điểm thu hút lượng lớn khách du lịch từ khắp nơi trên thế giới. Hơn nữa cộng hòa Síp còn có nhiều bệnh viện tư nhân hiện đại cung cấp dịch vụ khám chữa bệnh, dịch vụ y tế và phẫu thuật. Các bệnh viện này tọa lạc ở khắp nơi trên khắp đất nước.
Chất lượng cuộc sống tại đảo Síp rất lý tưởng nhưng chi phí sinh hoạt tại đây lại khá rẻ, rẻ hơn nhiều so với các nước Anh Quốc. Đây chính là lý do khiến đảo Síp được lựa chọn là nơi đầu tư định cư Châu Âu. THẺ XANH CHÂU ÂU giá TỐI THIỂU của các nhà đầu tư.
Đầu tư định cư Síp – Con đường nhập cư Châu Âu vĩnh viễn
Chương trình đầu tư lấy quốc tịch đảo Síp là cách đơn giản và hiệu quả nhất để nhà đầu tư được cấp quốc tịch Liên minh châu Âu và nhập cư Châu Âu vĩnh viễn. Đây là chương trình duy nhất cho phép nhà đầu tư lấy ngay quốc tịch châu Âu trong 90 ngày mà không cần phải đáp ứng bất kỳ yêu cầu nào về thời gian cư trú. Đặc biệt, nhà đầu tư và các thành viên trong gia đình được hưởng đủ mọi quyền lợi của công dân châu Âu, bao gồm quyền được sinh sống và làm việc ngay lập tức tại bất kỳ quốc gia thành viên nào thuộc khối châu Âu.

Đầu tư định cư Síp – Con đường nhập cư Châu Âu vĩnh viễn
Đặc biệt, hộ chiếu của Síp được miễn Visa ở 158 nước trong đó có Anh, Úc, Mỹ, Hồng Công.. thuộc loại hộ chiếu có quyền lực hàng đầu thế giới. Đảo Síp còn là thành viên liên minh EU và khối Schengen nên người có hộ chiếu Síp sẽ được xem như là một công dân EU thực thụ, có quyền sống, đi lại, học tập và làm việc tại 27 nước như Pháp, Đức, Bỉ..Hiện hộ chiếu Việt Nam chỉ mới được 48 nước miễn thị thực, xếp thứ 78/104 nước chỉ ngang với cộng hòa Trung Phi hay Turkmenistan. Vì vậy việc đầu tư định cư để lấy hộ chiếu Síp giúp công dân Việt Nam thuận lợi trong việc đi lại, sinh sống, học tập và làm việc.
Cho đến thời điểm hiện tại, Chính phủ Việt Nam và Chính phủ Cộng hòa Síp vẫn chưa có một ký kết nào liên quan đến việc miễn thị thực nhập cảnh cho công dân cả hai nước đảo Síp và Việt Nam. Do đó, nếu công dân Việt Nam muốn đến Cyprus du lịch hay đi công tác cần phải xin visa Cộng hòa Síp.
Nếu bạn cảm thấy hứng thú với bài viết của chúng tôi thì có thể tham khảo thêm bài viết: Đầu tư định cư Quốc tế và những điều bạn cần biết
posted in technical issues
Purr Data 2.5.0
and this is what i get after cloning the repository and trying to build
fremen@fremenCPU MINGW64 /c/purr-data
$ git clone https://git.purrdata.net/jwilkes/purr-data.git
Cloning into 'purr-data'...
remote: Counting objects: 47163, done.
remote: Compressing objects: 100% (22028/22028), done.
remote: Total 47163 (delta 24626), reused 46952 (delta 24468)
Receiving objects: 100% (47163/47163), 67.66 MiB | 1.09 MiB/s, done.
Resolving deltas: 100% (24626/24626), done.
Checking out files: 100% (17854/17854), done.
fremen@fremenCPU MINGW64 /c/purr-data
$ cd purr-data/l2ork_addons
fremen@fremenCPU MINGW64 /c/purr-data/purr-data/l2ork_addons
$ ./tar_em_up.sh -Z
Fetching the nwjs binary from
https://git.purrdata.net/jwilkes/nwjs-binaries/raw/master/nwjs-sdk-v0.22.1-mingw64_nt-10.0-x64.tar.gz
https://git.purrdata.net/jwilkes/nwjs-binaries/raw/master/nwjs-sdk-v0.22.1-mingw64_nt-10.0-x64.tar.gz:
2018-04-04 15:24:28 ERROR 404: Not Found.
./tar_em_up.sh: 203: command failed with exit code 8, exiting now.
./tar_em_up.sh: 203: wget -nv $nwjs_url
 posted in news
Final Solution: Anyone looking to control Ableton Live...easily
Hi All
A little bit of work to set up but forget midi mapping...google it if you dont believe me.
After a lot of time spent trying to get a simple but sophisticated way (using a minimal 8 button floorboard) to control Live on w10, I thought I would share this particular solution to possibly help others (especially after the help offered here on this forum). I tried a number of scenarios, even buying Max 4 Live, but it turns out a lot simpler than that. It needs 3 main areas set
FOOT CONTROLLER BEHAVIOURS/GESTURES
Create pd patch that gives you 'behaviours' per switch. Ill be happy to share mine but Im just cleaning them up atm.
eg I have 4 standard behaviours that dont take too much time to master
- Action A: A quick click (less than 500ms) Always the primary action
- Action B: Long click ie 1 click down and pedal up after 500ms. I use this eg always as a negative ramp down for things like lowering volume but if its just held down and released in a natural way, it is the secondary action of the switch
- Action C: 3 Click ie 1 quick down, up and then hold down. I use this for a positive ramp eg as volume up
4 Actiion D: Double click, Always a cancel
These are all mapped to note/ctrl outs that match the 'Selected Track Control' below
PLUGIN
Use PD VST to create a plugin version of your patch. This is loaded into Live as a control track. Live manages the connection of your floor board etc into the actual track so you dont wrestle with the io. I always use track 1 for click (forget Live metronome, this is much more flexible and can have feel/swing etc) so I dedicate track 2 to control.
Use LoopMIDI to create a virtual midi cable that will go from this track and be fed into the remote script.
REMOTE SCRIPT: 'Selected Track Control'
Download latest from http://stc.wiffbi.com/
Install to live and make sure your notes/control conform.
Enable this as a control surface in live and connect midi in from the plugin. Think about giving the guy a donation...massive amount of work and he deserves it!
I use it to control 8 tracks x 8 scenes and is controlled by 3 switches
- Scene control up and down (A = down, B = up)
- Track control same as scene
- Rec/Fire/Undo Volume up and down (A = fire/rec, B = Volume Down, C = Volume Up, D (Dbl Click) = Undo
The scenes and tracks wrap so there isnt too much foot tapping
There is quite a bit more to it of course...its and maybe no one else needs this but it would have saved me a couple of weeks of time so Im happy to help anyone wanting to achieve gigging without a massive floor rig and an easy way to map and remember.
HTH someone
Cheers
mark
 posted in technical issues
Convert a reed organ to be MIDI controlled
@Pemega Sounds reasonable. But if you were to drive the solenoid both ways... on and off..... and add some mechanical hysteresis.... then you can bypass the problem completely. There was a patent in 1972 http://www.google.com/patents/US3683239 for this.
If they do not exist then all you would need to do (I know, it is never "that" easy) is to glue a small permanent magnet to the "on".... "down" side of the solenoid.
But they do exist...... try Googling "latching solenoid".......
If 1Kgf holding force and 10mm stroke will suffice........ https://www.ebay.co.uk/itm/BLP-Latching-Pull-Action-DC-D-Frame-Solenoid-10mm-stroke-12W-12Vdc-A1-3002500798/322919540231?hash=item4b2f812607:g:GLoAAOSwTf9ZWmss
The magnet needs to be powerful enough to "hold" the key return spring, and you might
need a sound damping buffer at the "stop"...... so a little more powerful again.
Repeat attempts at demagnetisation by the solenoid will mean that you need a permanent (nickel?) magnet..... something like what is used in a loudspeaker......
David
 posted in technical issues
Convert a reed organ to be MIDI controlled
I'm converting a reed organ to be MIDI controlled, and I'm using solenoids to pull down on the keys. There's 88 solenoids total, and I'm going to be powering it with 2x 40A 12V power supplies.
The solenoid control circuit I'm using is this:
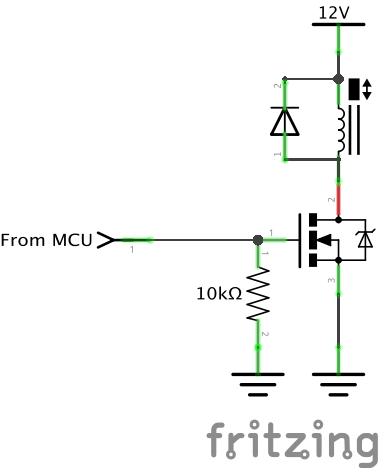
My problem is that each solenoid draws around 1.3A @ 12V. This results in very hot solenoids after less than a minute of being held down.
There are clever solenoid driver circuits that use a capacitor(http://www.kynix.com/Product/36.html) to give the solenoid the full power at first, then once the capacitor is charged (therefore no longer conducting DC power), power flows through a resistor that limits the current. However, this system needs time for the capacitor to discharge before being triggered again, and the capacitor has to be of a large value which would not work in this application well (my solenoid driver board design is dense enough at the moment... I want my component count to stay as low as possible). There are more complex circuits that get around the capacitor discharge problem using transistors and even more components (how they work is besides the point here) but again, I don't want many more components since every component gets multiplied by 88 circuits.
However, I think I have an idea for a solution, but I don't know if it would work. My idea is to PWM the raw power going into (all of) the existing circuits and then adding a single capacitor in parallel with my solenoid, like this:
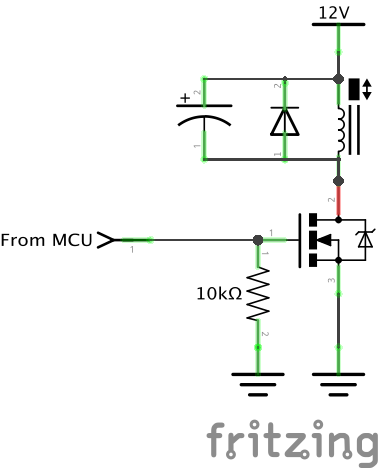
Thus, when the MOSFET was triggered, this capacitor would get charged to 12V before discharging into the solenoid, making it fire. Now that the solenoid is down, the PWM power (lets say its 50% duty cycle, therefore equal to 6V) can keep it held down.
Is this idea completely flawed? If it is, any ideas? Thanks.
 posted in technical issues
purr-data: bugs in [dropdown] object
Hello,
one good thing about [dropdown] ... if you got a lot of entries it will automatically create a scrollbar.
But this scrollbar doesn't work as expected. If you left-click the scrollbar to do some scrolling - dropdown will collapse and select one of the first entries. clicking the up-down buttons will do the same.
Using the mousewheel to scroll down (when mouse is over the scrollbar) will work but if you move the mouse to the left to select an entry on the bottom of the list, dropdown will scroll up again.
If your patch-canvas has scrollbars and the dropdown-object has scrollbars and you try to select an entry with your up/down-arrow keyboardkeys, both the canvas and the dropdown will scroll. Moreover the selection of dropdown will jump 2 entries on one keypress.
Another thing i noticed: If you place the drop down on the bottom of a patch-window and you try to do a selection, the dropdown object doesn't "drop-up" so it's hard to select something.
Tof/ menubutton worked differently, it would open up the drop down list independently from the parent window.
It's nice to have mousewheel in a gui object now. would be cool for sliders too. Any chances we could have mousewheel for the ds-draw command? (just like mouseover 1..)
Heres a patch showing the dropdown bugs:
 posted in technical issues
PD-2-ThoughtMap (a patch and its children as a plantuml-usecase) (Linux Shell Script/Package) (v0.1.1 update below)
When I run the command prompt I get:
100% Complete...
grep: .pd: No such file or directory
grep: .pd: No such file or directory
grep: .pd: No such file or directory
cat: /root/pd-externals/pd2thoughtmap/res/HTMLHEADER.txt: Permission denied
cat: /root/pd-externals/pd2thoughtmap/res/IMAGEHEADER.txt: Permission denied
cp: cannot stat '/root/pd-externals/pd2thoughtmap/res/jquery.js': Permission denied
cp: cannot stat '/root/pd-externals/pd2thoughtmap/res/jquery_plantuml.js': Permission denied
cp: cannot stat '/root/pd-externals/pd2thoughtmap/res/rawdeflate.js': Permission denied
pd2thoughtmap/pd2thoughtmap: line 253: defaultbrowser: command not found
 posted in extra~
[muse] -- float array that acts like a musical scale
Creates music scales using simple lists or by sending new pitches to individual notes. The more creation arguments there are, the more inlets there will be. It sends a frequency value through the 1st outlet and the unaltered midi value through the 2nd outlet.
- [muse 40 4 7]
- Sending 0, 1, 2 returns 40, 44, 47 respectively.
- The scale cycles through higher and lower octaves
- 3, 4, 5 returns 52, 56, 59
- -1, -2, -3 returns 35, 32, 28
functions:
- [list | l | d | x | i ..(
- Takes a list of numbers and maps the values to the array.
- Any non-numeric values are skipped over.
- They're basically all the same function, with the differences being in their offsets and/or whether it should change the size of the scale implicitly based on list size.
-- i is an implicit list, which changes the size of the scale based on the number of arguments specified.
-- x is an explicit list, which means that it doesn't change the scale size because it's leaving that up to the user to change explicitly. This message is also good for changing the root note.
-- list or l is the default list, and whether it interprets lists implicitly or explicitly is based on whether the toggle "exp" is set to 1 or 0. By default, lists are interpreted implicitly.
-- d has an offset of 1. It's basically a short form of [list d ...( or, a list that skips the root note. Like a normal list, it also adheres to the "exp" toggle to determine whether it is implicit or explicit.
- [exp 1|0(
- sets a boolean to determine whether or not scale size is implied in the size of lists sent.
- if exp equals 1, scale size will not change, unless the list is preceded by i.
- if exp equals 0, scale size will change, unless the list is preceded by x.
- [n $1(
- sets the size of the scale.
- the scale by default, with no creation arguments, is only 2 float values. This amount grows based on how many arguments are specified. but the array also resizes itself automatically to twice its original size whenever a size requested goes over the current maximum range.
- the same doubling effect applies to lists with more arguments than the maximum scale size.
-- [muse 40 2 4 5 7 9 11] has 7 floats worth of bytes reserved for the scale.
-- upon receiving [n 16(, since 16 is greater than (7 x 2), scale is resized to hold 16 floats.
-- upon receiving [n 17(, scale is resized to hold 32 floats. This doesn't mean the scale uses all 32 notes, but the space is now reserved if you ever decide to increase the scale size later.
- sets the size of the scale.
- [set $2 $1(
- scale is assigned the value $1 at index $2.
-- [set 6 11( set the 6th interval to 11.
- scale is assigned the value $1 at index $2.
- [ref $1(
- sets the reference pitch of middle A.
-- default value is 440.
- sets the reference pitch of middle A.
- [tet $1(
- assign the number of tones in an octave.
-- tones refer to how large a semi-tone needs to be in order to evenly disperse an octave into a specific amount of distinct pitches.
- assign the number of tones in an octave.
- [oct $1(
- assign the number of notes in an octave.
-- notes refer to the number of semi-tones that the scale should jump when going to the next or previous octave.
- assign the number of notes in an octave.
- [octet $1( / [ot $1(
- assigns # of notes and # of tones simultaneously
- [peek label(
- prints the current scale.
- a label is optional.
- [ptr label(
- prints the current size of the float pointer that your scale uses. It isn't necessarily the same size as the scale itself.
 posted in extra~
Yet another Sequencer (Buchla style not including randomizer)
Thanks man, I was just getting ready to edit the thing so I could have multiple instances and just add a route to the first inlet so that I could make some random note patterns or not random note patterns I guess sort of like having a structured set of notes with 2 or more sequencers and then change to another cord or mode with all that nesting ought to be pretty nice to jam along with. also recorded a 3 hour jam with 2 sequencers last night. I accidently closed my fractal sequencer sometime during the first hour, i was just getting ready to mess with the synths and get them dialed in to the sound I wanted after getting all the instruments tuned, the microphone , good and grounded as well as the headphones. The tuning is mostly 22edo or modes od 22edo since my piano is mostly tuned to a 12of22 whitekeys porcupine[7] and black keys superpyth[5] the piano actually needs a good tuniong going over but it was still fun to jam with the synth sequences being perfectly in tune to porcupine15circ which is what I named MEANTONE-KILLER accidently. so the4 synth starts out in 22edo then porcupine15 then porcupine[7]. The piano is somewhat tuned to 12of22, all the instruments are fretless but I have markers on them. It was mostly just having fun recording and learning some modes and seeing how tihs mixed mode tuning works, porcupine is cool because you can play it in 22 or 15 edo and it sounds great. I even playd in 7edo and also some JI overtop of it while I was listening to the new lite version of xensynth. definately the most fun I've had recording in quite some time.
 posted in patch~