Pure Data noob
We have all been there............
You have an abstract idea, and you are hard pressed to get ahead and build your patch!
But before you start....... you have to “know”...... at least......... that this.............
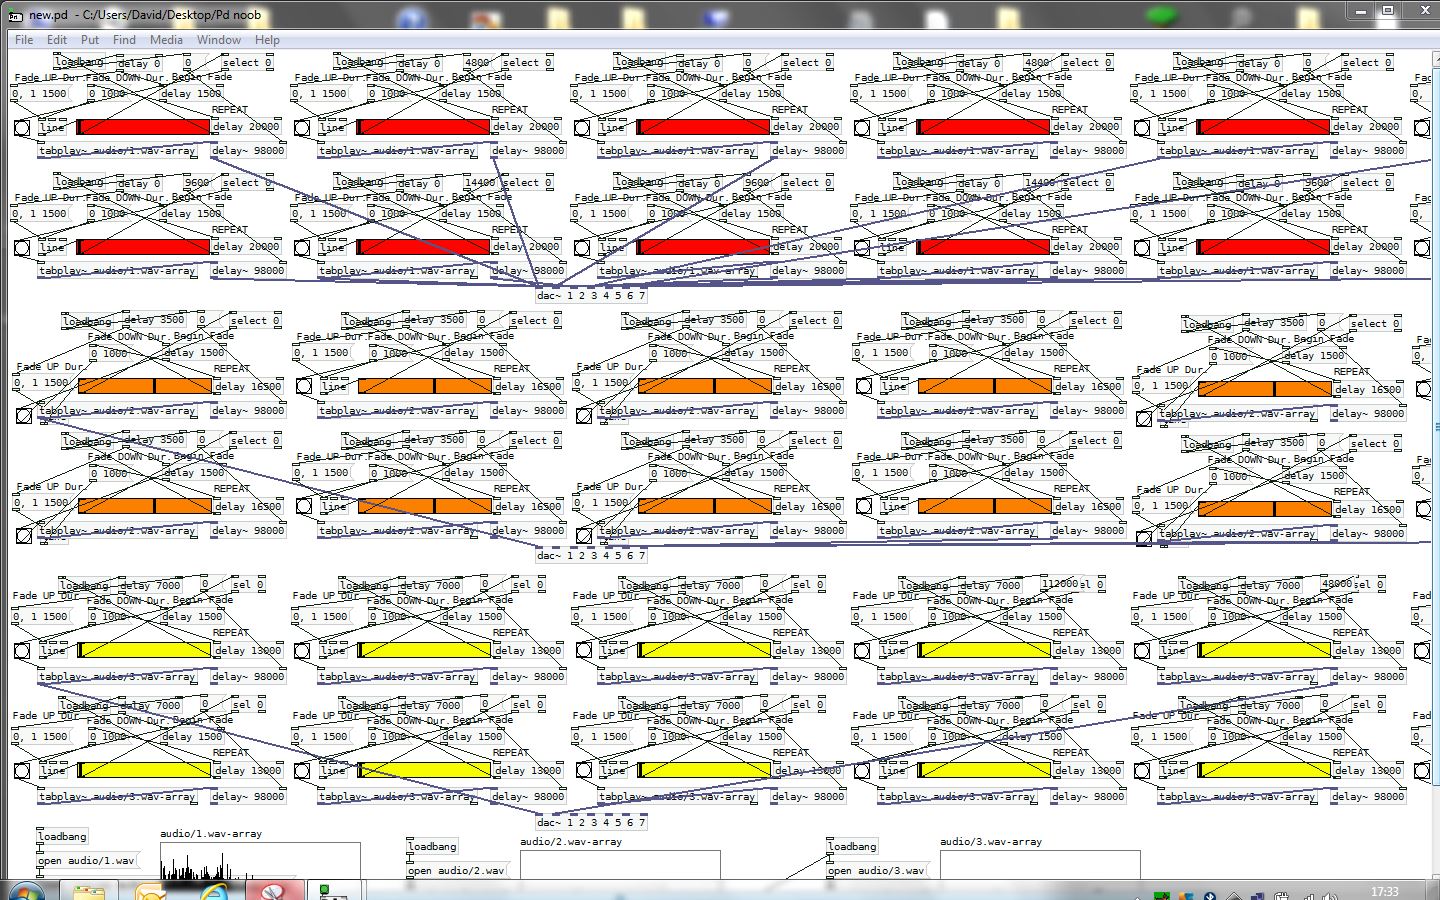
Is the same as this..........
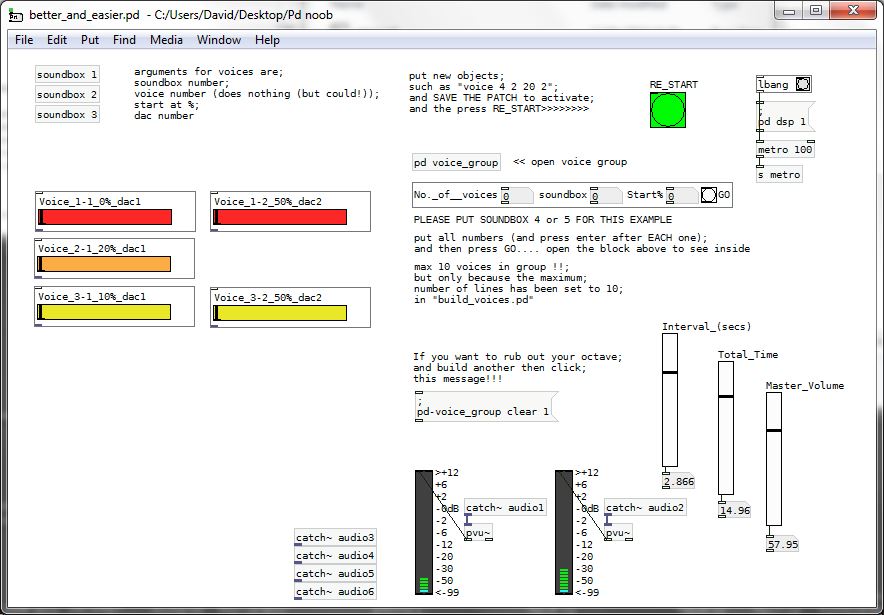
Well........nearly. There is in fact much more in the second patch.
And although the second patch is not perfect (in fact there are many mistakes), it is much easier to work with (and easier to find those mistakes).
You can build the first patch in about 2 minutes using just two components (abstractions) of the second patch. An abstraction is a patch... like a subroutine... that you can use over and over again.
Why is this important?
Because at some point your patch will become very messy, and if you are unlucky then it will stop working. You will not be able to see the mistake in the giant cobweb that you have created...... and when you finally spot that mistake you will have to fix it in 200 different places!
It is quite likely that you will then delete important items or connections by accident and cause more problems...... and not finish your project on time.
If you have a new brainwave with the first patch then you will be eating your breakfast after a sleepless night with your patch. With the second you will be hearing the result within minutes.
Please study the attached patches for as long as you can remain interested. They are difficult if you really are a complete beginner. If you have more experience then you will of course understand a lot more...........
If none of that is even remotely understandable then you have missed out on the basics.
It is much easier to use a dishwasher if you know where to put the soap and that it needs mains electricity to work at all......... http://puredata.info/docs/manuals/pd/x2.htm
DO NOT read chapter 2.9 yet.
( I have tried to explain some of the workings, especially the use of $ variables within an abstraction. (PLEASE SEE THE POST "show_me_dollars" BELOW IF YOU DO NOT UNDERSTAND THE USE OF "$"))
Try to remember while you are working that there is almost always a better (and easier) way to build your patches. Look in “soundbox.pd” as well for some $ clues!
As your project progresses you might come back here again, having found that you are able to create abstractions of your own. You will then be amazed at your understanding of what I am sure looks very difficult at this first glance!
Please do glance........it will do you good in the long run......
Pd noob.zip
David.
 posted in tutorials
Export to exe or dmg format
Eimer,
Pd and Pd-extended is free software and you may redistribute it, even in modified form, provided you follow the license terms (BSD and GPL).
If you are on OSX, it is very easy to create your own application with Pd-extended under the hood. Select menu-item 'file>>Make app from patch' or 'file>>Make app from folder'. What you get is a Pd-extended package with your patch as startup patch. The Pd window is minimized directly after startup, so at a first glance you don't notice it is Pd. But it is still fully functional with all Pd-extended libraries in it (120 MB!), and the possibility to edit patches and create new ones. With some extra tweaking, you can replace the Pd icon with an icon of your own make. The preferences file of this 'app' is within the app folder. If you included all necessary abstractions, and eventually your homebrew externals, you can distribute it as a stand alone app.
But probably you are not on OSX, otherwise you would have already seen this option. For Linux or Windows you could do something similar to the 'Make app' as described above, but do it by hand. You could write an executable tcl script to start Pd with your patch as startup patch, and eventually include other options in the script. (Pd uses Tk/tcl for graphics and other purposes, so it is included in every binary distribution of Pd-extended). The user can click that script to open your 'application'.
Disadvantages of distributing apps instead of patches are:
- you need to make separate distributions for every platform
- applications are large so you need ample download bandwidth on your server or host
- if Pd is obscured, you can't refer to Pd pages for support
All taken together, I see little advantage for distributing stand alone apps rather than Pd patches. If you want to make user-friendly distributions of your patches, you could organise them in a decent directory structure, where abstractions and other essential files are included in the search path by the [declare] object. For the user it is then a matter of installing a recent Pd(-extended) if they do not have it yet, and opening the main patch in your patches package. If all goes well, this is piece of cake, and on the other hand if they have troubles with soundcards etcetera, this is not something you could have prevented by supplying an app instead of a patch.
Katja
 posted in output~
Open Kinect?
hey buscon,
here's a copy of a mail i sent a friend, and the corresponding patches.
you can see these patches being used here:
(original mail)
ok here's a simplified version of the patch i use. i've just modified the "mud" patch and haven't checked it all, so there are bugs and errors everywhere, but i guess you're just interested in the abs which receive and dispatch the data from kinect.
so the kinect is received by osceleton and what i get in pd is osc messages. basically it's x, y, and z coordinates for each point of the body. so you'll be interested in the patches "kinector" and "shooter".
KINECTOR:
- it translates the osc into data that the granular sampler "mud" can understand (0 to 1 linear).
- move the horizontal sliders to chose a user and a joint.
- toggle from "value" to "CC". in X Y and Z type a sending chanel number. in the granular patch, toggle from value to CC, so you can affect a receiving chanel number for each automatisable parameter.
- hit the "learn" buton and then cover with your body the area you wish to use. this sets minimums and maximum for each axis. if you want to calibrate the whole body at ounce first select "all_joints". hit the "learn" buton again to end calibration. body motion is now active.
- the toggle on the top right activates remote sound control for the "learn" function, for if you work alone. enable it, use the vertical slider to choose the gate for incoming volume. stand at your starting point, and clap or scream. calibrate, and clap again.
- if you toggle from "abs" to "rltv", instead of calibrating the movement of each joint in absolute space it will consider their relative distance to the torso joint. the advantage of this is one movement will have the same effect wherever you are positioned in the space.
- you save, open, and load presets as textfiles on your drive. you can save presets for the whole patch on the top right of the master patch.
SHOOTER:
- basically the same as kinector, but used for one-shots instead of continuous changes.
- chose a user, a joint, an axis, and a direction
- type a chanel cumber where it says CC
- in "time", type a time in miliseconds. everytime a joint passes a chosen point in space in a chosen direction, it will output a line from 0 to 1 in the chosen time.
- calibrate in the same way. you can use "all_joints" too bu there's a huge error somewhere so if you do first toggle to "value".
- same as kinector for the rest.
ok here you go. i don't know how much you know pd, so that's why i explained as much as i could. these patches are absolutely not clean, they're my first ideas since i got the kinect, and i'm working on more to have one tight patch in the end (including speed detection, movement prevision to compensate latency, etc ... ).
ok hope this helps.
if you have trouble using the "mud" patch let me know. if you are going to use the patch, please let me know and make sure you mention it's mine.
cheers
salut
gab
 posted in technical issues
DJ/VJ scratching system
First my story: (you can skip down to END OF STORY if you want)
Ever since I saw Mike Relm go to town with a DVDJ, I've wanted a system where I could scratch and cue video. However, I haven't wanted to spend the $2500 for a DVDJ. As I was researching, I found a number of different systems. I am not a DJ by trade, so to get a system like Traktor or Serrato with their video modules plus turntables plus hardware plus a DJ mixer, soon everything gets really expensive. But in looking around, I found the Ms.Pinky system and after a little bit, I found a USB turntable on Woot for $60. So I bought it. It was marketed as a DJ turntable, but I knew that it wasn't really serious since it had a belt drive, but it came with a slip-pad and the USB connection meant that I wouldn't need a preamp. And so I spend the $100 on the Ms.Pinky vinyl plus software license (now only $80). This worked decently, but I had a lot of trouble really getting it totally on point. The relative mode worked well, but sometimes would skip if I scratched too vigorously. The absolute mode I couldn't get to work at all. After reading a little more, I came to the conclusion that my signal from vinyl to computer just wasn't strong enough, so I would need maybe a new needle or maybe a different turntable and I didn't really want to spend the money experimenting. I think that the Ms. Pinky system is probably a very good system with the right equipment, but I don't do this professionally, so I don't want to spend the loot on a system.
Earlier, before I bought Ms.Pinky (about two years ago), I had also looked around for a cheap MIDI USB DJ controller and not found one. Well, about a month ago, I saw the ION Discover DJ controller was on sale at Bed, Bath & Beyond for $50. They sold out before I could get one, but Vann's was selling it for $70, so I decided that that was good enough and bought one. I had planned to try to use it with Ms. Pinky since you can hook up MIDI controllers to it. But it turns out that you can hook up MIDI controllers to every control except the turntable, so that was a no go. If I had Max/MSP/Jitter, I could have changed that, but that's also way expensive. So, how should I scratch? My controller came with DJ'ing software and there's also some freeware, like Mixxx, but none of this has video support. So I look around and find Pure Data and GEM.
And I see lots of questions about scratching, how to do it. And there are even some tutorials and small patches out there, but as I look at them, none of them are quite what I'm looking for. The YouTube tutorial is really problematic because it's no good at all for scratching a song. It can create a scratching sound for a small sample, but it's taking the turntable's speed and using that as the position in the sample. If you did that with a longer song, it wouldn't even sound like a scratch. And then there are some which do work right, but none of them keep track of where you are in the playback. So, whenever you start scratching, you're starting from the beginning of the song or the middle.
So, I looked at all this and I said, "Hey, I can do this. I've got my spring break coming up. Looking at how easy PD looks and how much other good (if imperfect) work other people have done, I bet that I could build a good system for audio and video scratching within a week." And, I have.
END OF STORY
So that's what I'm presenting to you, my free audio and video scratching system in Pure Data (Pd-extended, really). I use the name DJ Lease Def, so it's the Lease Def DJ system. It's not quite perfect because it loads its samples into tables using soundfiler which means that it has a huge delay when you load a new file during which the whole thing goes silent. I am unhappy about this, but unsure how to fix it. Otherwise, it's pretty nifty. Anyway, rather than be one big patch, it relies on a system of patches which work with each other. Each of the different parts will come in several versions and you can choose which one you want to use and load up the different parts and they should work together correctly. Right now, for most of the parts there's only one version, but I'll be adding others later.
There's a more detailed instruction manual in the .zip file, but the summary is that you load:
the engine (only one version right now): loads the files, does the actual signal processing and playback
one control patch (three versions to choose from currently, two GUI versions and a MIDI version specific to the Ion Discover DJ): is used to do most of the controlling of the engine other than loading files such as scratching, fading, adjusting volume, etc.
zero or one cueing patch (one version, optional): manages the controls for jumping around to different points in songs
zero or one net patch (one version: video playback): does some sort of add-on. Will probably most commonly be used for video. The net patches have to run in a separate instance of Pd-extended and they listen for signals from the engine via local UDP packets. This is set-up this way because when the audio and video tried to run in the same instance, I would get periodic little pops, clicks, and other unsmoothnesses. The audio part renders 1000 times per second for maximum fidelity, but the video part only renders like 30 or 60 times per second. Pure Data is not quite smooth enough to handle this in a clever real-time multithreading manner to ensure that they both always get their time slices. But you put them in separate processes, it all works fine.
So, anyway, it's real scratching beginning exactly where you were in playing the song and when you stop scratching it picks up just where you left off, you can set and jump to cue points, and it does video which will follow right along with both the scratching and cuing. So I'm pretty proud of it. The downsides are that you have to separate the audio and video files, that the audio has to be uncompressed aiff or wav (and that loading a new file pauses everything for like 10 seconds), that for really smooth video when you're scratching or playing backwards you have to encode it with a codec with no inter-frame encoding such as MJPEG, which results in bigger video files (but the playback scratches perfectly as a result).
So anyway, check it out, let me know what you think. If you have any questions or feedback please share. If anyone wants to build control patches for other MIDI hardware, please do and share them with me. I'd be glad to include them in the download. The different patches communicate using send and receive with a standard set of symbols. I've included documentation about what the expected symbols and values are. Also, if anyone wants me to write patches for some piece of hardware that you have, if you can give me one, I'll be glad to do it.
Keith Irwin (DJ Lease Def)
 posted in patch~
PdLive!
Thanks C.!
The amazing jazzdrumbox patch is from Andy, many of the patches here come from forums and posts from users.
The drummachine is actually mine ") so thanks
so thanks
There is so many patch because it's a collection (even if some patches are very close to each others, maybe I'll make a selection later)
- the CTL patches deal with data ( for instance : midi seq, midi automations, or fiddle and bonk analyse to track signal and send midi notes and vel)
- Fx are fx
- S patches are instruments to be played with midi keyboard, or with ctl patches.
- z patches are used in other patches and can be used to create new ones.
Instruments patches are meant to be browsed with your classic browser, and I wanted them to be opened in a new pd window. But I guess I could add a menus to the main mixer patch to open synth, ctl patches and fx
The workflow 'should' be to first select your sounds/instruments select the audio bus then they are caught in the main window and that's were the patching begins with effects and controls. The main limitation is that I only have 5 audio buses for now, but I should add some more later on, a signal router may come in handy at that time .
 posted in patch~
Different ways of Implementing Delay Loops
Ta Toxonic - I'll take a look at the patch tonight. Good of you to take the time. Apologies if I've misunderstood though, but I think what you're describing is not quite what I mean: The pitch shift is separated out from the delay time - you're running a pitch shift effect into a separate delay line, which is not going to give the same effect. The delay time will not shorten as the pitch rises. I'll take a look at your patch tonight though as I may have misunderstood what you're getting at.
Maelstorm - thanks also. I understand why the pitch changes on a delay pedal. The pitchshifter patch was a bit of a red herring - though of course it's the same principle. The difference between what you're (both, I think) talking about and what I'm talking about is the way that the pitch changes.
Assuming a stable C tone playing into the delay:
With the standard simple PD delay set up, if you move the read point of a vd~ then you get a glissando as it accellerates, a constant pitch change as it moves at constant speed. So if you turn the knob to change the delay time in the middle of a tone you start with a constant pitch (C), then get a rise of pitch, then it levels out at a new pitch (as you turn then stop turning the knob),
_
___/
If you feed back into the delay, the glissando is repeated as the read speed changed while the write speed was constant:
_ _ _ _
/ |/ |/ |/ |
The effect I'm looking to emulate on the other hand is more akin to changing the speed of a phasor~ reading an array - the pitch change is not a blip, but a stable interval's transposition - eg: you turn the knob, the pitch of the repeats rise by a given interval and stays at that pitch as it repeats (now more quickly):
______
___/
If you play a constant C tone, then speed up the delay until it is a major third higher, you get a major third diad (until the delay dies away), rather than a C tone with a repeating squiggle overlaid.
The effect is the same as you get by speeding up a tape loop delay (though the pedal I'm trying to imitate is a digital delay) which is why I think the rate of the write and read heads are being increased by the same amount.
[edit, just tried to make this clearer and removed a couple of errors]
 posted in technical issues
Announce: mmm-0.1.0-eden
hi forum.
we proudly announce the first public release of our compact composer
for pd, mmm.
grab it at http://netpd.org/mmm-0.1.0.zip
mmm is best described in it's faq, see below. don't expect too much
yet, there is still a lot to be done. comments, bugreports, cash, are
welcome.
have fun with it!
christopher charles & enrique erne
faq for mmm-0.1.0 - eden
what is mmm?
mmm is a pd patch collection aimed at providing a studiolike(?),
streamlined, dynamic interface for making synthetic music.
screenshots?
http://www.netpd.org/mmm.png
ymmv depending on your operating system. we put some effort in
detecting the operating system and setting the fontsize according to
it, but quirky xorg or dpi settings might screw things up again.
where can i get it?
we currently host the mmm at http://netpd.org/mmm-0.1.0.zip ,
alternatively, you can grab netpd, enter the chat, and if either of
the authors is online, download it directly through netpd and start
rocking.
what does "mmm" stand for?
mmm was originally just the working title, but we came to like it
somehow. the original meaning is "music making machine" but you can
substitute every m for whatever you want. so "massive multiplayer
music" is okay with us, too.
what is the inspiration?
having worked on/with the bagoftricks (lots inconsistently coloured
gop-patches to be connected freely) and netpd (lots of
inconsistent-looking windows to clutter up the screen), we came to
mock up an clean, dynamic interface in which modules don't bring their
own gop or open their own window, but log onto the interface that's
provided for them by the motherpatch. all modules sharing the same
interface made it easy for them to share the same sequencer and
arranger.
what are the dependencies?
mmm should work with pd-0.39 and zexy installed. iemlib is important
for many synth and effects patches, and there's even set of gem
modules you can chain if you want.
is it actually usable?
no. this 0.1.0 release is rather a tech demo and a taste of things to
potentially come. you can crunch some acid loops out of it already,
but don't sell your protools studio equipment to start working with
mmm on monday.
how does it work?
mmm's interface (mmmmain.pd) is divided into 3 parts: there is the
module/channel view, where you can chain up synths and effects on 8
different channels. select an empty field on a channel, and then use
the scrollbox on the left to select a patch and open it. when clicking
on a patch you loaded up in the module view, the 2nd view comes into
play: from there you control the patch's sliders on the left, right of
it is the stepsequencer for each of the slider (means everything is
sequencable!). yet you won't hear anything until you did the following
2 things: press play in the uppermost row of mmmmain, and set up the
arranger to play the stepsequence. the arranger is not module-based,
but controls all modules of a channel are grouped in the arranger. for
now, you can only select pattern 01 or nothing to play in the
arranger. so set up a loop for the first pattern (loopstart:0,
looplength:1) set the first field on the channel you got your patch on
in the arranger to p01 and start making some noise.
does it work online?
yes. mmm is compatible to netpd and will automatically log on to
netpd's server if you have the netpd chat open. you can also download
the whole mmm package through netpd. feel free to jam around the
world.
what's not working yet / what is planned?
as for now, there is no support for samples whatsoever, it isn't
planned to support them soon. further, there is no hard disk recorder
available yet, but it is planned. the arranger/sequencer combo is very
crippled at the moment, only supporting 1 16-step-pattern to choose
from and 1 page of 16 patterns in the arranger. this will change
rather soon. next there are plans for luxury editing functions,
especially in the sequencer like copy, paste, random pattern,
interpolation and so on. plans exist for full keyboard control, but
this will be worked on not too soon. the module roster is far from
being complete yet, more is to come.
can i save my stuff?
should be possible with the buttons above the channels. don't rely on
the result though, this is still 0.1.0
can i add my own modules?
modules are not to hard to write, but for now, the list of selectable
modules is hardcoded. look at all the 4m-* patches in the patches
folder to see how they are ticking. contact us for adding your patch
to the mmm or try to figure out yourself how it works ")
what's the license?
mmm is licensed under the gnu lgpl. if you think this is a too useful
product to be free of charge, please consider donating the amount of
money you would've paid for it (or the amount of money you got from
selling your protools equipment on monday) to a trust of your choice.
who are the authors?
mmm is developed by enrique erne (eni, swiss, pd{at}mild.ch) and
christopher charles (syntax_tn, germany, chr.m.charles{at}gmail.com).
we can be contacted via email, irc (#dataflow) or directly in the
netpd chat. several patches within mmm are based upon netpd versions
of them, check netpd for the original authors. mmm shares some of it's
netcode with netpd, by roman haefeli.
disclaimer.
we cannot give you any guarantees on using mmm, not even that you
have fun. it should be relatively harmless, but don't come crying to
us if mmm accidently hijacks your *mule and downloads david hasslehoff
recordings to your computer.
eofaq
 posted in news
Escher-esque chord progressions
I've been getting into writing patches that generate music all by themselves, using mathematical
rules that apply quite nicely to music theory. I've made a few rhythm patches that make nice cross
rhythms using metronome division and delays (with values derived from multiples of the master
metronome), and i'll post these too if anyone is interested.
In this thread I'm showing off my "Mauritz Escher like Chord progressions" patch.
Screenshot: 
Mp3: http://responsible7.googlepages.com/zenpho_escher_pd.mp3
Patch: http://responsible7.googlepages.com/zenpho_escher.pd
First some basic music theory:
(skip this if you're comfortable with chords, 7ths, and inversions)
A major scale is constructed of 8 notes, with the "root" note doubled at the 8th note.
For the key of C major (all the "white" notes on a piano) the names and numbers of the notes in
the scale of C-major are:
Name, Number:
C, 1st (root)
D, 2nd
E, 3rd
F, 4th
G, 5th
A, 6th
B, 7th
C, 8th (remember the root is doubled at the octave)
A triad is constructed of the 1st, the 3rd, and the 5th notes in the scale.
A SEVENTH chord is constructed of a triad (notes 1,3 and 5) PLUS the 7th note in the
scale. So a C major 7th is note 1,3,5,7 or C,E,G,B.
Up until now we've been describing "standard" voicings of the chords, in other words, the notes
are played so that the root is the lowest pitched note, the 3rd is higher, the 5th is higher
still, and the 7th is the note just below the octave of the root.
At the risk of sounding redundant, "octave numbers" after the note name help clarify which octave
the note is to be played in. To play a C major 7th on the third octave, we would write:
C3,E3,G3,B3. To play it an octave higher we would write: C4,E4,G4,B4.
"Inversions" of chords re-order the pitches of the notes, but still play notes with the same
"name" as the 3rd, 5th, 7th etc. For example:
C3,E3,G3,B3 is a standard C major 7th...
...and G2,C3,E3,B3 is an inversion. All the notes are there (C,E,G,B) but they are in a different
order to the normal "Root, Third, Fifth, Seventh" arrangement. In this case, we say that "the
fifth is in the root".
Okay so now we know what a major 7th chord is. Lets deal with chord progressions.
Now imagine playing C3,E3,G3,B3 and removing the "root" (the C3) from the notes played,
we have a chord that reads "E3,G3,B3" - we were playing C major 7th and now we're playing E minor.
*THIS IS A VERY IMPORTANT STEP* Moving from C major 7 to E minor sounds "natrual" because the
notes that occour in C major 7 ALSO occour in the E minor.
Now lets make this E minor chord a 7th...
We've said before that a 7th chord can be constructed by playing the 1st, 3rd, and 5th notes, PLUS
the 7th note in the scale.
The scale of E minor (a flavour of minor) is:
Name, Number
E, 1st (root)
F#, 2nd
G, 3rd
E, 4th
B, 5th
C, 6th
D, 7th
E, 8th (octave)
The 7th note is "D" so we add the D note to our E minor triad to make E minor 7th.
E minor 7th is therefore: "E3,G3,B3,D4".
We can extend this E minor again, removing the root, working out the new scale for G major, adding
the 7th to make G major 7th, and again, and again, and again... but if we do - we keep moving
*UP IN PITCH* and spiral off the end of the keyboard.
HOW THE PATCH WORKS
Okay, so what my patch does is to take the idea of generating new 7th chords over and over,
but to play inversions of these chords so that the notes stay inside a single octave. If the
"root" note is in the 3rd octave, C3 for example. Then when I move to E minor, the D4 is
transposed to be a D3, to keep within this octave range.
Due to the fact that there are 12 semitones in an octave, and notes that fall outside the octave
range will wrap around to be an octave lower. The maths for generating the new chords basically
involves taking each note in the current major 7th chord and adding two semitones to each note in
turn.
Now our terminology could cause confusion here, because there are "notes in a scale" and "notes in a chord"... So I'm going to define some notation to show when i'm talking about the notes in a
chord.
For example:
A C major 7th has the notes C3,E3,G3,B3.
Note-1-in-the-chord is to be defined as chord_note_1.
Note-2-in-the-chord is defined as chord_note_2.
Note-3-in-the-chord is defined as chord_note_3.
Note-4-in-the-chord is defined as chord_note_4.
chord_note_1 has the pitch C3.
chord_note_2 has the pitch E3.
chord_note_3 has the pitch G3.
chord_note_4 has the pitch B3.
It is important to be clear about the idea of "pitch", "chord_notes" and "scale_notes" because
because chord_note_3 has the pitch "G3" and scale_note_3 of C major which is the pitch "E3".
Back to the procedure for generating new seventh chords.
We generate a major 7th to begin with.
C3,E3,G3,B3.
We add 2 semitones to chord_note_1 to get "D3", and we leave the other notes alone.
Our chord now reads: D3,E3,G3,B3.
Which is an "inversion" of E minor 7th.
This time we add 2 semitones to chord_note_2 to get "F#3", and we leave the other notes alone as
before.
Our chord now reads: D3,F#3,G3,B3
This is an inversion of G major 7th.
This time we add 2 semitones to chord_note_3 to get "A3", we leave the other notes.
Our chord now reads: D3,F#3,A3,B3
This is an inversion of B minor 7th.
This time we add 2 semitones to chord_note_4 to get C#4...
*BUT C#4 IS OUTSIDE THE OCTAVE 3! So we TRANSPOSE it down to C#3*
Our chord now reads: D#3,F#3,A3,C#3
This is an inversion of D major 7th.
After my patch modifies all 4 chord_notes, it moves back to chord_note_1, and adds another
2 semitones... over and over.
Eventually we get back to C major 7th again, but on the way we move through a variety of different
chords that evokes very interesting changes of moods.
Want to try playing with it?
Mp3: http://responsible7.googlepages.com/zenpho_escher_pd.mp3
Patch: http://responsible7.googlepages.com/zenpho_escher.pd
 posted in output~
Favorite ways of doing GUI
i think one thing you should take into account when designing a GUI is something that will fit well ontop of the work you've already done. if your patch has a message handling structure already embedded in it (one that is sufficient to control all parameters of your patch), it would be very easy to employ either of the trends mentioned above.
if your patch has a set up where many sub-patches on a main canvas, perhaps the graph-on-parent method would work well.
another consideration is displaying information from your patch (not just controlling or changing it).
though i guess the main thing is usability. certain components and controls are going to fit your patch better than others. if your patch needs to be used in some type of performance, what features will make the patch easiest to use for the performer.
i do not know much about it other than it exists, but joseph sarlo at UCSD is working on GrlPd...sometype of layer for making GUI's for your patches. the link is [url=http://crca.ucsd.edu/~jsarlo/gripd/
]http://crca.ucsd.edu/~jsarlo/gripd/
i hope this helped some and perhaps it will stimulate some forum discussion.
 posted in technical issues
Write table with 256 values coming from a number b
I'm guessing your patch receives the 256 values in a list?
You can extract the Nth element from a list with a message box like [ $N (
But for a list length 256 this could get tedious to patch. What I suggest is making a Java program to make the patch.
Make a patch to extract the right parts from the list for a short list, say length 4, perhaps with a [ t l l l l] connected up to [ $N M (, where M=N-1, each connected to [ unpack f f ( ==> [ tabwrite ] . If you create the message boxes last, it will be easier to write the program.
Then write a Java program to generate the patch you want. It's best if the patch generated is a complete abstraction, so you don't have to edit the output patch each time you edit the Java program (say if you want different length lists).
Here is an example of a Java program that I wrote to generate a patch with 256 number boxes in a 4x64 grid. It doesn't follow my guidelines for being a complete abstraction - I edited the patch afterwards to add more stuff, which will cause me problems next time I want a different sized grid....
----snip-----
public class NumberGrid4x64 {
public static void main(String args[]) {
System.out.println("#N canvas 403 0 525 1216 10;");
int count = 0;
System.out.println("#X obj 2 18 cnv 15 110 1136 empty \\$0-canvas-r \\$1 4 12 0 10 -225280 -90133 0;"); count++;
for(int y = 0; y < 64; y++) {
for(int x = 0; x < 4; x++) {
System.out.println("#X floatatom "+(7+26*x)+" "+(42+16*y+4*((int)(y/4))+4*((int)(y/16)))+" 3 0 0 0 - #0-"+y+"-"+x+"-r #0-"+y+"-"+x+"-s;"); count++;
}
}
int count0 = count;
for(int y = 0; y < 64; y++) {
for(int x = 0; x < 4; x++) {
System.out.println("#X obj "+(120+200*x)+" "+(42+16*y+4*((int)(y/4))+4*((int)(y/16)))+" r \\$0-"+y+"-"+x+"-s;"); count++;
System.out.println("#X msg "+(220+200*x)+" "+(42+16*y+4*((int)(y/4))+4*((int)(y/16)))+" "+y+" "+x+" \\$1;"); count++;
}
}
int count1 = count;
System.out.println("#X obj "+(500)+" "+(18)+" t a;");
for(int c = count0; c < count1; c = c + 2) {
System.out.println("#X connect "+(c)+" 0 "+(c+1)+" 0;");
System.out.println("#X connect "+(c+1)+" 0 "+count1+" 0;");
}
}
}
----snip----
 posted in news