Build a MIDI controller with the Arduino, Firmata and Pure Data
Time to start contributing some knowledge back to the wonderful world that is the internet; today, a step by step nice and easy tutorial on getting started to building your own MIDI controllers with the arduino.
When researching for my ableton controller project, I didn’t find much out there about using firmata on an arduino to send data to software. The standard approach just seemed to be create the code in the arduino language, upload it to your board and hack one of those MIDI to USB cables as a bodge job way of getting the MIDI out of the arduino.
So why firmata and pure data? Well the whole idea of firmata is that you flash it to your arduino, and it throws out serial about whats going on with the arduino inputs and outputs, then you decide how the software treats the readings coming in and going out.
Theory out the way, lets build some controllers. You’ll need a few things…
HARDWARE:
An arduino and something to wire into it (for this i’ll be using a pot)
A USB cable for your arduino
SOFTWARE:
Arduino – http://arduino.cc/en/Main/Software
Pure Data – http://puredata.info/downloads
Firmata – http://at.or.at/hans/pd/objects.html#pduino
Something to patch your new controller into; like Reason or Ableton Live
- SETTING UP FIRMATA AND PURE DATA
Install Pure Data and create a folder to store all your patches somewhere. Unzip Firmata and add the files ‘arduino.pd’, ‘arduino-test.pd’ and ‘arduino-help.pd’ to your new Pure Data folder. The ‘arduino.pd’ file is the object that we use in PD for opening up communication with your arduino and routing it to PD. Done? Awesome, your software is almost set up.
- FLASHING FIRMATA TO YOUR ARDUINO
Install the latest version of arduino and open it up. Connect your arduino with the USB cable to your laptop (i’m using a macbook for this by the way). In the example patches, open up “Standard Firmata”, select your board (im using an arduino mega), and your serial port (look for tty.usbserial for use with a USB cable). Then compile and hit the upload button and your arduino is now ready to use firmata and communicate with Pure Data!
- WIRING UP A POT

Potentiometers are cool, and theres a great arduino tutorial of how to wire one up here: http://www.arduino.cc/en/Tutorial/Potentiometer
Basically, all you need to know is that there are three pins; your two outer pins govern voltage flow across the pot, meaning one has to be 5V and the other has to be ground. It doesn’t matter which, but your 5v pin is going to be where your pot reads maximum, so convention dictates this should be the right hand pin. The center pin needs to be connected to an analog in on the arduino and will read the value of the pot as it sweeps from ground (0v) to 5v.
All wired up? Plug it into your laptop and open Pure Data, we’re ready to get things talking.
- SETTING UP OUR PATCH
Open the example “arduino-test.pd” Pure Data patch you copied over earlier. It should look like this one…

The test patch has everything we need to open a connection and enable pins. Firstly, lets delete a bunch of stuff and make our window a bit bigger. Hit Command + E to enter edit mode in Pure Data.

Ok a quick explaination; the key component here is the ‘arduino’ object. This is being drawn from the file you copied in earlier, and is what communicated with your arduino. Here we can do everything to control the arduino from opening a connection, to receiving data.
The large grid allows us to set the mode of each pin on the arduino. Remember pins 0 and 1 are reserved for Rx and Tx. I’m using analog pin 4 for this demo, so I’ve set my pin mode for pin 4 to ‘analog’.
Now we can plug our arduino in and get a reading from the potentiometer.
- ARDUINO INTO PURE DATA
With your arduino plugged in, hit command and E to bring us out of edit mode. In our patch, click on ‘Devices’ above the arduino object and open up the pure data terminal. (That other thing that loads with PD that has all the scary code in)

The “Devices” message connected to the arduino object pings your computer to find what devices are connected and on what serial ports. Since we’re using a USB cable to connect our arduino, we’re looking for something with ‘usbserial’ in it, in this case; port 2.
Select the relevent port in the green box at the top (remember the first box is ‘0’, second is ‘1’ and so forth) and hit ‘Open’ to establish a connection. Check the terminal to see if the connection was sucessful.

Now lets check we’re getting something in. Create a number box (Command + 3) and connect it to the relevent pin on the ‘Route analog’ box at the bottom. In this case, pin 4.
One more thing; if you’re not getting any readings in, you’ll need to click on ‘pd old analog/digital controls’ and enable your pins here too. What I tend to do in my patches is just not include the large grid but make my own ‘old pd’ controls custom to what i’m enabling/disabling to save space.
Here’s what the ‘old analog/digital controls’ subpatch looks like (pin 4 enabled)…

Come out of edit mode and check that you’ve got readings. If so congratulations! If not, troubleshoot, start with making sure your usb connection is opened, make sure all the correct pins are enabled (remember you’re counting from 0 not 1 on most of these buttons in PD, it’s just the way computers work).
- SCALING READINGS TO MIDI
So we’ve got a reading and chances are it’s to 3 decimal places between 0 to 1. No problem, create a new object (Command + 1) and type “autoscale 0 127”. This allows us to scale the input to a min and max value, in this case 0 to 127 of MIDI. Next, lets get things looking nice, create a new object and type “knob”. Connect this AFTER the autoscale object. (the knob is default set to read inputs from 0 to 127. Then create another number to display the scaled MIDI data coming out, and finally a new object and type “ctlout 1”.
It should look something like this…

The second box should be outputing values from 0 – 127 now, and the knob giving a visual representation of your potentiometer.
Now lets patch it into ableton…
- PURE DATA TO ABLETON LIVE
Firstly, you’ll need to set up your macs IAC driver if you’ve not done this. Basically you’ll need to go into Audio/MIDI preferences and enable your IAC driver. Then create a new input and output. One for input to DAW and one for output from DAW. Google around for a tutorial on this, its really simple, a 30 second job.
After you’ve set up your IAC driver, go back to PD and go to preferences > MIDI Settings, and connect your IAC driver.

Open ableton and go to its MIDI preferences. Create a device listing for your IAC driver and enable its ins and outs into ableton like so…


And thats it! Create an instrument and try to assign something! I’ve got it controlling the brightness of a bass sound here.
Shout out for Facu who requested this tutorial. Hopefully it’ll help some of you looking to get into this stuff and start building things but with no idea where to start.
 posted in tutorials
Problem loading libraries (iemguts)
Eighteen-year-old Shen Qiang says he soon thereafter began winning Canadian contests, and came in Canada in 2004. He will be a proud representative of the Canadian Olympic team this summer. While he didn't immigrate explicitly to further his table tennis career (he came with his family, who live in Toronto), he's happy with Table Tennis Canada's sports app, and is looking forward to the autumn opening of this new 24-hour training centre in Ottawa, so that he can work harder on his sport. Produced in northeast China, Shen first picked up a paddle at nine. He quit college to proceed to Harbin, a town 300 kilometers away, to train full-time and represent the province of Heilongjiang and had left home. The contest in China was extremely intense, '' he states. https://ok.ru/group/53953306755154/ The athletes trained five days a week, six hours a day; they were paid to train fulltime and compete, he says. "In China, it is very competitive because in the event you do not make results then you will be removed from the team, and if you don't have table tennis without a school, there is no future for you."
 posted in technical issues
Andúril (MobMuPlat app): fwd/bwd looper + 14 effects + elven cloak (control parameters via env~ and pitch as you play)
Andúril (MobMuPlat app): fwd/bwd looper + 14 effects + elven cloak (control parameters via env~ and pitch as you play)
UPDATED VERSION (corrected MobMuPlat system crash problem):
anduril.zip
This has been long in coming and I am very glad to finally release it (even tho my handheld hardware is not up to the job of running the elven cloak feature).
First a demo video and some screenshots, , and then the instructions.
DEMO VIDEO
SCREENSHOTS
Intention(s):
The app is designed to give (specifically a guitarist) tho really any input (even prerecorded as is the case in the demo (from: "Laura DeNardis Performing Pachabels Canon" from https://archive.org/details/LauraDenardisPerformingPachabelsCanon, specifically the wave file at: https://archive.org/download/LauraDenardisPerformingPachabelsCanon/PachabelsCanon.wav, Attribution-Noncommercial-Share Alike 3.0) FULL Control over the "voice" of their output-sound.
It includes:
a 5-band EQ (on page 2 of the app) (upfront that is applied to all incoming sounds);
a looper: with record, forward, backward, speed, and bypass controls (that runs via a throw along with the effects channel)
14 effects each with 3 controllable parameters (via the xy-slider+centered knob) including: chorus, distortion, delay, reverb, flanger, tremolo, vibrato, vcf, pitchshifter, pitchdelay, 12string, stepvibrato, pushdelay (delayfb driven by magnitude of the env~), and stagdelay (2 out-of-sync delay lines which can be driven in and out of phase by the sum of their delwrite+vd's so what goes in first may come out last)
elven_cloak: which drives the 3 parameter controls via the peak bands amplitude and proximity to a set pitch (midi note) and whose window can be broadened or shrunk and shifted within that window, i.e. the three effect parameters are changed automatically according to what and how you play
and
a tester synth: that randomly sends midi pitches between 20-108, velocities between 20-127, and durations between 250-500ms.
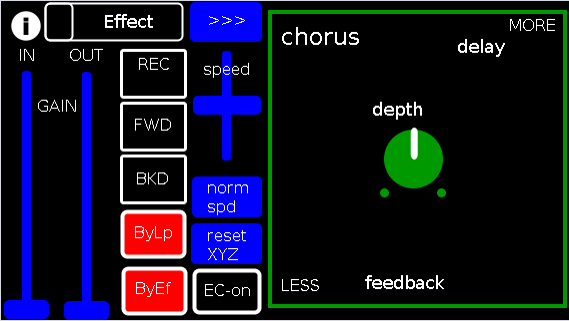
CONTROLS (from top-left to bottom-right):
PAGE 1:
Effect: effects menu where the you choose an effect;
>>>,<<<: page navigation buttons;
IN,OUT: gains (IN is the preamp on the EQ5, and OUT is applied to total output);
REC,FWD,BWD,speed,normspd: the looper toggles and on speed, higher is faster and mid normal and normspd resets to mid;
xy-slider+centered knob: the 3 parameter controls + their labels (the bottom is x, top y and above the knob for the third one), the name of the selected effect and its parameters load each time you choose from the Effects menu, bottom left is lowest, top-right highest;
ByLp,ByEff: bypasses for the looper and effects "channel" (the outputs are summed);
EC-on: elven cloak toggle (default=off);
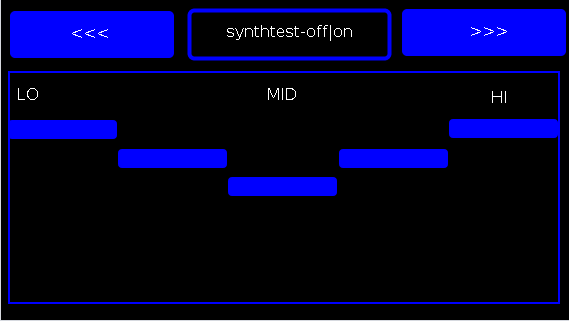
PAGE 2:
the EQ5 controls;
synthtest: off|on, default is off;
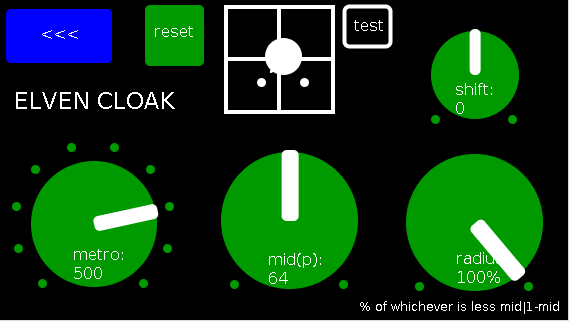
PAGE 3: elven cloak controls
reset: sets shift, metro, mid, and radius to 0, 500(ms),64,100% respectively (i.e. the entire midispectrum, 0-127) respectively;
mini-xyz, test: if test is on, you see a miniature representation of the xyz controls on the first page, so you can calibrate the cloak to your desired values;
shift: throws the center of the range to either the left or right(+/-1);
metro: how frequently in milliseconds to take env~ readings;
mid: the center in midipitch, i.e. 0-127, of the "watched" bands
radius(%): the width of the total bands to watch as a percentage of whichever is lower 1-mid or mid
END CONTROLS
Basic Logic:
There are 4 modes according to the bypass state of the looper and effects.
A throw catch and gain/sum/divide is applied accordingly.
End:
As I mentioned at the first, my handheld(s) are not good enough to let me use this but it runs great on my laptop.
So...
I would love to hear if this Does or Does Not work for others and even better any output others might make using it. I am enormously curious to hear what is "possible" with it.
Presets have not (yet ") been included as I see it, esp. with the cloak as a tool to be used for improv and less set work. Tho I think it will work nicely for that too if you just turn the cloak off.
been included as I see it, esp. with the cloak as a tool to be used for improv and less set work. Tho I think it will work nicely for that too if you just turn the cloak off.
hmmm, hmmm,...
I think that's about it.
Let me know if you need any help, suggestions, ideas, explanations, etc. etc. etc. regarding the tool. I would be more than happy to share what I learned.
Peace, Love, and Ever-Lasting Music.
Sincerely,
Scott
p.s. please let me know if I did not handle the "attribution" part of "Laura DeNardis Performing Pachabels Canon" License correctly and I will correct it immediately.
Ciao, for now. Happy PD-ing!
 posted in patch~
C74 and my definitive Return2Pd
Again C74 shits on your users, as he makes enough with Pluggo.
Arbitrary changes and are not consulted frequently, but a change of license which means C74 owns everything that is created in Gen development tool, it really is a gesture of usury only expect from a corporation like Microsoft.
Many users have been developing in Gen since leaving, and read attentively the license before investing money, time and other resources to learn and develop.
/****************************************
Copyright (c) 2012 Cycling ’74
Permission is hereby granted, free of charge, to any person obtaining a copy of this software
and associated documentation files (the "Software"), to deal in the Software without restriction,
including without limitation the rights to use, copy, modify, merge, publish, distribute, sublicense,
and/or sell copies of the Software, and to permit persons to whom the Software is furnished to do so,
subject to the following conditions:
The above copyright notice and this permission notice shall be included in all copies
or substantial portions of the Software.
THE SOFTWARE IS PROVIDED "AS IS", WITHOUT WARRANTY OF ANY KIND, EXPRESS OR IMPLIED,
INCLUDING BUT NOT LIMITED TO THE WARRANTIES OF MERCHANTABILITY, FITNESS FOR A PARTICULAR PURPOSE AND NONINFRINGEMENT.
IN NO EVENT SHALL THE AUTHORS OR COPYRIGHT HOLDERS BE LIABLE FOR ANY CLAIM, DAMAGES OR OTHER LIABILITY,
WHETHER IN AN ACTION OF CONTRACT, TORT OR OTHERWISE, ARISING FROM, OUT OF OR IN CONNECTION WITH THE SOFTWARE
OR THE USE OR OTHER DEALINGS IN THE SOFTWARE.
*****************************************************/
/**********************************
Cycling ’74 License for Max-Generated Code for Export
Copyright (c) 2016 Cycling ’74
The code that Max generates automatically and that end users are capable of exporting and using, and any
associated documentation files (the "Software") is a work of authorship for which Cycling ’74 is the author
and owner for copyright purposes. A license is hereby granted, free of charge, to any person obtaining a
copy of the Software ("Licensee") to use, copy, modify, merge, publish, and distribute copies of the Software,
and to permit persons to whom the Software is furnished to do so, subject to the following conditions:
The Software is licensed to Licensee only for non-commercial use. Users who wish to make commercial use of the
Software must contact the copyright owner to determine if a license for commercial use is available, and the
terms and conditions for same, which may include fees or royalties. For commercial use, please send inquiries
to licensing (at) cycling74.com. The determination of whether a use is commercial use or non-commercial use is based
upon the use, not the user. The Software may be used by individuals, institutions, governments, corporations, or
other business whether for-profit or non-profit so long as the use itself is not a commercialization of the
materials or a use that generates or is intended to generate income, revenue, sales or profit.
The above copyright notice and this license shall be included in all copies or substantial portions of the Software.
THE SOFTWARE IS PROVIDED "AS IS", WITHOUT WARRANTY OF ANY KIND, EXPRESS OR IMPLIED, INCLUDING BUT NOT LIMITED TO
THE WARRANTIES OF MERCHANTABILITY, FITNESS FOR A PARTICULAR PURPOSE AND NON-INFRINGEMENT. IN NO EVENT SHALL
THE AUTHORS OR COPYRIGHT HOLDERS BE LIABLE FOR ANY CLAIM, DAMAGES OR OTHER LIABILITY, WHETHER IN AN ACTION OF
CONTRACT, TORT OR OTHERWISE, ARISING FROM, OUT OF OR IN CONNECTION WITH THE SOFTWARE OR THE USE OR OTHER
DEALINGS IN THE SOFTWARE.
*****************************************************/
Anyway
My return to Pd...
 posted in Off topic
Using sigmund to generate a noise sample then subtract it...
@svanya Hello Svanya...... first, I apologise for the "Spaghetti Omelette". Your patch was not at all messy. My damaged brain could not concentrate enough to comprehend any of it.
Noise is pretty random. There are elements of it that can be predictable depending on the source, but only by frequency. So a "hum" in Europe will be exactly 50Hz, and in the US 60Hz. High frequency noise (from poorer quality op amps) though is absolutely random. Often nowadays there can be some predictable noise from a computer bus, and again that can be filtered by a notch filter.
But apart from filtering those known frequencies you cannot "predict" the waveform of the noise. You can kill it dead with a reverse phase in real time, but once you have the desired signal, music or whatever, added to the noise then the battle is lost. You certainly cannot loop an "anti-phase" signal for future subtraction. The noise is not a repetitive waveform except for those determined frequencies.
Noise cancelling headphones have a microphone capturing the external noise and adding that out of phase to the headphone amplifier signal...... but the noise is "known" in real-time, which makes that possible.
As you have mentioned before, extreme filtering has some nasty side effects. In post production, where the "noise" is analysed, and an anti-phase signal added to what is deemed to be noise, the desired signal can be heavily distorted, to the point where some frequencies are so overly amplified that there is high frequency "ringing", and high frequencies "muted".... so the music ends up sounding like an old wax gramophone recording! It can only be used in very small doses. Clicks and pops are much easier to deal with.....
David.
 posted in technical issues
What's your favorite noisegate?
@svanya Use the MultibandNoiseFilter. The left inlet is audio, the right sets how much noise to remove. The outlet is the filtered audio,
Attach a slider to the right inlet with a range from 0 to 2. That ought to be a wide enough range that you can adjust it to clean things up without also destroying the voice signal.
How it works is pretty simple, but difficult for me to put into words. If you are interested in how it works, take a look inside NoiseFilter and NoiseDetector.
NoiseFilter pretty much just attenuates the audio based on the noise level that it finds. How it finds the noise level is the trick.
It uses the subpatch dBr to find the level of the signal, then passes that through a highpass filter and a low pass filter. Those two determine what is seen as "static" noise. Anything that changes slower than the high pass is static noise. Anything that changes slower than the lowpass is signal. Anything that changes faster than the lowpass is noise.
Changing the value of the highpass determines how fast things get filtered out - if it "eats" your long notes, then you need to make the cutoff of the high pass lower.
Once it has the filtered level, it takes the absolute value of the variations in the level and compares them to the selected noise reduction level. Anything below the desired level closes the gate. Since this causes a pulsing signal, theres's a lowpass to smooth it out.
Now, you have a signal proportional to how much noise is in your signal. The more the noise, the lower this proportional signal is.
Multiply that with your original audio, and it attenuates the audio according to how much noise there is.
The rest is splitting it into bands so that you don't attenuate everything at once, but just the frequencies where there's noise.
 posted in technical issues
Looking for PD guru...private proj
Cool...excellent in fact. Will start with 1 issue and go 1 at a time...
Main behaviour is a single click/double click/long hold. ie For midi sustain, a quick single click enables a filter which allows only note on values to play midi notes (for sustained atmoshpheres played from a midi guitar). Anything longer than a quick click is a standard momentary sustain pedal. A double click resets the pedal action and sends an 'all notes off' to clear everything.
I was planning to use this in a browser so I used an active X timer so it would be async to the rest of the script. Hope I have added enough comments to explain;
Insert Code Here
Case 64
    'Case CC 64 = sustain message from floorboard
    'Dat1 = Midi message type+channel
    'Dat2 = message value

    'default action is send cc64 to instrument out ie Dat2 = 127 and begin sustain regardless of note off filter/sustain action

    If Dat2>0 Then mox.OutputMidiMsg InstOut, &hB0, 64, 127
    'SC is prefix: SingleClick
    'Check if its the first trigger in timer sequence and timer has been fired
    If SCTiming = 1 then
        'Test how many pedal downs have occured during timer period
        If Dat1 = SCOldDat1 THEN
            SCClkCnt = SCClkCnt+1
        End If
    Else
        'Waiting for Single Click Pedal Up
        If WaitForSCPU=1 Then
            If (SCOldDat1=Dat1 AND Dat2=0) Then
                'Long Hold Action - cc64 sustain off
                mox.OutputMidiMsg InstOut, &hB0, 64, 0
                'Clear wait flag
                WaitForSCPU = 0
            End If
        Else
            'fresh trigger
            'sc and dc are single/double click actions that are executed as strings according to timer
            sc="FilterMGNoteOff = FilterMGNoteOff XOR True : mox.OutputMidiMsg InstOut, &hB0, 64, 0"
            ' PUREDATA NOTE: couldnt see any XOR functions?
            dc="mox.OutputMidiMsg InstOut, &hB0, &h7B, &h7F : FilterMGNoteOff = False : mox.OutputMidiMsg InstOut, &hB0, 64, 0"
            'SCTiming is a flag to indicate timer has fired
            SCTiming = 1
            SCTimer.enabled = true
            SCTimer.Duration = 400
            'set the click count to 1 (ie pedal down of 127 has ocurred)
            SCClkCnt = 1
        End If
    End If
    'Single Click previous value used for comparison/click count
    SCOldDat1 = Dat1
Insert Code Here
And here is the timer sink/sub;

Insert Code Here
Sub SC_Timer
    SCTiming=0
    'Do Timer results here
    If (SCClkCnt=3 OR SCClkCnt=4) Then
        'DC Behaviour
        Execute(dc)
    Else
        If SCClkCnt=2 Then
            'msgbox "sc"
            'SC Behaviour
            Execute(sc)
        Else
            If SCClkCnt=1 Then
                'Wait for pedal up
                'msgbox "pedal up"
                WaitForSCPU=1
            End If
        End If
    End If
    'Reset ClkCnt
    SCClkCnt=0
    SCTimer.enabled = false
End Sub
Hope that helps explain ")
The above example is a bit parametric in that it feeds strings to the sub. This type of module is used throughout the script so Im totally open to simplifying it/modding to make it better in PD...which, from what I have seen, looks like it should be able to do.
If I can get all the previous code to translate, would like to add a control panel showing the fcb with the the current status/values of footswitches on screen, or even just just plug a tablet on the front of the controller for the future.
Many thanks
Mark
 posted in technical issues
Noise filter for microphone (Live Audio)
Well, the forum crash seems to have eaten my last post.
I have made a noise filter to clean up audio signals live.
Other noise removal filters need to have a noise sample selected and try to remove that noise from the complete track - they only work offline.
This patch works online. It removes any stationary noise from the signal and doesn't need any user adjustment except that it does need to be told how much to reduce the noise.
"Stationary noise" is a signal whose frequency content and amplitude stay (more or less) constant for over 1 second. Fan hum is a good example, as well as the more or less "white" noise from the wind from the fan. Car motor sounds from a car travelling at constant speed is also a good example.
It will also kill feedback squeal cold, even at the lowest settings.
The patch is built in layers, and the lower layers can be used independently or combined and used to build different filters.
The attached zip file includes all the components from the lowest level up to a complete demonstation that takes in audio from a microphone and puts out filtered audio on line out. It also includes a set of help files that describe the function and use of the various modules.
Included modules:
NoiseLevelDetector.pd - estimates the amplitude of the stationary noise
NoiseFilter.pd - attenuates the signal based on the amplitude from
NoiseLevelDetector.pd Since it is more effective at high frequencies, it is best to feed it limited bandwidth signals and use multiple filters to cover the desired audio range.
BandLimitedNoiseFilter.pd - a Noisefilter that only works on the specified frequency range.
MultibandNoiseFilter.pd - a complete filter that covers the range from 40Hz upto 22000 hz to filter the complete audio spectrum.
Test.pd - demo program that demonstrates the use of MultibandNoiseFilter.pd
It works best for speaking voices. Singing tends to be more stationary. It could be adapted to singing voices by changing a single value in one of the lower level blocks.
The original idea was to create filter for removing car noises from microphone audio for two-way radios. When used to cover just the range from 300Hz to 3000Hz, it does a very good job.
The biggest disadvantage is that it will start making "musical noise" if there is a lot of noise and the attenuation is set high. It also adds a slight echoing quality to the filtered audio.
The project is hosted on GitHub: PureData NoiseFilter project.
posted in patch~
Conditional gate
@mod said:
But time and time again we see the same sort of posts. People who just want to turn an audio signal on and off use something like [spigot~], people use [counter] instead of basic pd objects. They post these patches and run into trouble that could easily be avoided by only using vanilla objects unless necessary.
What's wrong with [counter]? Objects like those remedy the trouble of trying to figure out how to make one using only vanilla objects. Not that it's particularly difficult to do, but it may just be more intuitive or time saving to someone to use [counter].
Of course most people are using extended, but it's such a vast ocean that no-one knows how EVERY object in extended works. The object in question here, [gate], i can only hazard a guess, but i'm thinking that a maximum of 50% of users know the cyclone library and in particular the [gate] object well enough to debug a patch.
Well, that's where the basic advice that you and others have posted comes in: Right click -> Help.
Besides, I don't really think that because less people know or use an object should deter one from trying it. It may just make more sense or fit with their particular programming preferences. I know I like to build from low-level objects and work up, but not everyone is so interested. For example, I've built my own compressor abstraction. But plenty of other people would rather just load a compressor object and be done with it. Nothing wrong with either approach.
Also, I've been using Pd long enough that I feel comfortable saying I'm in "expert" territory. I don't know what every extended object does, but I don't know what EVERY vanilla object does, either.
(I'm speaking from my own bad experiences here too, because my old patches had some extended objects in them, and i answered countless emails from people having trouble with those externals not loading. I could have saved myself a lot of time by just using the correct vanilla constructs in the first place)
Now, this is a different issue, and I'm more inclined to agree here. You can definitely ensure higher compatibility by sticking to vanilla objects, as some externals don't work correctly on all OS's and vanilla users may not have some of the more popular libraries installed, but it does come with the potential costs of flexibility or computational load. And, this is only an issue if you want to share your patches or use them on other OS's.
When I'm writing a patch that's for personal use only, and I don't expect to be sharing it, I tend to use whatever I want. But if I'm making an abstraction I might share, I usually follow an order of precedence:
1. Use vanilla objects where possible/practical for best compatibility.
2. Use extended objects if needed, since it's used widely and newbie-friendly.
3. If absolutely necessary, use a popular lib not included in Pd-extended, like GridFlow or RjLib (I've never had to do this, yet).
But that's entirely for compatibility reasons only.
@Shakasin said:
But is there something in vanilla that could replace my [gate] just curious ?
. [== 1] [== 2] [== 3]
| | |
[spigot] [spigot] [spigot] etc....
Connect the gate number to the left inlet of the [== ] objects, and the value you want to pass to the left inlet of the [spigot]s.
 posted in technical issues
How to Enjoy Your Favorite Videos on Portable Devices at Will For Mac
Are you a Mac user?
Do you still feel frustrated that you can't enjoy your favorite videos on portable devices at will?
Now, a professional software---Aiseesoft Video Converter for Mac(http://www.aiseesoft.com/video-converter-for-mac.html)
can help you to solve all the problems. With it, you can convert between all popular video and audio formats with super fast conversion speed and high output quality, such as AVI, MP4, MOV, MKV, WMV, DivX, XviD, MPEG-1/2, 3GP, 3G2, VOB Video, MP3, AAC, and AC3 Audio etc. In addition, the best video converter for Mac can also extract audio from video file and convert video to MP3, AC3, and AAC...as you want.
OK, let's move to how to use the amazing software.
Step 0: Download and install Aiseesoft Video Converter for Mac.
After a while, you can use the following interface:
http://www.aiseesoft.com/images/guide/dvd-converter-suite-mac/video.jpg
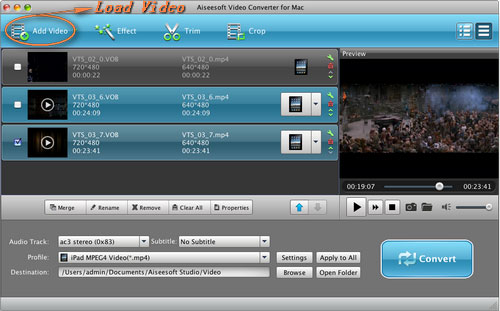
Step 2. Load Video
You can load your video by clicking "Add File" button or clicking "File" button, you can choose "add file" on a drop-down list.
Step 3. Output format and Settings
From the "Profile" drop-down list you can find one format that meets your requirement.
After doing the 3 steps above, you can click "start" button to start conversion.
Wait a minute, the conversion will be soon finished.
Tips:
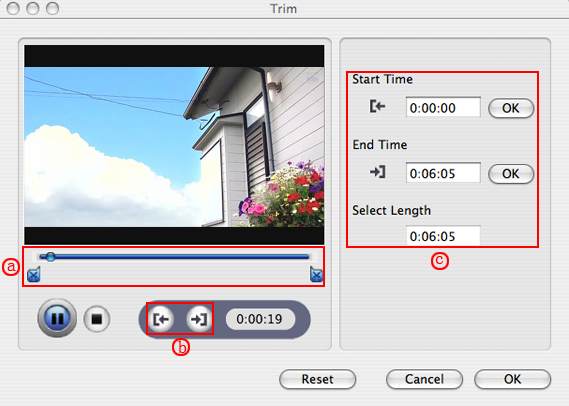
1. Trim
"Trim" function is for you to select the clips you want to convert.
There are 3 ways that you can trim your video.
a. You can drag the buttons(1) to set the start and end time
b. You can preview the video first and when you want to start trim click the left one of the pair buttons(2) when you want to end click the right one.
c. You can set the exact start and end time on the right side of the pop-up window.
It is for you to select the clips you want to convert.
http://www.aiseesoft.com/images/guide/dvd-ripper-for-mac/trim.jpg
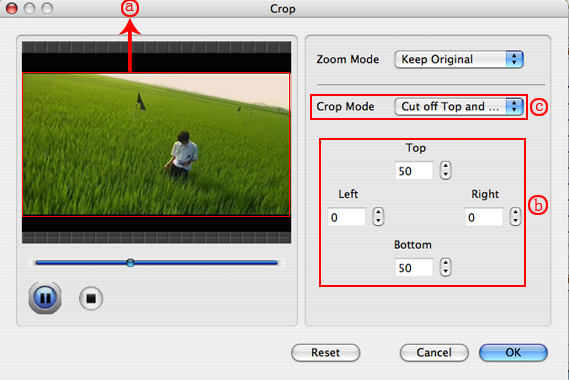
2. Crop
Cut off the black edges of the original movie video and watch in full screen using the "Crop" function.
There are 3 ways that you can crop your video.
a. We provide 7 modes on our "Crop Mode"(1)
b. You can set your own mode on the right side of the pop-up window(2)
c. You can drag frame to set your own crop mode(3)
You can cut off the black edges of the original movie video and watch in full screen using the "Crop" function.
http://www.aiseesoft.com/images/guide/dvd-ripper-for-mac/crop.jpg
3. Snapshot and merge into one file
If you like the current image of the video you can use the "Snapshot" option. Just click the "Snapshot" button the image will be saved and you can click the "Open" button next to "Snapshot" button to open your picture.
If you want to make several files output as one you can choose "Merge into one file".
If you are windows users, you can go to Aiseesoft Total Video Converter(http://www.aiseesoft.com/total-video-converter.html) to get more information.
 posted in technical issues