Audio Settings for multichannel with MOTU 828 mk3
@matthieu1978 Hello......... too late!
@moscardo...........
I use the same device. You will need ASIO. I do not remember why, but I ended up using Asio4All as the driver. I think I had some problems with the Motu drivers but.........?
Asio4All lets you make the Windows equivalent of an "Aggregate Device"...... so as many sound cards as you can connect....... !...
Asio4All ..... http://tippach.business.t-online.de/asio4all/
Before you start open the Motu Audio settings and set the samplerate, 64 samples per buffer, Internal master clock, tick "Use stereo pairs for windows audio".
In the second window make sure everything is ticked that you might want to use.
Select ASIO in Pd.
Select Asio4All in the Audio settings window.
Tick to use the ins and the outs......
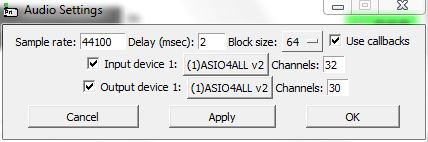
When you have selected Asio4All in Pd then set......
the samplerate you want (must match the setting in the MOTU Audio Console settings
Delay (msec) 2 or 3 should work.
Blocksize 64
Tick the "callback" box
Set 32 in channels (set more if you want to use the built in computer soundcard at the same time)
Set 30 out channels (if more channels... as above)
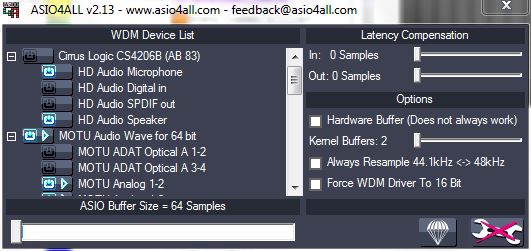
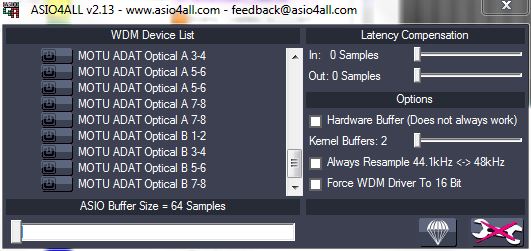
You can now look at the Asio4All setup. A little green arrow icon should have appeared in the bottom right of windows.
Open it, click the "Spanner" and set like this for all the analog channels.
Highlight (click) the boxes at the left side for digital ins and outs and the inserts and reverb returns if you want to use them them.
Even if the inputs (or outputs) are not in the correct order, they will stay the same, even after re-plugging the soundcard, rebooting the computer, and re-starting Pd.
 posted in technical issues
audio in not working
@MrKoggs1 Have you used the interface without Pure Data?
If you want low latency then asio will be the only way to work with windows.
Maybe the M-audio drivers will only work with asio?
If you select "ASIO (via PortAudio)" in the Pd "Media" tab then when you open the tab below for "audio settings..." to select the interface you will see that it now lists the "Asio" drivers.
If you want to use the built-in interface as well then it will be best to use Asio4All..... which can build an aggregate device for all of your sound interfaces (better than Pd can manage).
You will need to set up the asio driver (Asio4All or the M-Audio driver) to match Pd Audio settings...
64bit buffer.
44100 or 48000Hz
and set Pd to 2 or 3ms in the "Delay (mSecs)" box (more if it doesn't work).
Ticking the "use Callbacks" box is a good idea.
In Asio4All....
For Vista you will need to tick the "Allow Pull Mode (WaveRT)" box.
Set the "ASIO Buffer Size" to 64 samples.
Sometimes you will need to try (re-open) Pd a few times before everything talks properly.
I might have forgotten something!
David.
posted in technical issues
Build a MIDI controller with the Arduino, Firmata and Pure Data
Time to start contributing some knowledge back to the wonderful world that is the internet; today, a step by step nice and easy tutorial on getting started to building your own MIDI controllers with the arduino.
When researching for my ableton controller project, I didn’t find much out there about using firmata on an arduino to send data to software. The standard approach just seemed to be create the code in the arduino language, upload it to your board and hack one of those MIDI to USB cables as a bodge job way of getting the MIDI out of the arduino.
So why firmata and pure data? Well the whole idea of firmata is that you flash it to your arduino, and it throws out serial about whats going on with the arduino inputs and outputs, then you decide how the software treats the readings coming in and going out.
Theory out the way, lets build some controllers. You’ll need a few things…
HARDWARE:
An arduino and something to wire into it (for this i’ll be using a pot)
A USB cable for your arduino
SOFTWARE:
Arduino – http://arduino.cc/en/Main/Software
Pure Data – http://puredata.info/downloads
Firmata – http://at.or.at/hans/pd/objects.html#pduino
Something to patch your new controller into; like Reason or Ableton Live
- SETTING UP FIRMATA AND PURE DATA
Install Pure Data and create a folder to store all your patches somewhere. Unzip Firmata and add the files ‘arduino.pd’, ‘arduino-test.pd’ and ‘arduino-help.pd’ to your new Pure Data folder. The ‘arduino.pd’ file is the object that we use in PD for opening up communication with your arduino and routing it to PD. Done? Awesome, your software is almost set up.
- FLASHING FIRMATA TO YOUR ARDUINO
Install the latest version of arduino and open it up. Connect your arduino with the USB cable to your laptop (i’m using a macbook for this by the way). In the example patches, open up “Standard Firmata”, select your board (im using an arduino mega), and your serial port (look for tty.usbserial for use with a USB cable). Then compile and hit the upload button and your arduino is now ready to use firmata and communicate with Pure Data!
- WIRING UP A POT

Potentiometers are cool, and theres a great arduino tutorial of how to wire one up here: http://www.arduino.cc/en/Tutorial/Potentiometer
Basically, all you need to know is that there are three pins; your two outer pins govern voltage flow across the pot, meaning one has to be 5V and the other has to be ground. It doesn’t matter which, but your 5v pin is going to be where your pot reads maximum, so convention dictates this should be the right hand pin. The center pin needs to be connected to an analog in on the arduino and will read the value of the pot as it sweeps from ground (0v) to 5v.
All wired up? Plug it into your laptop and open Pure Data, we’re ready to get things talking.
- SETTING UP OUR PATCH
Open the example “arduino-test.pd” Pure Data patch you copied over earlier. It should look like this one…

The test patch has everything we need to open a connection and enable pins. Firstly, lets delete a bunch of stuff and make our window a bit bigger. Hit Command + E to enter edit mode in Pure Data.

Ok a quick explaination; the key component here is the ‘arduino’ object. This is being drawn from the file you copied in earlier, and is what communicated with your arduino. Here we can do everything to control the arduino from opening a connection, to receiving data.
The large grid allows us to set the mode of each pin on the arduino. Remember pins 0 and 1 are reserved for Rx and Tx. I’m using analog pin 4 for this demo, so I’ve set my pin mode for pin 4 to ‘analog’.
Now we can plug our arduino in and get a reading from the potentiometer.
- ARDUINO INTO PURE DATA
With your arduino plugged in, hit command and E to bring us out of edit mode. In our patch, click on ‘Devices’ above the arduino object and open up the pure data terminal. (That other thing that loads with PD that has all the scary code in)

The “Devices” message connected to the arduino object pings your computer to find what devices are connected and on what serial ports. Since we’re using a USB cable to connect our arduino, we’re looking for something with ‘usbserial’ in it, in this case; port 2.
Select the relevent port in the green box at the top (remember the first box is ‘0’, second is ‘1’ and so forth) and hit ‘Open’ to establish a connection. Check the terminal to see if the connection was sucessful.

Now lets check we’re getting something in. Create a number box (Command + 3) and connect it to the relevent pin on the ‘Route analog’ box at the bottom. In this case, pin 4.
One more thing; if you’re not getting any readings in, you’ll need to click on ‘pd old analog/digital controls’ and enable your pins here too. What I tend to do in my patches is just not include the large grid but make my own ‘old pd’ controls custom to what i’m enabling/disabling to save space.
Here’s what the ‘old analog/digital controls’ subpatch looks like (pin 4 enabled)…

Come out of edit mode and check that you’ve got readings. If so congratulations! If not, troubleshoot, start with making sure your usb connection is opened, make sure all the correct pins are enabled (remember you’re counting from 0 not 1 on most of these buttons in PD, it’s just the way computers work).
- SCALING READINGS TO MIDI
So we’ve got a reading and chances are it’s to 3 decimal places between 0 to 1. No problem, create a new object (Command + 1) and type “autoscale 0 127”. This allows us to scale the input to a min and max value, in this case 0 to 127 of MIDI. Next, lets get things looking nice, create a new object and type “knob”. Connect this AFTER the autoscale object. (the knob is default set to read inputs from 0 to 127. Then create another number to display the scaled MIDI data coming out, and finally a new object and type “ctlout 1”.
It should look something like this…

The second box should be outputing values from 0 – 127 now, and the knob giving a visual representation of your potentiometer.
Now lets patch it into ableton…
- PURE DATA TO ABLETON LIVE
Firstly, you’ll need to set up your macs IAC driver if you’ve not done this. Basically you’ll need to go into Audio/MIDI preferences and enable your IAC driver. Then create a new input and output. One for input to DAW and one for output from DAW. Google around for a tutorial on this, its really simple, a 30 second job.
After you’ve set up your IAC driver, go back to PD and go to preferences > MIDI Settings, and connect your IAC driver.

Open ableton and go to its MIDI preferences. Create a device listing for your IAC driver and enable its ins and outs into ableton like so…


And thats it! Create an instrument and try to assign something! I’ve got it controlling the brightness of a bass sound here.
Shout out for Facu who requested this tutorial. Hopefully it’ll help some of you looking to get into this stuff and start building things but with no idea where to start.
 posted in tutorials
Sysex program dump with random zeros
Okay ;that's what I suspected you were doing. It is possible to use the MTP serial directly with linux and the mtpav driver, though this requires a machine with true hardware parallel port access (USB adapters won't cut it) and is limited to MIDI output only as the driver is a hack that was never finished. I used to run mine that way with a second USB MIDI interface connected to one or more of the MTP's unused routed MIDI outputs (there is, BTW still no way to connect the MTP USB version directly to a Linux system as it doesn't use a standard USB MIDI driver)
As far as the kernel is concerned, I've only ever used lowlatency or RT kernels for MIDI stuff. I don't know how a generic kernel would affect this problem but it's probably best avoided as they are not specifically built for multimedia.
Now read closely as this is where it becomes stupidly complicated.
First, make sure that the problem is internal to Pd. Your interfaces are probably not the issue (since Pd is only seeing the UM-1 driver I don't think the MTP even figures in here). However, the chosen MIDI API can get in the way, specifically in the case of the unfinished JACK MIDI. JACK MIDI presently can only pass SYSEX as short realtime messages. SYSEX data dumps will disappear if sent into the current JACK MIDI system. ALSA works OK. OSS probably too, but I have not tried it.
If that stuff is ruled out and you are still getting problems, it probably has to do with a set of longstanding bugs/oversights in the Pd MIDI stack that can affect the input, output, or both.
On the output side there is a sysex transmission bug which affects all versions of Pd Vanilla before 0.48. The patch that fixed Vanilla had already been applied to L20rk/PurrData for some time (years, I think). The output bug did not completely disable SYSEX output. What it did was to miss-format SYSEX in a way that can't be understood by most modern midi applications, including the standard USB MIDI driver software (SYSEX output from Pd is ignored and the driver/interface will not transmit anything). You would not notice this bug with a computer connected directly to an MTP because the MAC and Linux MTP drivers are programmed to pass raw unformatted MIDI.
If this is the problem and you have to use a pre-0.48 version of Vanilla it can be patched. See:
https://sourceforge.net/p/pure-data/bugs/1272/
On the MIDI input side of Pd we have 2 common problems. One is the (annoyingly unfinished but nevertheless implemented) input to output timestamping buffer that's supposed to provide sample-accurate MIDI at the output (if it was finished). This can be minimized with the proper startup flags (for a MIDI-only instance of Pd, -rt -noaudio -audiobuf 1 -sleepgrain 0.5 works for me) or completely defeated with a source code tweak to the s_midi.c file. This may not be the source of your particular problem as it usually only affects the time it takes to pass messages from input to output, but is worth mentioning as it can be very annoying regardless.
With SYSEX dumps it is more likely that the problem lies with the MIDI queue size. This is very common and I experienced it myself when trying to dump memory from a Korg Electribe Ea-1.. The current version of Pd limits the queue to a size of 512 (even worse it used to be 20) and any input larger than that will get truncated w/no error warning. There is not yet any way to change this with startup flags or user settings. This can only be "fixed" by a different tweak to s_midi.c and recompiling the app.
The attached text files are derived from the Pd-list and will show the specific mods that need to be made to s_midi.c.
 posted in technical issues
pd 0.47.1 change audio settings will hang program both on Mac and Windows
@leowang Yes, you are correct, my mistake.
I am using windows7.
I was in a hurry and didn't explain well. Try opening Pd from the [fix.pd] patch (Pd not already running)..... and then open media-settings, save and close............. and then see if you can change to what you wish.
I have 64 samples set (Block size) which is called Buffer size (samples) in my Asio4All driver. I have never changed that setting for Pd, but I have had to change it in the driver for some soundcards.
I am (almost) certain that the driver receives a 64 sample block size quite happily, and then you can set the block size for the cpu / outboard dsp in the driver settings. The driver does the block size conversion, and if you set the size too low in the driver then it will stall, or cause dropouts.
I have 2ms (Delay) set in Pd, which is called Buffer Offset in Asio4All. More Buffer offset, hardware or software, can be added in the driver if necessary.
But finding the low latency setting is all trial and error.
I have found that setting the offset (Delay ms) in Pd too low will cause dropouts, and setting it too high can cause Pd to stop responding. I think maybe Pd hangs when you open the Audio-settings window......... before you change the Block size......... and so the fix might help?
David.
posted in technical issues
Custom Ubuntu Live Cd and PD
@flextUser Hello....... A custom Ubuntu Live cd will be running Ubuntu on the laptop...... so the fact that it ""was"" a windows machine is irrelevant. The live cd will need to run on that machine........ have all of the video/audio etc. drivers that will work on that particular machine......
Linux is pretty good at that now, but you will need to check on the actual hardware.
Then you might need the drivers for his hardware, soundcard, joystick, etc.
Depending on the complexity of your patch the usb stick will need to be fast enough.
I would try running the basic live cd first, with your patch on another key, and see what needs to be downloaded/added to get it all running (on their machine)....... if it will run straight away then you are lucky.
Yumi....... http://www.pendrivelinux.com/yumi-multiboot-usb-creator/ I have used and it is not bad for getting going with the Linux Ubuntu drive......... from then on you will start to get an idea of the possible problems. Make sure that you take the option to have a writable file on the drive so that you can save setting, preferences etc.
The computer that you are going to boot from the drive will need a bios where you can put "boot from usb drive" (or similar) to the top of the boot order.............
There is a lot of useful help on the left side of the web page that I linked to.........
Ps again! I didn't mention....... but its very important...... that the usb Ubuntu, Pd etc. must not write to the computer hard drive while it is running....... as the windows that is installed will not know about the writes........ and that will risk windows not booting again afterwards when the Ubuntu key is removed and the computer is rebooted normally......
David.
posted in technical issues
Gem window crashes / Install struggles on Ubuntu
Please help! Sooooo many hours trying to figure this out, should be simple I think but I'm not a sophisticated user of Linux.
The Gem objects appear properly when I open the windows, but whenever I try to open/create a gemwindow, it immediately crashes (however, it seems to respond when I change the data - for instance, I can see color changes when i make those changes, but again, the gem window crashes immediately...)
A possible solution lies here but haven't been able to get a response when I attempt to implement this
"
Why does Gem crash when creating the Gem-window? !
When I try to create a Gem-window, my X-server crashes (or worse)? btw, I am using Ubuntu/hoary with fglrx drivers.
quick
try setting the environment variable GEM_SINGLE_CONTEXT to 1
explanation
Gem establishes an (invisible) openGL-context at startup, even if no Gem-window is created yet. When you create the Gem-window, a 2nd openGL-context is used (which shares some properties with the invisible context).
For some reasons this seems to be not possible with some gfx-drivers (e.g. ATI's proprietary fglrx drivers) and some window-managers (i suspect compiz/beryll), leading to crashes of the X-server and/or system freezes.
The current workaround is to set the environment variable GEM_SINGLE_CONTEXT=1, which prevents this dual-context magic.
how?
if you are starting Pd from the bash, you can start Pd/Gem with GEM_SINGLE_CONTEXT=1 pd -lib Gem
on bash, you can also set this permanently by adding a the line export GEM_SINGLE_CONTEXT=1 to either ~/.bashrc (the bash-configuration file in your home-directory) or to /etc/bash.bashrc (to set it for all users)
"
- newer linux user but though I followed compiling instructions for installing Gem, it seems never to create a conf file.. when I open pd-extended in terminal, I get this message:
open: ./gem.conf: No such file or directory
any thoughts or input would be VERY APPRECIATED, thanks!
 posted in technical issues
having trouble running guitar/mic line into pd
@Wolf-Breath Hello there......
The symptoms that you describe are those of Pd struggling because of incorrect audio settings. It is not your fault, they are not easy to set up initially.
The quickest way to get it working (and you would have the advantage of using the computers other audio connections at the same time, or even multiple asio soundcards) would be to use Asio4all......... http://www.asio4all.com/
I am assuming that you are using windows (FL and reaper)?
(FROM HERE TO........... "END" BELOW SHOULD HELP WITH YOUR CURRENT DRIVER AS WELL!)
Make sure you select ASIO in the Media window first.
Then in your Media/Audiosettings window choose Asio4all (or your asio driver for your Focusrite if you don't want to use Asio4all) as your soundcard and set the channels (number of channels) that you want to use (total including your computer soundcard). Don't worry if you set too many, as Pd will just drop any that don't actually exist.
Set Pd something like this.......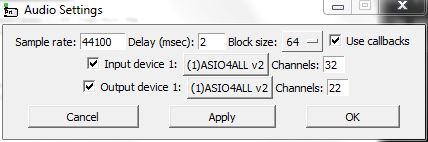
If you have problems then set the samplerate to match your soundcard, the delay higher (try 30 or more for example and then gradually decrease it to reduce the latency) and try a higher block size although that should not be necessary. Ticking the callbacks box allows Pd to communicate better with the soundcard. Then go back to choosing your soundcard again. The setup you see above gives 2ms latency which is excellent. (END)
Now you should have a little green icon for the asio4all driver in your taskbar (if it is red then there are settings to be changed to make it work).
Click that to open asio4all settings and you should see something like this........ If not then click the "spanner"at the bottom right corner.
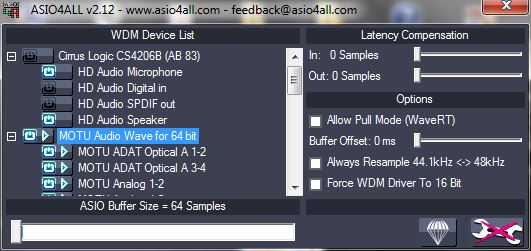
Choose which inputs and outputs you want to use, and count down the list of active ins and outs making a note of their order in the list (ins and outs separately). They will be numbered [dac~ 1] etc. in the same order in Pd.
Good luck, and come back here if you are still struggling....
You might find that Pd is still struggling because of your old settings. If so then start Pd with no audio from a batch file using the -noaudio flag, before you do the above........ see below.....
David.
If you don't know how to use a batch file then try this before you start setting up your soundcard. It will reset the sound settings so that Pd responds properly again!! http://forum.pdpatchrepo.info/topic/9250/pd-will-not-start
Or make your own like this.....
It will open Pd and load the directory in which the patch Minx_Run.pd can be found, load the readsf~ directory and then turn off audio, turn on asio, turn off midi and load the patch Minx_Run.pd......

Later, when all of your settings are correct you can have different setups depending upon which soundcards you have connected, like this...........

posted in technical issues
Pd-extended 0.40.3 released, dedicated to Jamie Tittle
@hans said:
Finally, it's done! The most polished release of Pd yet. We are further refining Pd into a truly powerful and usable programming platform.
http://puredata.org/downloads/
This release is dedicated to Jamie Tittle, aka tigital, who recently died of cancer. He was a long time and key contributor to Gem and Pd in general, even while he was in the hospital undergoing treatment. He is sorely missed in this community, and I am sure by many others.
Some highlights of this release:
* more functional namespace tools ([declare] and [import])
* new appearance designed to enhance readability
* GLSL shader support in Gem
* usability improvements
* on Mac OS X, you can now build "standalone" applications
* standard locations for user-installed externals
* many bug fixesHere's the rough changelog:
next visual appearance designed for readability
default locations for user-installed externals, helpfiles, etc.
GNU/Linux: /usr/local/lib/pd-externals and ~/pd-externals
Mac OS X: /Library/Pd and ~/Library/Pd
Windows: %ProgramFiles%/Common Files/Pd and %UserProfile%/Application Data/Pdlots of standard key bindings added:
Enter/Return for OK
Escape for Cancel
Ctrl/Cmd-W closes all windows
on Mac OS X, Cmd-` cycles thru open windows
on Mac OS X, Cmd-m minimizes windows
Ctrl/Cmd-R raises/lowers Pd window
Ctrl/Cmd-Shift-R shrinks/grows Pd window
Ctrl/Cmd-Shift-L clears Pd window's text console
Ctrl/Cmd-B opens the Help Browseryou can now use "~" in all paths to mean home folder, and on Windows you can use environment variables, lie %UserProfile% in paths
improved Cut/Copy/Paste support for working in object and message boxes
fixed Cut/Copy/Paste for the Pd window's console
[declare] and [import] now sorted out for loading (but much work needs to be done before there namespace support is complete)
"File -> Save As" defaults to the Home folder (~/) on Mac OSX
new patches default to the folder last saved in
included pgp_opengl aka 3dp on GNU/Linux and Mac OS X
'hardware' and 'deprecated' removed from libraries loaded by default
On Debian/Ubuntu, the packages now install into /usr rather than /usr/local
On Mac OS X, you can now build "standalone" applications from the File menu.
bug fixes and clean up of [hid] and mapping externals
included config in Info.plist for the Spotlight Importer
KNOWN BUGS
check http://puredata.info/dev/bugtracker before reporting bugs
Escape, Enter, and Ctrl/Cmd-W don't close the Path and Startup preferences
pdp_opengl is alpha and will definitely crash Pd
loading pdp_opengl will crash Pd if X11 is not open before trying to load it
the GUI runs slower in some situations
The new visual style is very nice indeed,
 posted in news
Low audio latency in windows 7
@Coalman said:
up above Billy Stiltner was talking about the RealTek audio drivers for windows 7...this may be off topic but don't install those!
I guess it depends because I was having problems before I installed the RealTek audio drivers on my machine, which are supposed to be the ones installed by the company by the default for my computer model. I couldn't record into Audacity in real time at all. So, It made me realise that we should never let Microsoft update our drivers. Now, with the RealTek drivers, everything works like a charm, so never generalize!
Regarding running multiple app with Asio4all, there's Asio server that is pretty good to run multiple apps. That's the only way I was able to use Ableton synced with other apps.
On another note, I started using Bidule with PureData and Geosonix and was using Loopbe1. You can only use 1 port! You can always buy Loopbe30 which is 20$, but I found Loopmidi, which is free. So, regarding virtual midi interfaces, check out LoopMIDI. And if it pisses you off that Asio4all is limited, well, get Asio Server here:
http://vidance.com/asiomulti/asiomulti.html
And here's a good article on how to optimize Windows 7 for music. What to upgrade, what services to stop:
http://blog.dubspot.com/optimize-your-windows-7-pc-for-djing-music-production/
 posted in technical issues