MIDI into [seq] and Markov chains
@ingox State saving works only if one (or more) instance of the abstraction is loaded in a parent patch. When you save the parent patch, all abstractions dump the content of their tables which get saved in the parent .pd file, each linked to the instance of the abstraction that sent it. when you re-open the parent patch, those saved tables are dumped back. Nothing is stored in the abstraction itself, so if you open the abstraction file nothing gets recalled and so the tables are initialised as empty (you mustn't use the -k flag).
I suppose it could be disabled but I can't think of any scenario where that would be advantageous.
I've recently made these abstractions which I use all the time and have made my pd life so much easier I don't even remember what it was like before.
https://forum.pdpatchrepo.info/topic/12066/store-state-patch-less-state-saving-method-for-abstractions/9
The only difference in our markov patch is that the order cannot be set with an argument anymore because if you create the object [markov 3], then send it the message [order 2(, and save the parent patch, the text is saved containing a second order markov chain, but when you open the parent again it loads the argument 3. In fact I think it's not ideal to set the order in the argument.
I hope this makes sense, I'll post a modified patch to show this.
 posted in technical issues
Abstraction list append and cold right inlet
I am getting a different result in my code when I run a patch as a an abstraction vs on its own. The issue seems to be with a list append object and the right cold inlet. The patch does the following:
- takes a number input
- pass the number input to the hot side of the list append
- if the number input is <= 127, pass 1 to the right cold side of list append else if it is 128 or greater pass 1 + 1 (2) to the right cold side list append.
- format the list in a message, print the message
- and also print the value of the data directly.
Here is the abstraction patch:
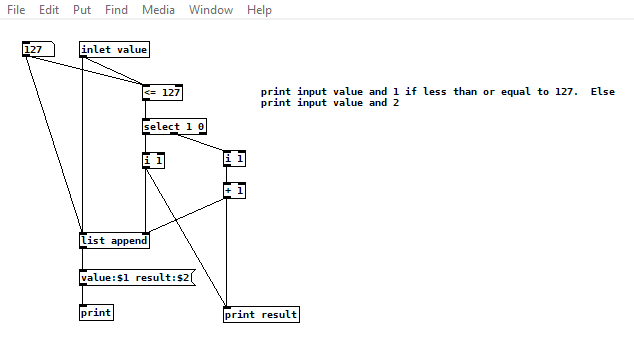
Here is the main patch:

When I run the main patch and enter 127 then 128 into the number atom I get the following output in the console:
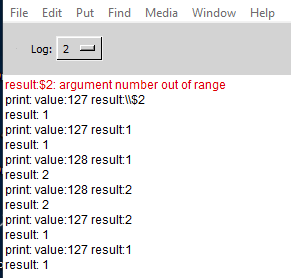
first problem is the number out of range. Second problem is that the $2 value in the message is not the same as the value printed from "print result".
When I run the patch on its own and use the number atom in the patch for the value I get a different output in the console:
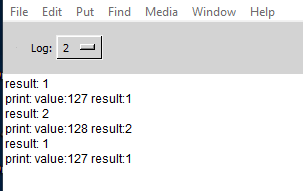
In this case the value of "print result" and the $2 value in the message are the same.
It seems there is a difference in the order of execution of the print statements and maybe there is also a difference in order of when the cold inlet on the list append gets updated.
Why is there a difference when run as an abstraction and how do I correct the number out of range error?
thanks for your help.
 posted in technical issues
Table-using Abstraction can be used multiple times in one patch
@Maggie17 Sometimes it is easier with words........
Dollar $ variables in Pure Data patches.
A dollar variable is a thing that can be given a new value.
The new value can be a float or a symbol.
- If the Dollar variable is in an [object] box
A Pd patch can be saved and used inside another patch. We then call it an abstraction.... and it is just like a programming sub-routine.
If you want to use it many times then you have a problem, that they are all the same, so if you put an object [receive woof] they will all receive any message that you send with [send woof].
That might well be what you want to do.
But what if you want to send the message to only one of them?
You can give it an [inlet], but your patch will get messy, and what if your patch needs to make its own mind up about which abstraction it wants to send the message to, maybe depending on which midi note it received?
The solution is to give the abstraction arguments... some parameters that define it and make it different to the other copies.
For example [my_abstraction]
Let’s give it some arguments [my_abstraction 5 9 woof]
Inside the abstraction, as it is created (you open its parent patch) the dollar variables will be replaced. Wherever you see $1 written IN AN OBJECT it has been replaced by the number 5.
Number 5 because 5 is the first argument and has actually replaced the $1. You still see $1, but if you bang a [$1] object it will output 5.
[f $2] will output 9
[symbol $3] will output woof
So if you have an object [receive $1-$3] then it has now become [receive 5-woof]
And if you want to send it a message from outside, from another patch or abstraction, you will need to use [send 5-woof]
Every Pd patch, which remember includes your abstractions, also has a secret number. The number is unique and greater than 1000. As Pd opens each patch it gives it the number, increased by one from the last number it gave.
That number will replace $0 as the patch is created. You can find out what the number is by banging a [$0] object and connecting its output to a number box, or [print] object.
$0 can be used in any object as part of the name or the address, which means that a message cannot escape from the abstraction. A sub-patch like [pd my-subpatch] will be given the same number.
But from outside your abstraction you don’t know what it will be when the patch is created, so it is not useful. (A lie, you can find out, but as it can change every time you open your patch it is not worth the bother).
Use it to send messages within your patch [send $0-reset] to [receive $0-reset] for example, because the message is absolutely unique to its window, so you know it cannot interfere with other abstractions. - If the Dollar $ variable in a [message( box
Dollar $ variables are also replaced, but not as the patch is created (drawn by Pd as you open it).
Dollar zero $0 has no meaning in a message box. It will produce a zero if the message is banged, but that is it.
It is a mistake, a patching error, to put a $0 in a message box.
$1 $2 $3 $4 etc. in a message box are replaced by incoming atoms (individual floats or symbols or whatever) when they arrive. $1 will be replaced by the first atom in the list, $2 the second etc.
So if you have a message box [$1 $2 $3( ..... and you send into it a list [3 48 lala( .....then it will output 3 48 lala
That is not really very useful.
But it is actually very powerful.
Make a list in a message box........ [33 12 wav(
And bang it into a message box [open my-track$2-$1.$3( and you will get the output.........
open my-track12-33.wav
Which could be just the message that you want to send to [soundfiler]
David.
 posted in technical issues
Closing patches without Pd crashing, hopefully in an elegant way...
@whale-av Yes, the first patch closes fine, but the 2nd patch that closes it is crashing Pd.
I was thinking of another possibility. I could have 3 patches, and one just stays open the whole time, which would be the patch that closes all the other patches.
I would open my first patch. My 2nd patch would be the one that I would use to perform. Then when I want to change patches for a performance I open the 3rd patch that sends some kind of trigger that the 1st patch uses to close the 2nd patch, and then it closes the 3rd patch. The 1st patch just stays open till I shutdown.
It's a convoluted scheme, but that way I can avoid a patch needing to closes itself, which I think is what the problem is.
 posted in technical issues
Closing patches without Pd crashing, hopefully in an elegant way...
Hi,
I have a headless Rpi setup using Pd .49.
I am trying to have everything automated, and one thing I'm trying to work out is that I want to close the patch I'm using before I open the next patch. I am doing this by sending internal Pd messages.
I used to quit Pd and re-open it, but due to problems I couldn't resolve after much time connecting my midi controller, I am going to try to just close my patch rather than quit and reopen Pd.
What I've worked out is that every patch will have a [r closepatch] object, and when I want to change patches I will open a patch that will send a bang from [s closepatch] , then it will close itself. I added several seconds of delay time to both patches, but this method always causes Pd to crash.
I am using this message to close a patch: [; pd-mypatch.pd menuclose 1(
My question: How can I close a patch from another patch, and then close the patch that closed the first one? Or is there a better way.
Even better, is there a way that I don't have to enter in the name of the main patch I want to close, like can I use some sort of variable, or send another internal message that will load the patch name into the patch closing message?
I am attatching what I have. First open "closetest1.pd" then "close_patch5.pd" If you connect the messages you can test them properly, but they always make Pd crash on my Rpi.
Thank You.
posted in technical issues
Patch runs fine but latency increases over time and use
I like to think i am pretty savvy when it comes to PD, but alas, I still have much to learn it would seem, as I cannot for the life of me solve an issue with a patch of mine that has been driving me mad for quitge some time now. When I open the patch, all midi runs fine. Everything is low latency and very usable... but the more I play around in the patch and play keys and alter settings, things get slower and slower... until finally after a while there is too much latency in the midi system to even use my patch properly. The problem is solved when I shut down PD and restart the patch, but then rears it's ugly head once againm after some time. The patch is prety complex andf has a lot fo stuff going on, but it is a midi only program. The audio engine is off, so that is not likely the cause. Im thinking it has something to do with the console stacking up, or various objects which store data stacking up and bogging down. I would like to build in some way to clear things up soo the latency never piles on too much, but I cannot figure out which object is causing it or why! Does anyone know of any onjects that are known to cause this problem so as to point me in the right direction? I can post the patch if anyone cares to see it, but I warn you that it is pretty huge and would have layers and layers of patching to dig through. Maybe there is some way to globally clear all the midi data buffers or something? any help would be immensly appreciated, as the patch otherwise works well and It's something I use in almost every session!
Many thanks.
Cheers!
 posted in technical issues
foo_pd - Pure Data plugin for foobar2000
This is a spiritual successor to amPd. It's much more stable and has many more features than amPd:
-
reads/writes metadata to/from patches. This is done by storing the info in the form of comments, in a canvas called [pd meta] or [pd info]. If no such canvas exists, foobar will add it in the top left-hand corner of your patch.
-
comes with a Win32 Dialog UI element, containing sliders, toggles, buttons, and edit-text/button combos to send messages to your patch.
- foobar looks in your patch for a canvas called [pd mix] and uses the parameters of whatever sliders, bang objects, or toggles it finds there to give your UI controls similar functionality.
How playback works
- libpd sends a 1 to vol, then a bang to play.
- Generally this is where, in your patch, you have an [r play] hooked up to your metro, and an [r vol] connected to a [*~ ] before your output reaches [dac~].
- the length of the song is arbitrarily set by the user.
- This affects the trackbar's cursor visibility and ability to set a position.
- If the length is 0, there will be no trackbar cursor. Otherwise, the cursor, when moved, will send its position in seconds to pos. From there, it's up to your patch to take that information from [r pos] and work it into song events.
- The patch will not actually stop and move on to the next track until libpd receives a bang from [s stop].
How the mixer works
- all mixer controls go inside of [pd mix]
- horizontal and vertical sliders are turned into slider controls in the UI element
- labels assigned to sliders in the patch become labels for the UI element's slider controls. The same applies for send symbols.
- min and max values of sliders on the UI element work in integers only, so if you want a gradual shift from, say, 0 to 1, write "gradient" in the slider's receive symbol, and the slider's range will be broken down into roughly 200+ individual steps.
- there are currently 7 sliders in the UI element
- bang objects with no label become simple buttons in the UI
- their send symbols will be reflected in the button's name and they will send a bang when clicked.
- there are currently 3 buttons
- bang objects with a label assigned become message buttons
- these have an edit text field associated with them, where you can type out any message you want and send it to the destination.
- the bang's label is placed inside of the edit text field as a suggested message to send.
- pure data strips commas out of labels, so I'm using apostrophes to denote where commas should go. ex: do this' then this
- there are currently 2 message buttons, with the 'any' button being a potential 3rd.
- a bang object with a label written in the format dest : msg will be assigned to the 'any' button.
- the 'any' button has an editable destination field, giving you access to basically any receive symbol in your patch.
- also substitutes as a third normal message button, when the other two are already in use
- toggles become checkboxes
- each checkbox can have a label and send symbol assigned to it
- there are currently 4 checkboxes
- right-clicking a track shows the context menu entry Pd Player -> Load mixer.
- basically, you can load mixers of tracks not currently playing for some potentially interesting exchanges between patches. After loading the mixer, you still need to hit the Refresh button to show the changes.
foo_pd's copy of libpd.dll contains only the externals that I needed to run the example patches. If you want your own patches to work with foo_pd, you might need to make another build using MSYS2. If you're not sure which objects aren't instantiating, foobar's console prints all of pd's messages while audio is being processed. I'll also add more externals over time.
I'll be maintaining foo_pd at https://github.com/myQwil/foo_pd where you can also find the latest builds
foo_pd.zip
Last Updated: Feb 26, 2021 3:55pm EST
 posted in libpd / webpd
FFT analysis in wav files
Hi, guys!
I'm relatively new to Pure Data and I'm making a visual project — with Pure Data (Purr Data version) and Processing — that depends on a good FFT analysis.
I've been trying to solve this problem for some time now.
I made the patch that is in this tutorial:
This patch opens a file and "draws" the left and right channels on two arrays.
I'm trying to mix this patch with the "patches/3-8-1-1-rfft-array.pd" of this tutorial:
http://www.pd-tutorial.com/english/ch03s08.html#id431716
So, what I'm trying to do is to make an FFT analysis to an wav file to represent visually the amplitude of each range of frequencies from the lower frequencies to the higher frequencies for different songs.
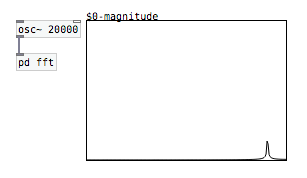
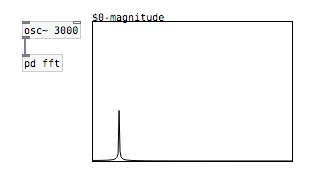
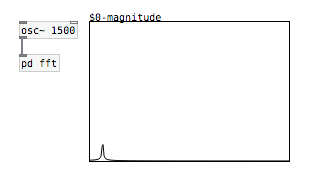
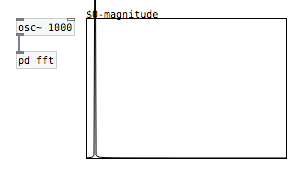
When I test the FFT analysis with an [osc~] object (writing it in an array), everything is kind of fine: 10000Hz in the middle, 20000Hz glued to the right. But I noticed that when I put [osc~ 0], the amplitude glued to the left is really high. Same with 50Hz, 100Hz, 150Hz, etc.. until around 1500Hz. Another thing I noticed is that each frequency has a different amplitude.
So, one thing I tried to do: I put the FFT code in a subpatch and changed the blocksize inside it to 4096 with the object [block~]. Since only the first 32 bins shows the frequencies, I put the size of the array with half the blocksize: 2048. Then, since the main frequencies of the majority of the songs goes until around 5000Hz — I've been told that C8 correspond to around 4200Hz, and that would be in the 7th bin in a block size of 64 —, I tried to reduce the size of the array to 512:
20000 (total frequencies) / 2048 (bins) = 9,76 (frequencies per bin)
5000 (frequencies for songs) / 9,76 (frequencies per bin) = 512 (bins)
In a blocksize of 64, this would correspond to the first 8 bins.
But still, after all this, the frequencies are always glued to the left:
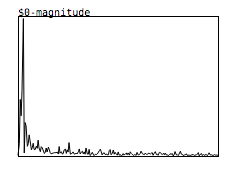
I've tried everything to make a well-distributed FFT analysis, like it should be, but it's ALWAYS glued to the left with all the songs that I tried with...
Sorry for the long post and let me know if I wasn't clear in my question...
Thank you in advance!
 posted in technical issues
Build a MIDI controller with the Arduino, Firmata and Pure Data
Time to start contributing some knowledge back to the wonderful world that is the internet; today, a step by step nice and easy tutorial on getting started to building your own MIDI controllers with the arduino.
When researching for my ableton controller project, I didn’t find much out there about using firmata on an arduino to send data to software. The standard approach just seemed to be create the code in the arduino language, upload it to your board and hack one of those MIDI to USB cables as a bodge job way of getting the MIDI out of the arduino.
So why firmata and pure data? Well the whole idea of firmata is that you flash it to your arduino, and it throws out serial about whats going on with the arduino inputs and outputs, then you decide how the software treats the readings coming in and going out.
Theory out the way, lets build some controllers. You’ll need a few things…
HARDWARE:
An arduino and something to wire into it (for this i’ll be using a pot)
A USB cable for your arduino
SOFTWARE:
Arduino – http://arduino.cc/en/Main/Software
Pure Data – http://puredata.info/downloads
Firmata – http://at.or.at/hans/pd/objects.html#pduino
Something to patch your new controller into; like Reason or Ableton Live
- SETTING UP FIRMATA AND PURE DATA
Install Pure Data and create a folder to store all your patches somewhere. Unzip Firmata and add the files ‘arduino.pd’, ‘arduino-test.pd’ and ‘arduino-help.pd’ to your new Pure Data folder. The ‘arduino.pd’ file is the object that we use in PD for opening up communication with your arduino and routing it to PD. Done? Awesome, your software is almost set up.
- FLASHING FIRMATA TO YOUR ARDUINO
Install the latest version of arduino and open it up. Connect your arduino with the USB cable to your laptop (i’m using a macbook for this by the way). In the example patches, open up “Standard Firmata”, select your board (im using an arduino mega), and your serial port (look for tty.usbserial for use with a USB cable). Then compile and hit the upload button and your arduino is now ready to use firmata and communicate with Pure Data!
- WIRING UP A POT

Potentiometers are cool, and theres a great arduino tutorial of how to wire one up here: http://www.arduino.cc/en/Tutorial/Potentiometer
Basically, all you need to know is that there are three pins; your two outer pins govern voltage flow across the pot, meaning one has to be 5V and the other has to be ground. It doesn’t matter which, but your 5v pin is going to be where your pot reads maximum, so convention dictates this should be the right hand pin. The center pin needs to be connected to an analog in on the arduino and will read the value of the pot as it sweeps from ground (0v) to 5v.
All wired up? Plug it into your laptop and open Pure Data, we’re ready to get things talking.
- SETTING UP OUR PATCH
Open the example “arduino-test.pd” Pure Data patch you copied over earlier. It should look like this one…

The test patch has everything we need to open a connection and enable pins. Firstly, lets delete a bunch of stuff and make our window a bit bigger. Hit Command + E to enter edit mode in Pure Data.

Ok a quick explaination; the key component here is the ‘arduino’ object. This is being drawn from the file you copied in earlier, and is what communicated with your arduino. Here we can do everything to control the arduino from opening a connection, to receiving data.
The large grid allows us to set the mode of each pin on the arduino. Remember pins 0 and 1 are reserved for Rx and Tx. I’m using analog pin 4 for this demo, so I’ve set my pin mode for pin 4 to ‘analog’.
Now we can plug our arduino in and get a reading from the potentiometer.
- ARDUINO INTO PURE DATA
With your arduino plugged in, hit command and E to bring us out of edit mode. In our patch, click on ‘Devices’ above the arduino object and open up the pure data terminal. (That other thing that loads with PD that has all the scary code in)

The “Devices” message connected to the arduino object pings your computer to find what devices are connected and on what serial ports. Since we’re using a USB cable to connect our arduino, we’re looking for something with ‘usbserial’ in it, in this case; port 2.
Select the relevent port in the green box at the top (remember the first box is ‘0’, second is ‘1’ and so forth) and hit ‘Open’ to establish a connection. Check the terminal to see if the connection was sucessful.

Now lets check we’re getting something in. Create a number box (Command + 3) and connect it to the relevent pin on the ‘Route analog’ box at the bottom. In this case, pin 4.
One more thing; if you’re not getting any readings in, you’ll need to click on ‘pd old analog/digital controls’ and enable your pins here too. What I tend to do in my patches is just not include the large grid but make my own ‘old pd’ controls custom to what i’m enabling/disabling to save space.
Here’s what the ‘old analog/digital controls’ subpatch looks like (pin 4 enabled)…

Come out of edit mode and check that you’ve got readings. If so congratulations! If not, troubleshoot, start with making sure your usb connection is opened, make sure all the correct pins are enabled (remember you’re counting from 0 not 1 on most of these buttons in PD, it’s just the way computers work).
- SCALING READINGS TO MIDI
So we’ve got a reading and chances are it’s to 3 decimal places between 0 to 1. No problem, create a new object (Command + 1) and type “autoscale 0 127”. This allows us to scale the input to a min and max value, in this case 0 to 127 of MIDI. Next, lets get things looking nice, create a new object and type “knob”. Connect this AFTER the autoscale object. (the knob is default set to read inputs from 0 to 127. Then create another number to display the scaled MIDI data coming out, and finally a new object and type “ctlout 1”.
It should look something like this…

The second box should be outputing values from 0 – 127 now, and the knob giving a visual representation of your potentiometer.
Now lets patch it into ableton…
- PURE DATA TO ABLETON LIVE
Firstly, you’ll need to set up your macs IAC driver if you’ve not done this. Basically you’ll need to go into Audio/MIDI preferences and enable your IAC driver. Then create a new input and output. One for input to DAW and one for output from DAW. Google around for a tutorial on this, its really simple, a 30 second job.
After you’ve set up your IAC driver, go back to PD and go to preferences > MIDI Settings, and connect your IAC driver.

Open ableton and go to its MIDI preferences. Create a device listing for your IAC driver and enable its ins and outs into ableton like so…


And thats it! Create an instrument and try to assign something! I’ve got it controlling the brightness of a bass sound here.
Shout out for Facu who requested this tutorial. Hopefully it’ll help some of you looking to get into this stuff and start building things but with no idea where to start.
 posted in tutorials
Easiest way to connect a MIDI keyboard to PD-l2ORK on Ubuntu 16.04
@NoDSP Yea, you are right, actually. The a2j bridge is what enables jack patching for midi in most programs. I suppose that's an important detail that I overlooked. Once a2j is up and running, it feels like part of jack, but yea technically it is alsa. Your also right in that Ive noticed mixing internal and external patching of inputs and outputs to be problematic. I think it's some kind of permissions conflict... Like each program wants to take ownership of the patching privelages and they block eachother out. Im still looking for a way to resolve that...
@casper I was thinking a bit about it, and you might check out the jackx library of externals. There is an object in there that lets you manipulate jack patching from within PD. for instance, my sound card is a bit weird, as the main outputs read as output 3 and 4 instead of 1 and 2. When pulseaudio connects to 1 and 2 on startup, theres no sound. So each time i'd restart, I would have to manually open some patching program (I prefer carla from kxstudio,) and route everything correctly. Eventually, I made a patch that uses jack-connect from jackx to automatically route everything properly via loadbang. I made another version of it that starts, connects everything and then closes itself. I put that in my startup applications, so now every time I reboot, everything is automatically routed properly. You could make an object like that for your colleagues so when they open up pd, the midi routing is right there for them. I'll let you take a look at the patch I made to do this. (note, open pd with the -noloadbang flag or the patch will open and close all instances of pd-l2ork in 10 seconds.) also, the ports that you will be connecting will likely have different names then the ones here, so adjust them accordingly, and finally make sure the jackx externals are loaded and working properly to make this work. jackconnect.pd
posted in technical issues