Possible debugger of sorts to find red messages that can not be found with Cntrl + Mouse 1
@RetroMaximus Unfortunately there is no "index" of objects in the patch file.
When Pd opens a patch it gives them an index in their order in the list...... which is also the order in which they were put in the patch...... because that will determine the order of operations.
They appear as "obj x y" where x and y are where they appear in the patch window.... coordinates, not index.
BUT beware..... it is not just "obj" objects that count..... "floatatom" "msg"..... anything that has connections is counted.
The connect message is connect a b x y....... you see a load of them already at the bottom of the text file.
"a" is the object number to connect from starting at zero.
"b" is the outlet number of that object starting at zero on the left outlet.
"x" is the object number to connect to starting at zero.
"y" is the inlet number of that object to connect to starting at zero on the left inlet.
So with 2 objects only..... say [f] and [print]...... [connect 0 0 1 0(
With [route 1 2] and 2 [print] objects [connect 0 0 1 0( for the print of the left outlet of route and [connect 0 1 2 0( for the middle outlet.
That assumes you created [route] first and the prints afterwards.
Each object number starting at 0 is assigned in the order in which it was put in the patch.
You are going to have to count the objects in the patch to test before you start because the first [print] you put will have the next object number.
Actually you could just put a bigger number into my patch below...... a guess, but big.... and it will just throw more errors as it tries to connect [print] s together when it runs out of other objects to connect to.
debugger.zip
Of course it gets more complicated by an enormous factor when you want a [print] on all outlets of all the objects, but again, you could repeat connect messages for each object up to 10? outlets and suffer the console errors as it tries to connect to non existent outlets....... but then your print numbers will not match up with the object numbers.... hum.
David.
 posted in technical issues
PD's scheduler, timing, control-rate, audio-rate, block-size, (sub)sample accuracy,
Hello, 
this is going to be a long one.
After years of using PD, I am still confused about its' timing and schedueling.
I have collected many snippets from here and there about this topic,
-wich all together are really confusing to me.
*I think it is very important to understand how timing works in detail for low-level programming … *
(For example the number of heavy jittering sequencers in hard and software make me wonder what sequencers are made actually for ? lol )
This is a collection of my findings regarding this topic, a bit messy and with confused questions.
I hope we can shed some light on this.


- a)
The first time, I had issues with the PD-scheduler vs. how I thought my patch should work is described here:
https://forum.pdpatchrepo.info/topic/11615/bang-bug-when-block-1-1-1-bang-on-every-sample
The answers where:
„
[...] it's just that messages actually only process every 64 samples at the least. You can get a bang every sample with [metro 1 1 samp] but it should be noted that most pd message objects only interact with each other at 64-sample boundaries, there are some that use the elapsed logical time to get times in between though (like vsnapshot~)
also this seems like a very inefficient way to do per-sample processing..
https://github.com/sebshader/shadylib http://www.openprocessing.org/user/29118
seb-harmonik.ar posted about a year ago , last edited by seb-harmonik.ar about a year ago
• 1
 whale-av
@lacuna An excellent simple explanation from @seb-harmonik.ar.
Chapter 2.5 onwards for more info....... http://puredata.info/docs/manuals/pd/x2.htm
David.
“
There is written: http://puredata.info/docs/manuals/pd/x2.htm
„2.5. scheduling
Pd uses 64-bit floating point numbers to represent time, providing sample accuracy and essentially never overflowing. Time appears to the user in milliseconds.
2.5.1. audio and messages
Audio and message processing are interleaved in Pd. Audio processing is scheduled every 64 samples at Pd's sample rate; at 44100 Hz. this gives a period of 1.45 milliseconds. You may turn DSP computation on and off by sending the "pd" object the messages "dsp 1" and "dsp 0."
In the intervals between, delays might time out or external conditions might arise (incoming MIDI, mouse clicks, or whatnot). These may cause a cascade of depth-first message passing; each such message cascade is completely run out before the next message or DSP tick is computed. Messages are never passed to objects during a DSP tick; the ticks are atomic and parameter changes sent to different objects in any given message cascade take effect simultaneously.
In the middle of a message cascade you may schedule another one at a delay of zero. This delayed cascade happens after the present cascade has finished, but at the same logical time.
2.5.2. computation load
The Pd scheduler maintains a (user-specified) lead on its computations; that is, it tries to keep ahead of real time by a small amount in order to be able to absorb unpredictable, momentary increases in computation time. This is specified using the "audiobuffer" or "frags" command line flags (see getting Pd to run ).
If Pd gets late with respect to real time, gaps (either occasional or frequent) will appear in both the input and output audio streams. On the other hand, disk strewaming objects will work correctly, so that you may use Pd as a batch program with soundfile input and/or output. The "-nogui" and "-send" startup flags are provided to aid in doing this.
Pd's "realtime" computations compete for CPU time with its own GUI, which runs as a separate process. A flow control mechanism will be provided someday to prevent this from causing trouble, but it is in any case wise to avoid having too much drawing going on while Pd is trying to make sound. If a subwindow is closed, Pd suspends sending the GUI update messages for it; but not so for miniaturized windows as of version 0.32. You should really close them when you aren't using them.
2.5.3. determinism
All message cascades that are scheduled (via "delay" and its relatives) to happen before a given audio tick will happen as scheduled regardless of whether Pd as a whole is running on time; in other words, calculation is never reordered for any real-time considerations. This is done in order to make Pd's operation deterministic.
If a message cascade is started by an external event, a time tag is given it. These time tags are guaranteed to be consistent with the times at which timeouts are scheduled and DSP ticks are computed; i.e., time never decreases. (However, either Pd or a hardware driver may lie about the physical time an input arrives; this depends on the operating system.) "Timer" objects which meaure time intervals measure them in terms of the logical time stamps of the message cascades, so that timing a "delay" object always gives exactly the theoretical value. (There is, however, a "realtime" object that measures real time, with nondeterministic results.)
If two message cascades are scheduled for the same logical time, they are carried out in the order they were scheduled.
“
[block~ smaller then 64] doesn't change the interval of message-control-domain-calculation?,
Only the size of the audio-samples calculated at once is decreased?
Is this the reason [block~] should always be … 128 64 32 16 8 4 2 1, nothing inbetween, because else it would mess with the calculation every 64 samples?
How do I know which messages are handeled inbetween smaller blocksizes the 64 and which are not?
How does [vline~] execute?
Does it calculate between sample 64 and 65 a ramp of samples with a delay beforehand, calculated in samples, too - running like a "stupid array" in audio-rate?
While sample 1-64 are running, PD does audio only?
[metro 1 1 samp]
How could I have known that? The helpfile doesn't mention this. EDIT: yes, it does.
(Offtopic: actually the whole forum is full of pd-vocabular-questions)
How is this calculation being done?
But you can „use“ the metro counts every 64 samples only, don't you?
Is the timing of [metro] exact? Will the milliseconds dialed in be on point or jittering with the 64 samples interval?
Even if it is exact the upcoming calculation will happen in that 64 sample frame!?
- b )


There are [phasor~], [vphasor~] and [vphasor2~] … and [vsamphold~]
https://forum.pdpatchrepo.info/topic/10192/vphasor-and-vphasor2-subsample-accurate-phasors
“Ive been getting back into Pd lately and have been messing around with some granular stuff. A few years ago I posted a [vphasor.mmb~] abstraction that made the phase reset of [phasor~] sample-accurate using vanilla objects. Unfortunately, I'm finding that with pitch-synchronous granular synthesis, sample accuracy isn't accurate enough. There's still a little jitter that causes a little bit of noise. So I went ahead and made an external to fix this issue, and I know a lot of people have wanted this so I thought I'd share.
[vphasor~] acts just like [phasor~], except the phase resets with subsample accuracy at the moment the message is sent. I think it's about as accurate as Pd will allow, though I don't pretend to be an expert C programmer or know Pd's api that well. But it seems to be about as accurate as [vline~]. (Actually, I've found that [vline~] starts its ramp a sample early, which is some unexpected behavior.)
[…]
“
- c)


Later I discovered that PD has jittery Midi because it doesn't handle Midi at a higher priority then everything else (GUI, OSC, message-domain ect.)
EDIT:
Tryed roundtrip-midi-messages with -nogui flag:
still some jitter.
Didn't try -nosleep flag yet (see below)
- d)

So I looked into the sources of PD:
scheduler with m_mainloop()
https://github.com/pure-data/pure-data/blob/master/src/m_sched.c
And found this paper
Scheduler explained (in German):
https://iaem.at/kurse/ss19/iaa/pdscheduler.pdf/view
wich explains the interleaving of control and audio domain as in the text of @seb-harmonik.ar with some drawings
plus the distinction between the two (control vs audio / realtime vs logical time / xruns vs burst batch processing).
And the "timestamping objects" listed below.
And the mainloop:
Loop
- messages (var.duration)
- dsp (rel.const.duration)
- sleep
With
[block~ 1 1 1]
calculations in the control-domain are done between every sample? But there is still a 64 sample interval somehow?
Why is [block~ 1 1 1] more expensive? The amount of data is the same!? Is this the overhead which makes the difference? Calling up operations ect.?
Timing-relevant objects
from iemlib:
[...]
iem_blocksize~   blocksize of a window in samples
iem_samplerate~  samplerate of a window in Hertz


------------------ t3~ - time-tagged-trigger --------------------
-- inputmessages allow a sample-accurate access to signalshape --
t3_sig~          time tagged trigger sig~
t3_line~         time tagged trigger line~


--------------- t3 - time-tagged-trigger  ---------------------
----------- a time-tag is prepended to each message -----------
----- so these objects allow a sample-accurate access to ------
---------- the signal-objects t3_sig~ and t3_line~ ------------
t3_bpe           time tagged trigger break point envelope
t3_delay         time tagged trigger delay
t3_metro         time tagged trigger metronom
t3_timer         time tagged trigger timer

[...]
What are different use-cases of [line~] [vline~] and [t3_line~]?
And of [phasor~] [vphasor~] and [vphasor2~]?
When should I use [block~ 1 1 1] and when shouldn't I?
[line~] starts at block boundaries defined with [block~] and ends in exact timing?
[vline~] starts the line within the block?
and [t3_line~]???? Are they some kind of interrupt? Shortcutting within sheduling???
- c) again)

https://forum.pdpatchrepo.info/topic/1114/smooth-midi-clock-jitter/2
I read this in the html help for Pd:
„
MIDI and sleepgrain
In Linux, if you ask for "pd -midioutdev 1" for instance, you get /dev/midi0 or /dev/midi00 (or even /dev/midi). "-midioutdev 45" would be /dev/midi44. In NT, device number 0 is the "MIDI mapper", which is the default MIDI device you selected from the control panel; counting from one, the device numbers are card numbers as listed by "pd -listdev."
The "sleepgrain" controls how long (in milliseconds) Pd sleeps between periods of computation. This is normally the audio buffer divided by 4, but no less than 0.1 and no more than 5. On most OSes, ingoing and outgoing MIDI is quantized to this value, so if you care about MIDI timing, reduce this to 1 or less.
„
Why is there the „sleep-time“ of PD? For energy-saving??????
This seems to slow down the whole process-chain?
Can I control this with a startup flag or from withing PD? Or only in the sources?
There is a startup-flag for loading a different scheduler, wich is not documented how to use.
- e)

[pd~] helpfile says:
ATTENTION: DSP must be running in this process for the sub-process to run. This is because its clock is slaved to audio I/O it gets from us!
Doesn't [pd~] work within a Camomile plugin!?
How are things scheduled in Camomile? How is the communication with the DAW handled?
- f)

and slightly off-topic:
There is a batch mode:
https://forum.pdpatchrepo.info/topic/11776/sigmund-fiddle-or-helmholtz-faster-than-realtime/9
EDIT:
- g)
I didn't look into it, but there is:
https://grrrr.org/research/software/
clk – Syncable clocking objects for Pure Data and Max
This library implements a number of objects for highly precise and persistently stable timing, e.g. for the control of long-lasting sound installations or other complex time-related processes.
Sorry for the mess!
Could you please help me to sort things a bit? Mabye some real-world examples would help, too.

 posted in technical issues
How to use OSC namespaces in MobMuPlat?
Is it possible to parse the namespace of OSC messages in MobMuPlat?
MobMuPlat handles OSC communication in a wrapper patch that provides a message called 'fromNetwork'.
Say the OSC message is: /level1/level2/levelN format value
It has the format: [path format value]. The path here uses a namespace that subdivides according to levels.
With oscparse, the namespace in the path could be parsed like this :
netreceive -> oscparse-> list trim -> route level1 -> route level 2 ... route levelN
https://forum.pdpatchrepo.info/topic/9856/oscformat-and-oscparse-integer-not-routing-as-expected/8
With MobMuPlat's 'valueFromNetwork', is it still possible to "route" the value of the message according to the namespace? Since valueToNetwork contains a list where the first argument is the entire path, I can only split the first argument from the remaining arguments:
receive fromNetwork -> route list -> route /level1/level2/levelN
But I can't further split within the path itself to divide leve1/level2/levelN:
receive fromNetwork -> route list -> route .level1 -> route level2 -> route levelN.
Is there a way of doing this?
 posted in technical issues
ELSE library 1.0 beta 18 and Live Electronics Tutorial 1.0 beta 8 released
Howdy, I have big updates to the ELSE library and my Live Electronics Tutorial!
Raspberry Pi binaries for ELSE are still missing, but it'll be up soon. Find available releases on github while they don't show up in deken.: https://github.com/porres/pd-else/releases/tag/v1.0-beta18
There are 30 new objects in ELSE. This is the first release over 300 objects and there's already 324 of them! I'm shocked on how much it's growing... I realize now how this library is unique in the number of objects towards DSP and audio processing. There are 219 tilde objects, that's more objects than Pd itself has, or all of cyclone...
So, what's the most exciting new stuff?
There's a bunch of reverb objects here - [mono.rev~], [stereo.rev~], [echo.rev~], [giga.rev~], [free.rev~] (check also [fdn.rev~] which wasn't really ready).
There are a few dynamic processors as well: [compress~], [duck~] and [expand~].
A couple of FX like [chorus~] and [phaser~].
A [spectrograph~] object.
Some objects that deal with lists ([regroup], [pick], [sort], [scramble], [merge], [unmerge] & [rand.seq]).
A [trigger2] object that behaves like [trigegr] in Purr Data and Max, that people from time to time request to be in Pd as well (if Pd's trigger includes such functionalities, I'll delete this object).
Check complete changelog here: https://github.com/porres/pd-else/releases/tag/v1.0-beta18 . As usual, I have breaking changes while we're at the beta stage.
As for my Live Electronics tutorial, which is based on this library, most of the changes reflect the new objects from the ELSE library. So then, most importantly, the reverb section just got a major upgrade. I'm also now including an appendix with s quick start on Data Structures! Check it out at https://github.com/porres/Live-Electronic-Music-Tutorial/releases/tag/v1.0-beta-8
cheers
 posted in news
Is automatic patching possible?
@elden [obj 350 10 r test( means put [r test] at x =350 y = (minus) 10 (from top left corner)..... build_bus_panels.pd
[connect 0 0 1 0( connects the first objects first outlet to the second objects first inlet.
[connect 2 1 3 4( connects the third objects second outlet to the fourth objects fifth inlet.
... object... outlet .... object .... inlet.... as you would draw it in Pd.
It's great counting from zero isn't it......?
Better than Hex though....... 
The object "id's" are the order they were created in. If in doubt put all the objects by message before you put anything in the patch manually, or count up the objects that you have already and go from that number + 1
As a rule, you need to put any permanent objects first..... as you might need to connect to them.
But if you change them... add or take away..... you will need to change all of your connect messages.
That is why I prefer to set a base number and derive all my connect messages from that using [+ n] and $ variables in the messages. Much easier like that to modify the dynamic patching.
If you are adding to an already existing patch, and want to connect to something, you will have to open the patch in a text editor and count from the top of the page down to that object (objects only) because you have no idea in what order they were created..
David.
posted in technical issues
what can a blender make? the best blenders are incredible kitchen appliances
Most families have a kitchen blender of certain sorts. A portion of those blenders are more remarkable than others. A few clients are more proficient than others with regards to recognizing what a blender can do. Recognizing what your blender can do can set aside you cash and enhance your cooking experience just as spare you https://goodfoodblogph.com/ time in the kitchen.
Mixed Drinks
Each child realizes that blenders are remarkably acceptable at making mixed beverages. Blenders can make milk shakes, smoothies, natural product shakes, solidified beverages, and the more remarkable blenders can make squashed ice for margaritas and daiquiris. These beverages can be made with and without liquor. Blenders are ideal for family social occasions, local gatherings or for the each morning power drink.
The blender's capacity decides how smooth your beverage will be. On the off chance that for instance you are including almonds or carrots they will be separated into a lot littler parts the more remarkable your blender is. What's more, in the event that you do like lumps in your beverage and you have an exceptionally ground-breaking blender then you simply need to decrease the mixing time. Anyway it doesn't work the reverse way around. In the event that your blender comes up short on the force it will always be unable to deliver a truly smooth mixed beverage, particularly when utilizing more strong things.
Purees, Dips, Salsas and Soups
Blenders are the ideal kitchen apparatuses with regards to making purees, plunges, salsas and soups. You can make any kind of soup you need, simply include 1 cup of cooked vegetable, some cooked boneless chicken on the off chance that you like, and a ¼ cup of water to your blender. At that point mix until it is smooth enough for you.
You can without much of a stretch mix any of the accompanying: avocado cream, guacamole, cream of mushroom/tomato, Mexican salsa, dark bean plunge, new organic product yogurt, new pesto sauce, fruit purée, and some more. Numerous sound and fun suppers and bites can without much of a stretch be made with the correct blender, frequently setting aside you time and cash all the while.
Infant Foods
Who would not like to take care of its infant new and solid food. Blenders are a simple method to make a variety of various enhanced and supporting infant nourishments. From fruit purée to carrot puree to verdant green squeezes, all can be newly made and individualized to give you 100% control of what you feed your child. This will likewise spare you a great deal of cash as well.
Pounded Spices and Fresh Grinded Coffee
Envision pounding your own new espresso each morning, or on the ends of the week. Envision the smell and the full flavor that you get from newly crushed espresso. There is then no requirement for you to stop by a coffeehouse on your approach to work and drop $4 or more dollars each time you need great new espresso. The more impressive blenders can crush espresso beans as fine as you might want them to be.
Make your own newly ground pepper from peppercorns. You can even make your own pepper mix by combining various kinds of peppercorns. Do likewise with nutmeg, cinnamon and other dried flavors. Whenever you have visitors over for supper or BBQ dazzle them by revealing to them that you made the flavor blend yourself.
Crushed/Shred Meat
Make your own burger patties from lean cut meats and set aside cash all the while. Additionally, another preferred position is that you know precisely what meat is truly in your patty. Shred cooked meats for sandwiches, e.g., chicken or pork. For this Best Blenders suggests an incredible blender.
Cleaved Vegetables
Do you scorn cleaving onions? Why not utilize your blender? You need hacked carrots as well? Not an issue, utilize your blender. Utilize a low setting or the beat highlight on your blender https://www.flickr.com/people/blenderforsmoothiesreviews/ and the activity will be done right away. It doesn't make a difference on the off chance that they are dry or wet, a decent blender will cleave them to an ideal serving size in no time flat, sparing you time and tears.
Ground Cheese
You like including ground cheddar your pasta or making new pizza or meal? At that point why not utilize newly ground cheddar? It is exceptionally easy to do - cut your cheddar into 3D squares, throw into your blender and utilize your blender's heartbeat include until you have the cheddar ground to your ideal size. Newly ground cheddar consistently tastes better!
Serving of mixed greens Dressings and Mayonnaise
Practically any blender can make serving of mixed greens dressing. Pick your dressing fixings and mix until smooth. At that point bottle it for next time or to take it to the workplace or cookout.
For mayonnaise the fundamental formula is two eggs, 1 tsp. mustard and ½ crushed lemon (whenever liked), mix at fast until foamy, at that point gradually include 1 ¼ cup cooking oil and keep on mixing at rapid until thick and rich. Spot not utilized segment into a container and store in cooler. All new and scrumptious, and everything is without additives.
Crushed Whole Grains
You like eating entire grains? What about creation entire grain flapjacks? It is without a doubt less expensive than locally acquired blends, and truly easy to do as well. Most don't know that a blender can deliver a fine powder from entire grains. The blender ought to have more force than a normal home blender for this errand.
Frozen yogurt
Make the most extravagant seasoned frozen yogurts ever with your blender. Ideal for birthday celebrations or home film evenings. Truly easy to do as well, as relatively few fixings are required. It is additionally remarkably simple to store your newly made frozen yogurt in the cooler until one week from now or the end of the week after. With a bit of testing your companions will before long be advising you to bundle your frozen yogurt and sell it. To make frozen yogurt your blender will require enough mixing capacity to have the option to deal with solidified products of the soil in the event that you decide to utilize them. The more remarkable the blender the creamier and smoother the frozen yogurt.
Additive Free Fresh Nut Butters
Make your own new nutty spread, or almond or cashew margarine. Ideal for snacks, picnics or bites. This can be a solid and reasonable choice to locally acquired items. Envision the expression on your companions faces when you disclose to them that you make it yourself. Here is the way to make new nutty spread https://gab.com/topbestblenderreviews without any preparation utilizing your blender.
First mix 2 cups of cooked peanuts and ½ tablespoon of vegetable or nut oil until it becomes glue like. At that point taste and if necessary include minuscule amounts of earthy colored sugar, nectar or salt to fit individual taste. On the off chance that you like your nut spread crunchy, include some more peanuts at the end and mix just for a couple of moments. Best Blenders suggests the more remarkable blenders for this kind of mixing.
 posted in Off topic
Build a MIDI controller with the Arduino, Firmata and Pure Data
Time to start contributing some knowledge back to the wonderful world that is the internet; today, a step by step nice and easy tutorial on getting started to building your own MIDI controllers with the arduino.
When researching for my ableton controller project, I didn’t find much out there about using firmata on an arduino to send data to software. The standard approach just seemed to be create the code in the arduino language, upload it to your board and hack one of those MIDI to USB cables as a bodge job way of getting the MIDI out of the arduino.
So why firmata and pure data? Well the whole idea of firmata is that you flash it to your arduino, and it throws out serial about whats going on with the arduino inputs and outputs, then you decide how the software treats the readings coming in and going out.
Theory out the way, lets build some controllers. You’ll need a few things…
HARDWARE:
An arduino and something to wire into it (for this i’ll be using a pot)
A USB cable for your arduino
SOFTWARE:
Arduino – http://arduino.cc/en/Main/Software
Pure Data – http://puredata.info/downloads
Firmata – http://at.or.at/hans/pd/objects.html#pduino
Something to patch your new controller into; like Reason or Ableton Live
- SETTING UP FIRMATA AND PURE DATA
Install Pure Data and create a folder to store all your patches somewhere. Unzip Firmata and add the files ‘arduino.pd’, ‘arduino-test.pd’ and ‘arduino-help.pd’ to your new Pure Data folder. The ‘arduino.pd’ file is the object that we use in PD for opening up communication with your arduino and routing it to PD. Done? Awesome, your software is almost set up.
- FLASHING FIRMATA TO YOUR ARDUINO
Install the latest version of arduino and open it up. Connect your arduino with the USB cable to your laptop (i’m using a macbook for this by the way). In the example patches, open up “Standard Firmata”, select your board (im using an arduino mega), and your serial port (look for tty.usbserial for use with a USB cable). Then compile and hit the upload button and your arduino is now ready to use firmata and communicate with Pure Data!
- WIRING UP A POT

Potentiometers are cool, and theres a great arduino tutorial of how to wire one up here: http://www.arduino.cc/en/Tutorial/Potentiometer
Basically, all you need to know is that there are three pins; your two outer pins govern voltage flow across the pot, meaning one has to be 5V and the other has to be ground. It doesn’t matter which, but your 5v pin is going to be where your pot reads maximum, so convention dictates this should be the right hand pin. The center pin needs to be connected to an analog in on the arduino and will read the value of the pot as it sweeps from ground (0v) to 5v.
All wired up? Plug it into your laptop and open Pure Data, we’re ready to get things talking.
- SETTING UP OUR PATCH
Open the example “arduino-test.pd” Pure Data patch you copied over earlier. It should look like this one…

The test patch has everything we need to open a connection and enable pins. Firstly, lets delete a bunch of stuff and make our window a bit bigger. Hit Command + E to enter edit mode in Pure Data.

Ok a quick explaination; the key component here is the ‘arduino’ object. This is being drawn from the file you copied in earlier, and is what communicated with your arduino. Here we can do everything to control the arduino from opening a connection, to receiving data.
The large grid allows us to set the mode of each pin on the arduino. Remember pins 0 and 1 are reserved for Rx and Tx. I’m using analog pin 4 for this demo, so I’ve set my pin mode for pin 4 to ‘analog’.
Now we can plug our arduino in and get a reading from the potentiometer.
- ARDUINO INTO PURE DATA
With your arduino plugged in, hit command and E to bring us out of edit mode. In our patch, click on ‘Devices’ above the arduino object and open up the pure data terminal. (That other thing that loads with PD that has all the scary code in)

The “Devices” message connected to the arduino object pings your computer to find what devices are connected and on what serial ports. Since we’re using a USB cable to connect our arduino, we’re looking for something with ‘usbserial’ in it, in this case; port 2.
Select the relevent port in the green box at the top (remember the first box is ‘0’, second is ‘1’ and so forth) and hit ‘Open’ to establish a connection. Check the terminal to see if the connection was sucessful.

Now lets check we’re getting something in. Create a number box (Command + 3) and connect it to the relevent pin on the ‘Route analog’ box at the bottom. In this case, pin 4.
One more thing; if you’re not getting any readings in, you’ll need to click on ‘pd old analog/digital controls’ and enable your pins here too. What I tend to do in my patches is just not include the large grid but make my own ‘old pd’ controls custom to what i’m enabling/disabling to save space.
Here’s what the ‘old analog/digital controls’ subpatch looks like (pin 4 enabled)…

Come out of edit mode and check that you’ve got readings. If so congratulations! If not, troubleshoot, start with making sure your usb connection is opened, make sure all the correct pins are enabled (remember you’re counting from 0 not 1 on most of these buttons in PD, it’s just the way computers work).
- SCALING READINGS TO MIDI
So we’ve got a reading and chances are it’s to 3 decimal places between 0 to 1. No problem, create a new object (Command + 1) and type “autoscale 0 127”. This allows us to scale the input to a min and max value, in this case 0 to 127 of MIDI. Next, lets get things looking nice, create a new object and type “knob”. Connect this AFTER the autoscale object. (the knob is default set to read inputs from 0 to 127. Then create another number to display the scaled MIDI data coming out, and finally a new object and type “ctlout 1”.
It should look something like this…

The second box should be outputing values from 0 – 127 now, and the knob giving a visual representation of your potentiometer.
Now lets patch it into ableton…
- PURE DATA TO ABLETON LIVE
Firstly, you’ll need to set up your macs IAC driver if you’ve not done this. Basically you’ll need to go into Audio/MIDI preferences and enable your IAC driver. Then create a new input and output. One for input to DAW and one for output from DAW. Google around for a tutorial on this, its really simple, a 30 second job.
After you’ve set up your IAC driver, go back to PD and go to preferences > MIDI Settings, and connect your IAC driver.

Open ableton and go to its MIDI preferences. Create a device listing for your IAC driver and enable its ins and outs into ableton like so…


And thats it! Create an instrument and try to assign something! I’ve got it controlling the brightness of a bass sound here.
Shout out for Facu who requested this tutorial. Hopefully it’ll help some of you looking to get into this stuff and start building things but with no idea where to start.
 posted in tutorials
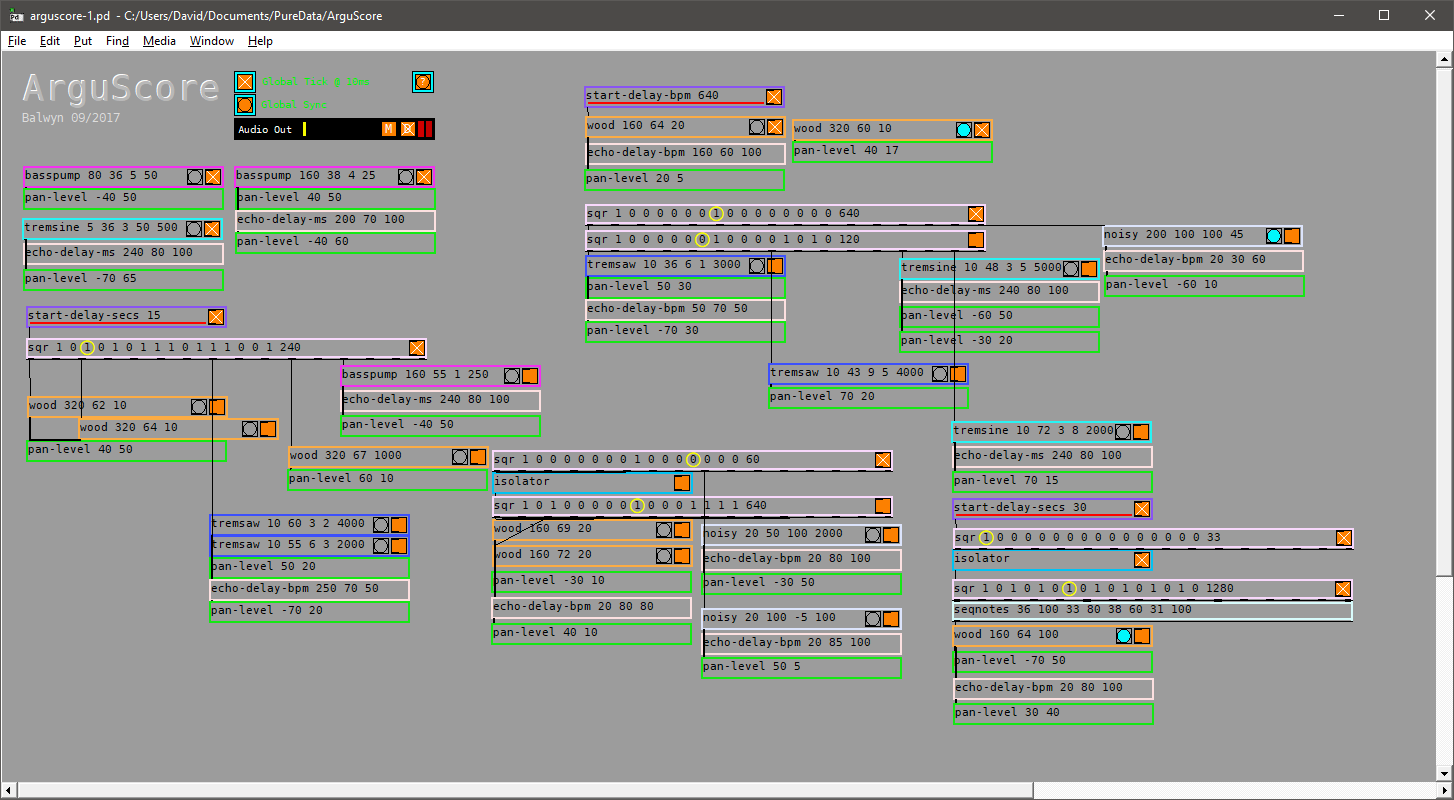
ArguScore
Here is an updated version
arguscore-update.zip
and a few Purr Data compatibility replacement objects: purr-data-compatible-replacements.zip
A creation argument only object driven system for instant music making;
Objects so far;
Required;
globaltimer - outputs a 10ms bang to drive all objects;
globalsync - resets all objects to zero or start;
audio~ - dac~ catcher~ for all throws~, output level, mute;
Sound Objects
By default sound objects start playing at the bpm of the first argument
basspump - args - bpm note distortion duration
wood - args - bpm note duration
tremsaw - args - bpm note vibrato distortion duration
tremsine - args - bpm note vibrato noise duration
noisy - args - bpm note vcfq duration
kauplus - args - bpm note string-resonation duration
Effect Objects
sqr - args - 16 required(0 or 1) bpm (starts playing by default)
overides sound objects autoplay
2 optional args for cursor offset and pitch if font different
has 16 outlets to send 0 or 1
echo-delay-bpm - args - bpm feedback(0 to 100) level(0 to 100)
echo-delay-ms - args - millisecs feedback(0 to 100) level(0 to 100)
pan-level - args - pan (-100 to 100) level (0 to 100)
autopan - args - width (0 to 100) frequency (* 0.01) level (0 to 100)
fade - args - millisecs to fade-in pecentage of level to drop to (0 to 100) millisecs to fade-out
filter - args - highpass (midi note to frequency) lowpass (midi note to frequency)
(0 to 135 equates to approx 8Hz to 19912Hz)
start-delay-secs - args - seconds (delays the autostart of the connected object)
start-delay-bpm - args - bpm (delays the autostart of the connected object)
stop-delay-secs - args - seconds (outputs a one at the end of the delay which can connect to a globalsync)
stop-delay-bpm - args - bpm (delays the autostart of the connected object)
isolator - sits between two sqr's and sends a signal to start/stop the receiving sqr
seqnotes - four pairs of note & velocity that receive sqr ones to fire a connected sound object
Notes
Can crash Pd when making lots of edits to arguments, particularly while playing, so save often
There is a [declare -path objects] hiding behind the audio~ object
Fixed missing note and velo message for tremsaw
Two more arguscore patches can be open at the same time providing only one patch contains the globaltimer and audio~ objects (see arguscore-2.pd and arguscore-2-b.pd)
new objects
kauplus, autopan, fade, filter, stop-delay-secs, stop-delay-bpm;
 posted in patch~
ArguScore
ArguScore
A creation argument only object driven system for instant music making
Objects so far:
Required:
globaltimer - outputs a 10ms bang to drive all objects
globalsync - resets all objects to zero or start
audio~ - dac~ catcher~ for all throws~, output level, mute
Sound Objects
By default sound objects start playing at the bpm of the first argument
basspump - args - bpm note distortion duration
wood - args - bpm note duration
tremsaw - args - bpm note vibrato distortion duration
tremsine - args - bpm note vibrato noise duration
noisy - args - bpm note vcfq duration
Effect Objects
sqr - args - 16 required(0 or 1) bpm (starts playing by default), overides sound objects autoplay, 2 optional args for cursor offset and pitch if font different has 16 outlets to send 0 or 1
echo-delay-bpm args - bpm feedback(0 to 100) level(0 to 100)
echo-delay-ms - args - millisecs feedback(0 to 100) level(0 to 100)
pan-level - args - pan (-100 to 100) level (0 to 100);
start-delay-secs - args - seconds (delays the autostart of the connected object)
start-delay-bpm - args - bpm (delays the autostart of the connected object)
isolator - sits between two sqr's and sends a signal to start/stop the receiving sqr;
seqnotes - four pairs of note & velocity that receive sqr ones to fire a connected sound object
Cheers
Balwyn
arguscore.zip
posted in patch~
[struct] / [pointer] object limitation?
I'm also curious about what triggers the Stack Overflow.
A safety mechanism that puts an upper limit on how deep an immediate "chain reaction" can be in response to an event like a mouse click, key press, netreceive, or clock callback (.e.,g. a bang coming from [delay 1000]). When I say "chain reaction", I mean an initial message to an object triggers an outgoing message to another object, and so on until there are no more outgoing messages to process. When I say "immediate", I mean the messages get sent without any logical time in between.
Here's an example:
[bng]
|
[bng]
|
[bng]
If you clicked the object chain above, you get an immediate chain reaction 3 objects deep.
Now, if you extended that chain so that there were 1001 [bng] objects-- each with a single connection to the next-- you'd get a stack overflow error because it exceeds the limit Pd puts on how deeply a single message is allowed to flow in an immediate chain reaction.
The way Pd is coded, these simple examples actually end up using recursive function calls in C. Using recursion with too many levels can end up overflowing the stack and cause a crash, which is why you get that particular error message. (1000 may be too small a number nowadays, but recursion is complex and I'm not sure how one would come up with a better number.)
When you use recursion explicitly in a Pd diagram-- that is, hooking an object's outlet to an inlet that is back up the chain-- you make it way more likely to hit this particular error. You can imagine that your recursive diagram ends up "unrolling". That is, if you have a chain of 4 objects where the bottom one connects back into the top one and recursing 251 times, you're going to hit a stack limit and get the error.
The [until] object solves this "explicit" recursion problem-- it sends a bang to its outlet, and when the resulting immediate chain reaction has finished it sends another until the specified limit is reached.
So if you have this:
[10000(
|
[until]
|
[bng]
|
[bng]
|
[bng]
You go two objects deep for the bang coming out of [until], then three more for the first time through the chain of [bng] objects. So now we're 5 deep. But once the first iteration of the [bng] objects are done they unroll, so we're back to being just 2 levels deep. Then the [until] object starts its next iteration, which goes 3 more deep, then unrolls. It can do this indefinitely, which is why [until] is preferred over using recursive object chains in Pd.
 posted in technical issues