Raspberry Pi noob trying to install ANY version of Pd
Hello, I just got my first Raspberry Pi and I really would love to run Pd on it! I don't care if it's Pd-extended or Pd-vanilla, I just want to run some version of it.
I installed Raspbian using NOOBS. I tried to install Pd-extended using the instructions at this link: https://puredata.info/downloads/pd-extended-0-43-3-on-raspberry-pi-raspbian-wheezy-armhf but I ran into a problem when entering the command:
$ sudo dpkg -i Pd-0.43.3-extended-20121004.deb
Here's a picture of the errors I received:
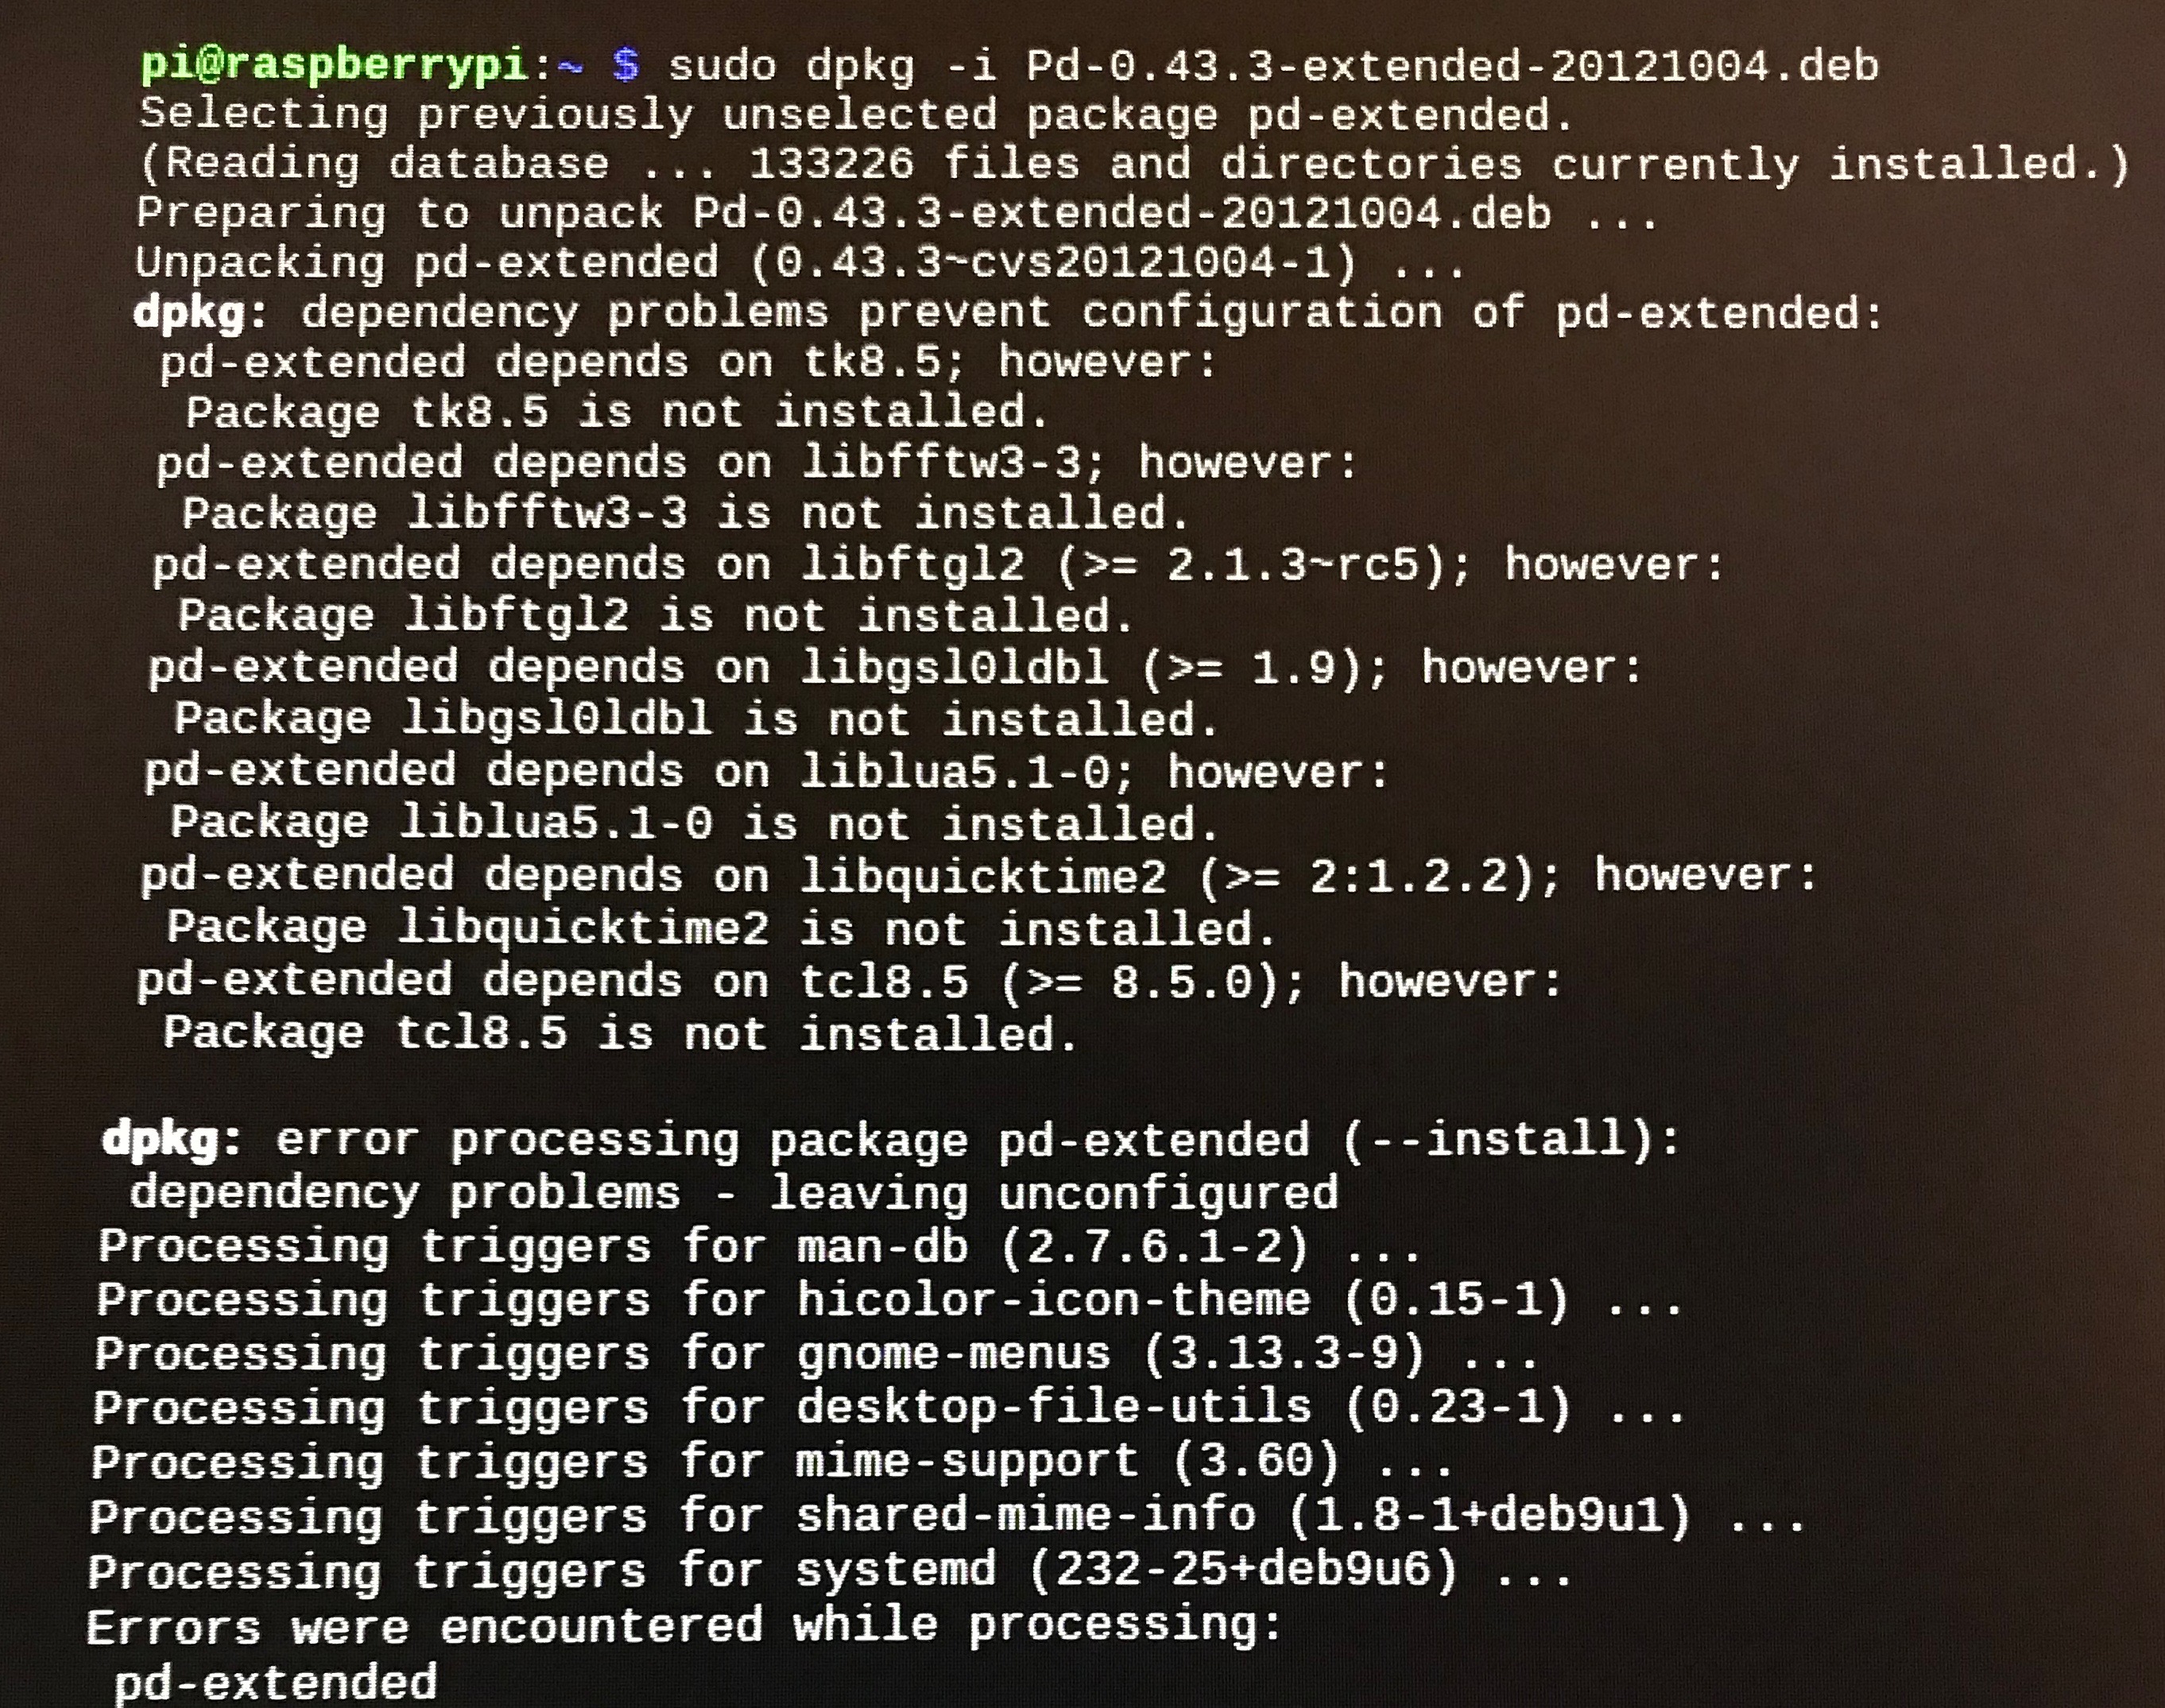
Honestly, I don't know what dependencies are or how to get the right ones. I also tried to install Pd 0.48 using the tutorial written by user emviveros on the forum post at this link: https://forum.pdpatchrepo.info/topic/11626/pd-48-on-raspberry-pi-3 but, like user nicnut, when I tried to run autogen by typing "./autogen.sh" I also received an error that said " ./autogen.sh: 21: ./autogen.sh: autoreconf: not found".
If anyone knows of a surefire way to get ANY version of Pure Data running on Raspbian installed via NOOBS, I would really appreciate the help!
Thanks,
Jeff
 posted in technical issues
Raspi/Bela reading sound files from USB stick
I'm making some patches using both Raspberry Pi and Bela boards. Is anyone able to tell me how I can access sound files in PD that are located on a USB stick plugged into these devices? On PD on my computer I can just use readsf~ or soundfiler to look for the files using the path /Volumes/USBSTICK/filename.wav.
However this doesn't work on the Bela or Raspberry Pi, the files can't be found - is there a different address to use? Or do I need to mount the disk somehow? I imagine the solution is very similar for both the Raspberry Pi and the Bela systems, but maybe I'm wrong?
(cross posted on the Bela forum)
 posted in technical issues
Pd working headless on a raspberry pi in 2018
Hey everybody,
I'd like to get pure data working on my raspberry pi to run headless, open a patch, accept audio input, and send it on out to the worth.
I have a sabrent usb audio device, It works fine if I open a gui and load pd within it. Upon loading the gui Pd takes the sound card, is happy, and a very simple patch of adc->dac puts the audio out.
I can't get it working headless. I've followed every internet advice. I know this isn't the fault of pure data but of Linus Torvalds/the Linux community, but I'd like to plug in the raspberry pi, get it going headless on say, ring mod into some delay, and just go from there. But will this ever be possible? Please help.
I wiped the microsd card today, installed raspberry stretch, and that's what it runs on now.
Thank you.
A dying soul.
 posted in technical issues
how do i close ofelia render window?
@youaresound Yes, that's a RPi specific issue.
I think it happens because OF doesn't use X11 windowing system on the RPi as a default.
https://forum.openframeworks.cc/t/program-window-on-raspberry-pi-doesnt-behave-like-windows-on-other-platforms
However, I think there's a solution to make it use X11 by recompiling OF using different setting.
https://forum.openframeworks.cc/t/raspberry-x11-window
I will try this later and see if I can fix it.
 posted in technical issues
raspberry pi Midi
I am looking to install pure data on raspberry pi. Can someone put me on the right path to how pure data would see midi on raspberry pi as well as how pure data would send midi message back to the input device on raspberry pi
Also can we setup virtual midi ports
 posted in technical issues
rPi no midi input or output found
I've been doing a bunch of experiments with PD on a Raspberry Pi, with custom-built MIDI control via a Teensy microcontroller. I've been using Raspbian lite with no GUI. This was working really well until recently.
For various reasons I updated my Raspberry Pi to the latest Raspbian (Stretch) which also allowed me to get a slightly more decent build of PD, 0.47.1.
Since doing that I can't seem to get any MIDI input in PD, no matter what startup flags I use. Most tellingly, if I run pd -nogui -listdev I get the following list:
audio input devices:
- bcm2835 ALSA (hardware)
- bcm2835 ALSA (plug-in)
- Teensy MIDI (hardware)
- Teensy MIDI (plug-in)
audio output devices: - bcm2835 ALSA (hardware)
- bcm2835 ALSA (plug-in)
- Teensy MIDI (hardware)
- Teensy MIDI (plug-in)
API number 1
no midi input devices found
no midi output devices found
--
I find it very odd that it lists my Teensy MIDI device as an audio input and output, and also says that no midi input or output devices have been found. It is somewhat understandable that my patches will not therefore recognise any midi activity, but I don't understand why PD isn't seeing the MIDI devices.
If I run aconnect -o I can see that the Raspberry Pi recognises the device:
client 14: 'Midi Through' [type=kernel]
0 'Midi Through Port-0'
client 20: 'Teensy MIDI' [type=kernel,card=1]
0 'Teensy MIDI MIDI 1'
and if I run aseqdump -p 20 the MIDI data comes streaming through normally. I'm interpreting this to mean that the MIDI device is working, and the alsamidi system is working on the rPi. My only explanation is that something has changed in PD 0.47.1 to create this bug?
I am thinking about starting from scratch and installing Raspbian Jessie instead to test and see if this works, but I'd like to avoid that if possible! Any ideas?
posted in technical issues
how to control 40-pin extended GPIO on rasberry Pi 3
@davidborrao Use the help file for comport (right click the object..... then help) and click [devices( to get a list of available ports on the RPI.
But I have misled you..... comport can be used to send and receive data on the gpio serial port pins.
What you want could be done in python. The pin states can be retrieved with digitalRead([pin] ...https://learn.sparkfun.com/tutorials/raspberry-gpio
and you would have to write some code to send the info through a local port to a [netreceive] object in your patch.....
There is some help with that here....... https://guitarextended.wordpress.com/2012/11/03/make-python-and-pure-data-communicate-on-the-raspberry-pi/
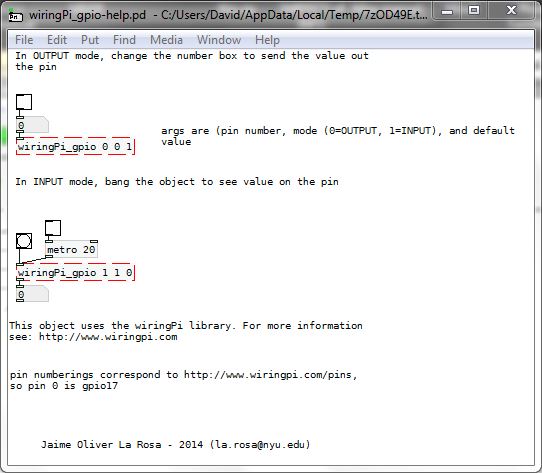
There is just a chance though that you could make this work......... http://nyu-waverlylabs.org/rpi-gpio/ by compiling it for your rpi. There is a readme in the download about compiling.
If that works it would give you direct read and write access to the pins without Python, and be by far the easiest solution.
David.
 posted in technical issues
how to control 40-pin extended GPIO on rasberry Pi 3
@davidborrao You might need to look at the raspberry forum to know how to wire the pins for that... drain current etc. Then you will need wiring-pi...... http://wiringpi.com/download-and-install/ ...... and then use [comport] to communicate with Pd..... https://forum.pdpatchrepo.info/topic/9997/gpio-raspberry-p3-and-pure-data
A quicker, easier, and maybe cheaper route would be to use a cheap android tablet with something like ...... https://hexler.net/software/touchosc ...... which is available for ios as well if you have an apple device already.
You can make your own controls and talk to Pd wirelessly (Wi-Fi dongle needed for the Pi of course)using OSC or Midi.
It will allow you to adapt your patch easily to other requirements as you go...... (volume, re-start track, select track, pause...... whatever you can imagine.....
David.
posted in technical issues
Build a MIDI controller with the Arduino, Firmata and Pure Data
Time to start contributing some knowledge back to the wonderful world that is the internet; today, a step by step nice and easy tutorial on getting started to building your own MIDI controllers with the arduino.
When researching for my ableton controller project, I didn’t find much out there about using firmata on an arduino to send data to software. The standard approach just seemed to be create the code in the arduino language, upload it to your board and hack one of those MIDI to USB cables as a bodge job way of getting the MIDI out of the arduino.
So why firmata and pure data? Well the whole idea of firmata is that you flash it to your arduino, and it throws out serial about whats going on with the arduino inputs and outputs, then you decide how the software treats the readings coming in and going out.
Theory out the way, lets build some controllers. You’ll need a few things…
HARDWARE:
An arduino and something to wire into it (for this i’ll be using a pot)
A USB cable for your arduino
SOFTWARE:
Arduino – http://arduino.cc/en/Main/Software
Pure Data – http://puredata.info/downloads
Firmata – http://at.or.at/hans/pd/objects.html#pduino
Something to patch your new controller into; like Reason or Ableton Live
- SETTING UP FIRMATA AND PURE DATA
Install Pure Data and create a folder to store all your patches somewhere. Unzip Firmata and add the files ‘arduino.pd’, ‘arduino-test.pd’ and ‘arduino-help.pd’ to your new Pure Data folder. The ‘arduino.pd’ file is the object that we use in PD for opening up communication with your arduino and routing it to PD. Done? Awesome, your software is almost set up.
- FLASHING FIRMATA TO YOUR ARDUINO
Install the latest version of arduino and open it up. Connect your arduino with the USB cable to your laptop (i’m using a macbook for this by the way). In the example patches, open up “Standard Firmata”, select your board (im using an arduino mega), and your serial port (look for tty.usbserial for use with a USB cable). Then compile and hit the upload button and your arduino is now ready to use firmata and communicate with Pure Data!
- WIRING UP A POT

Potentiometers are cool, and theres a great arduino tutorial of how to wire one up here: http://www.arduino.cc/en/Tutorial/Potentiometer
Basically, all you need to know is that there are three pins; your two outer pins govern voltage flow across the pot, meaning one has to be 5V and the other has to be ground. It doesn’t matter which, but your 5v pin is going to be where your pot reads maximum, so convention dictates this should be the right hand pin. The center pin needs to be connected to an analog in on the arduino and will read the value of the pot as it sweeps from ground (0v) to 5v.
All wired up? Plug it into your laptop and open Pure Data, we’re ready to get things talking.
- SETTING UP OUR PATCH
Open the example “arduino-test.pd” Pure Data patch you copied over earlier. It should look like this one…

The test patch has everything we need to open a connection and enable pins. Firstly, lets delete a bunch of stuff and make our window a bit bigger. Hit Command + E to enter edit mode in Pure Data.

Ok a quick explaination; the key component here is the ‘arduino’ object. This is being drawn from the file you copied in earlier, and is what communicated with your arduino. Here we can do everything to control the arduino from opening a connection, to receiving data.
The large grid allows us to set the mode of each pin on the arduino. Remember pins 0 and 1 are reserved for Rx and Tx. I’m using analog pin 4 for this demo, so I’ve set my pin mode for pin 4 to ‘analog’.
Now we can plug our arduino in and get a reading from the potentiometer.
- ARDUINO INTO PURE DATA
With your arduino plugged in, hit command and E to bring us out of edit mode. In our patch, click on ‘Devices’ above the arduino object and open up the pure data terminal. (That other thing that loads with PD that has all the scary code in)

The “Devices” message connected to the arduino object pings your computer to find what devices are connected and on what serial ports. Since we’re using a USB cable to connect our arduino, we’re looking for something with ‘usbserial’ in it, in this case; port 2.
Select the relevent port in the green box at the top (remember the first box is ‘0’, second is ‘1’ and so forth) and hit ‘Open’ to establish a connection. Check the terminal to see if the connection was sucessful.

Now lets check we’re getting something in. Create a number box (Command + 3) and connect it to the relevent pin on the ‘Route analog’ box at the bottom. In this case, pin 4.
One more thing; if you’re not getting any readings in, you’ll need to click on ‘pd old analog/digital controls’ and enable your pins here too. What I tend to do in my patches is just not include the large grid but make my own ‘old pd’ controls custom to what i’m enabling/disabling to save space.
Here’s what the ‘old analog/digital controls’ subpatch looks like (pin 4 enabled)…

Come out of edit mode and check that you’ve got readings. If so congratulations! If not, troubleshoot, start with making sure your usb connection is opened, make sure all the correct pins are enabled (remember you’re counting from 0 not 1 on most of these buttons in PD, it’s just the way computers work).
- SCALING READINGS TO MIDI
So we’ve got a reading and chances are it’s to 3 decimal places between 0 to 1. No problem, create a new object (Command + 1) and type “autoscale 0 127”. This allows us to scale the input to a min and max value, in this case 0 to 127 of MIDI. Next, lets get things looking nice, create a new object and type “knob”. Connect this AFTER the autoscale object. (the knob is default set to read inputs from 0 to 127. Then create another number to display the scaled MIDI data coming out, and finally a new object and type “ctlout 1”.
It should look something like this…

The second box should be outputing values from 0 – 127 now, and the knob giving a visual representation of your potentiometer.
Now lets patch it into ableton…
- PURE DATA TO ABLETON LIVE
Firstly, you’ll need to set up your macs IAC driver if you’ve not done this. Basically you’ll need to go into Audio/MIDI preferences and enable your IAC driver. Then create a new input and output. One for input to DAW and one for output from DAW. Google around for a tutorial on this, its really simple, a 30 second job.
After you’ve set up your IAC driver, go back to PD and go to preferences > MIDI Settings, and connect your IAC driver.

Open ableton and go to its MIDI preferences. Create a device listing for your IAC driver and enable its ins and outs into ableton like so…


And thats it! Create an instrument and try to assign something! I’ve got it controlling the brightness of a bass sound here.
Shout out for Facu who requested this tutorial. Hopefully it’ll help some of you looking to get into this stuff and start building things but with no idea where to start.
 posted in tutorials
Getting Pure data to work on Raspbian Jessie (giving pure data permission to access device?)
@alexandros Thanks for your reply. I'm using extended as the PD file i am using requires a number of externals for it to work. PD-L2ORK would be great, but after a number of attempts, I can’t seem to get it working on raspbian Jessie, using step 3 on http://l2ork.music.vt.edu/main/make-your-own-l2ork/software/raspberry-pi/ (since I am not running it headless as I have a screen mouse and keyboard for the pi) the install seems to run smoothly but then after there is no trace of the program anywhere on my raspberry pi, just the download file sitting there. So I ended up settling for extended instead.
I should have the udev rules, since I installed teensyduino using the script here https://github.com/cmcmurrough/cse2100/blob/master/teensy/install_teensyduino.sh which also installs the udev rules.
Might the problems be with identifying/permissions for the correct output? In my case this is a USB to the teensy. I’m a newbie to both raspberry pi and PD, so don’t know if I need to/ how to pre-configure these (if I need to that is).
Thanks
 posted in technical issues