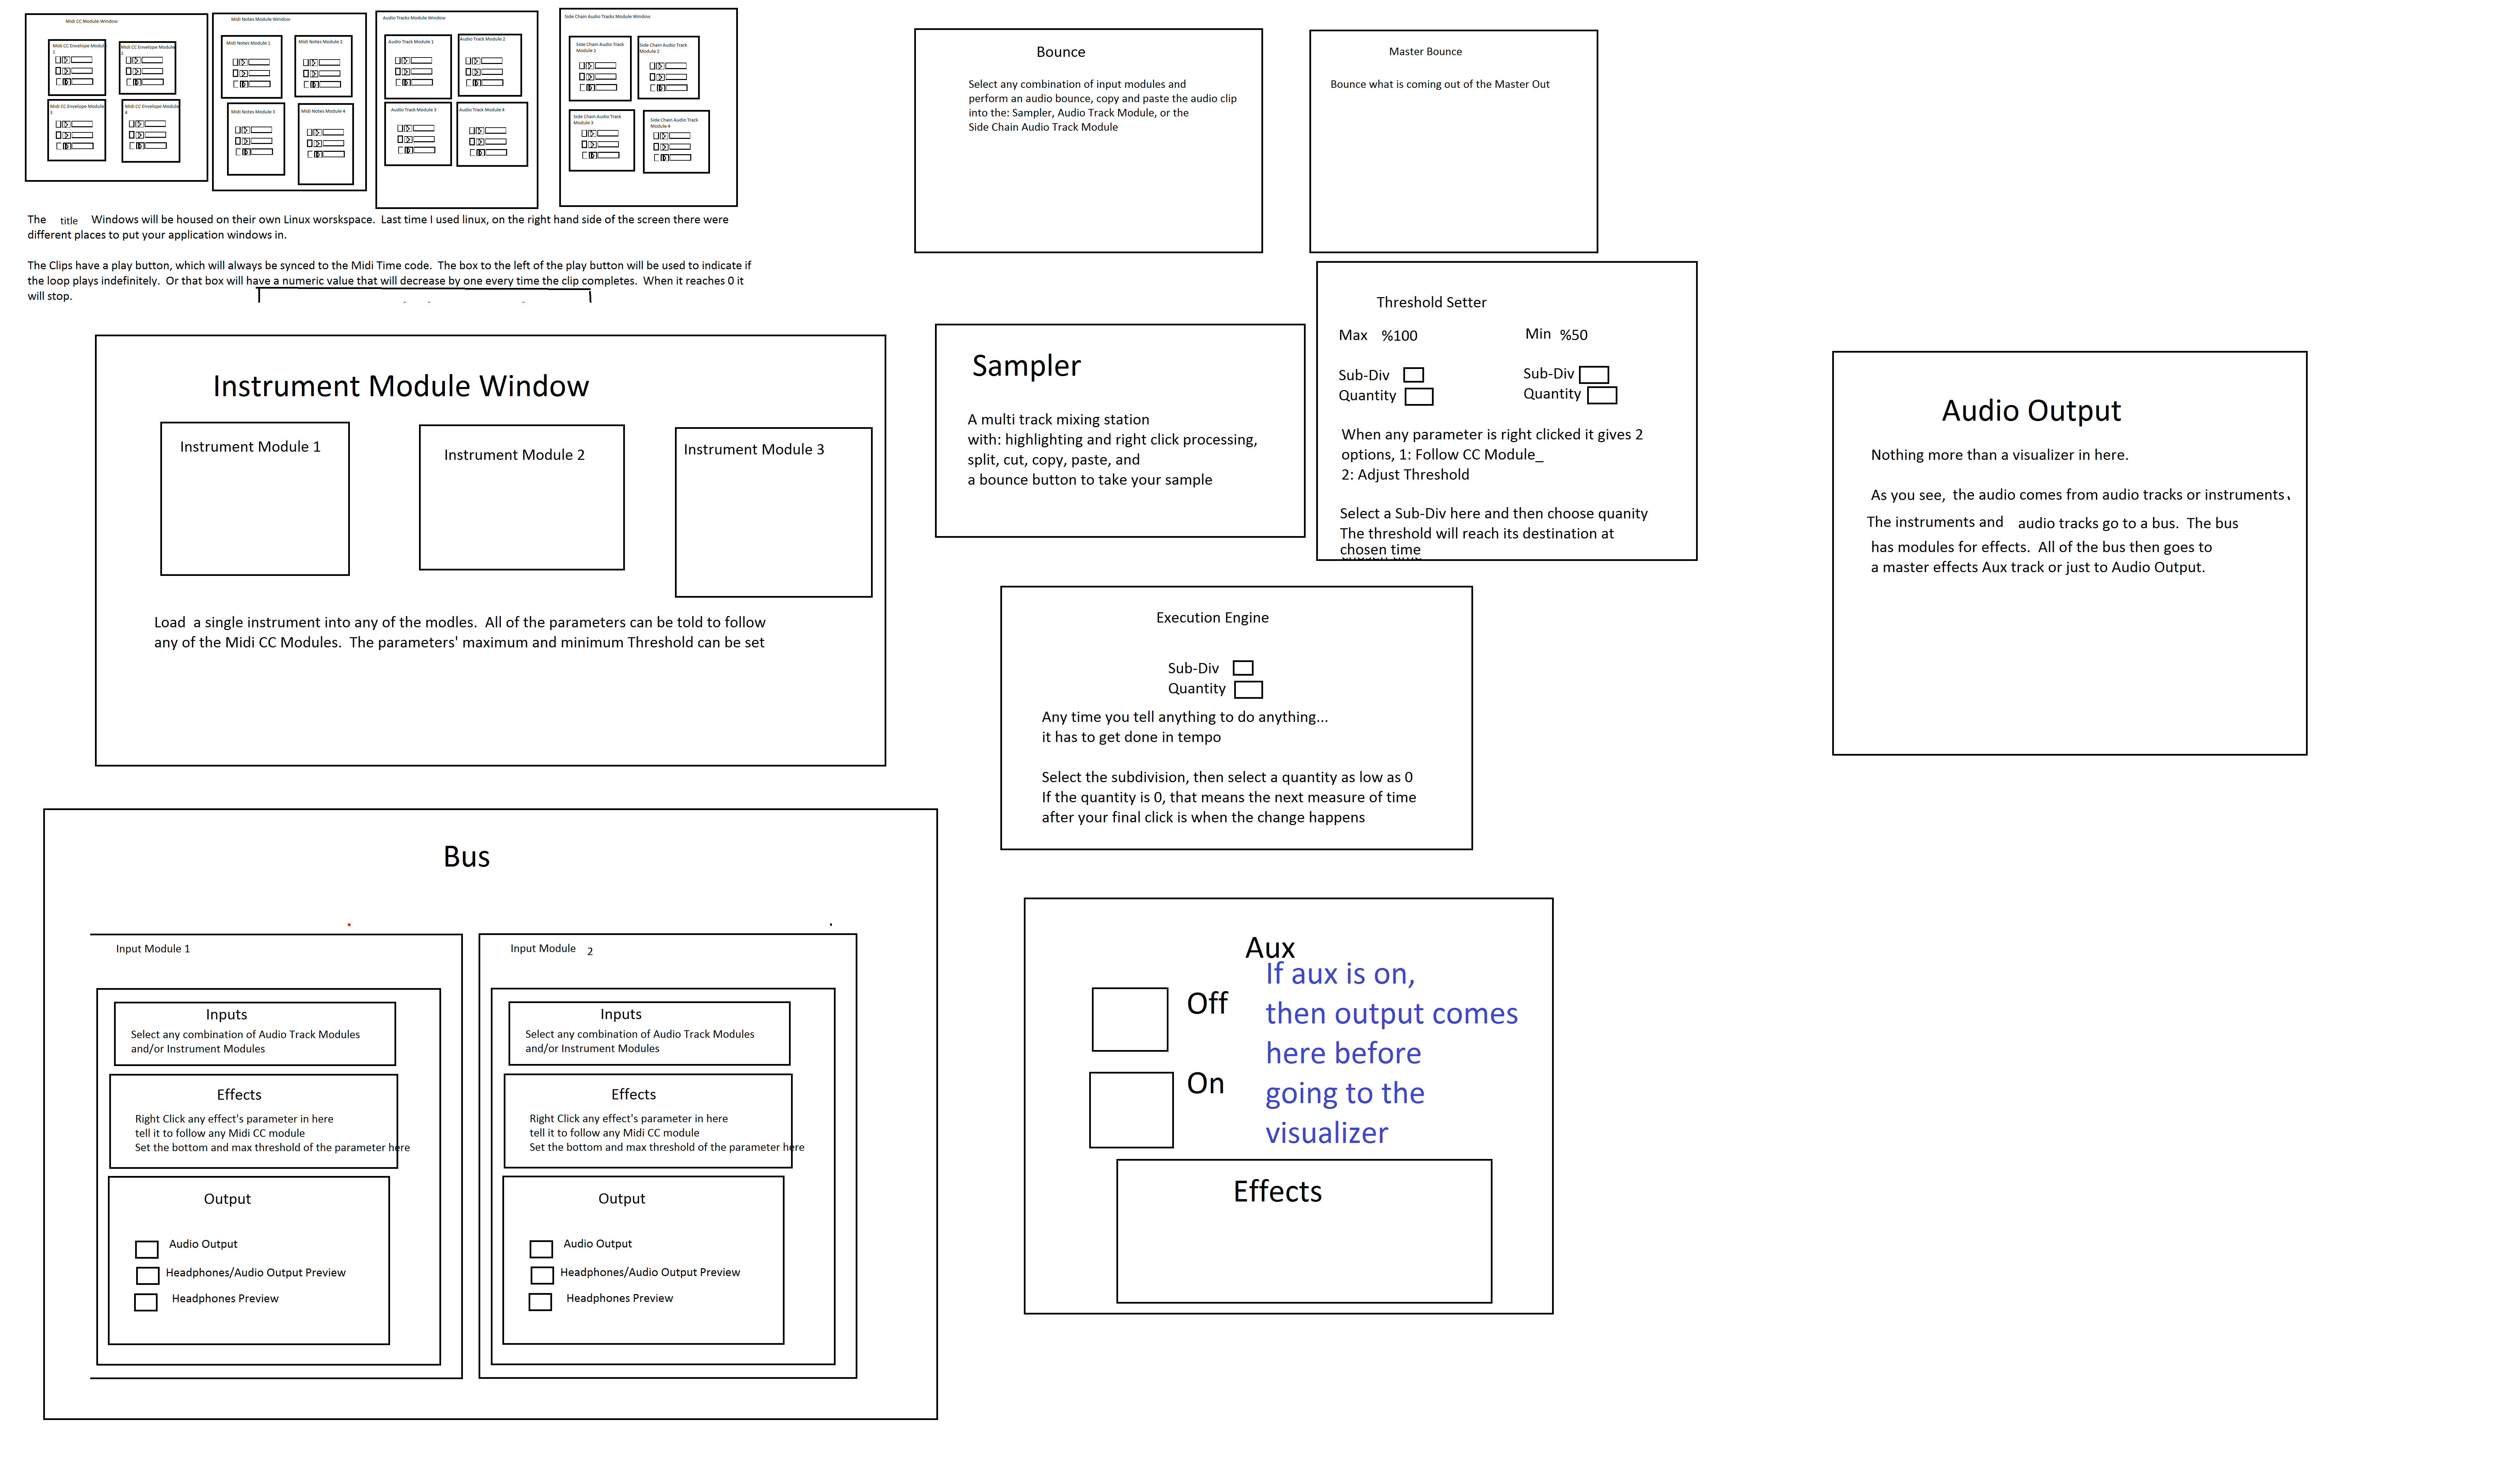
Beatmaker Abstract
http://www.2shared.com/photo/mA24_LPF/820_am_July_26th_13_window_con.html
I conceptualized this the other day. The main reason I wanted to make this is because I'm a little tired of complicated ableton live. I wanted to just be able to right click parameters and tell them to follow midi tracks.
The big feature in this abstract is a "Midi CC Module Window" That contains an unlimited (or potentially very large)number of Midi CC Envelope Modules. In each Midi CC Envelope Module are Midi CC Envelope Clips. These clips hold a waveform that is plotted on a tempo divided graph. The waveform is played in a loop and synced to the tempo according to how long the loop is. Only one clip can be playing per module. If a parameter is right clicked, you can choose "Follow Midi CC Envelope Module 1" and the parameter will then be following the envelope that is looping in "Midi CC Envelope Module 1".
Midi note clips function in the same way. Every instrument will be able to select one Midi Notes Module. If you right clicked "Instrument Module 2" in the "Instrument Module Window" and selected "Midi input from Midi Notes Module 1", then the notes coming out of "Midi Notes Module 1" would be playing through the single virtual instrument you placed in "Instrument Module 2".
If you want the sound to come out of your speakers, then navigate to the "Bus" window. Select "Instrument Module 2" with a drop-down check off menu by right-clicking "Inputs". While still in the "Bus" window look at the "Output" window and check the box that says "Audio Output". Now the sound is coming through your speakers. Check off more Instrument Modules or Audio Track Modules to get more sound coming through the same bus.
Turn the "Aux" on to put all audio through effects.
Work in "Bounce" by selecting inputs like "Input Module 3" by right clicking and checking off Input Modules. Then press record and stop. Copy and paste your clip to an Audio Track Module, the "Sampler" or a Side Chain Audio Track Module.
Work in "Master Bounce" to produce audio clips by recording whatever is coming through the system for everyone to hear.
Chop and screw your audio in the sampler with highlight and right click processing effects. Glue your sample together and put it in an Audio Track Module or a Side Chain Audio Track Module.
Use the "Threshold Setter" to perform long linear modulation. Right click any parameter and select "Adjust to Threshold". The parameter will then adjust its minimum and maximum values over the length of time described in the "Threshold Setter".
The "Execution Engine" is used to make sure all changes happen in sync with the music.
IE>If you selected a subdivision of 2, and a length of 2, then it would take four quarter beats(starting from the next quarter beat) for the change to take place. So if you're somewhere in the a (1e+a) then you will have to wait for 2, 3, 4, 5, to pass and your change would happen on 6.
IE>If you selected a subdivision of 1 and a length of 3, you would have to wait 12 beats starting on the next quater beat.
IE>If you selected a subdivision of 8 and a length of 3, you would have to wait one and a half quarter beats starting on the next 8th note.
http://www.pdpatchrepo.info/hurleur/820_am,_July_26th_13_window_conception.png
 posted in abstract~
Better sounding guitar distortion ... beyond \[clip~\] and \[tanh~\]
Hi there,
thank you for your feedback !
@mod said:
wow, nice to finally see this!
why are highs contrary to what you'd expect? at a low sample rate, the highs are folded back into low frequencies, but when you upsample, the highs are preserved as true highs. i think it works just how it should. The upsampled version is certainly much clearer and brighter to my ears. Particularly with a high distortion level.
That makes sense. The upsampling workaround officially wins (I'll try x16)! I think I focus too much on highs, as I tend to find this disto patch rather 'acid'; the original sample sounds much darker than the distorted sound. I don't owe the actual pedal so I only rely on my 'feeling', which is far from reliable ") Of course it's logical to add highs with such a nonlinearity, and lows are filtered several times.
Of course it's logical to add highs with such a nonlinearity, and lows are filtered several times.
Anyway I still find the heavily distorted sounds have a strong 'schh schh schh component' in the highs, and I can't remember having heard that as strong in actual analogic effects. Would you agree with that? Of course I know this is a rather basic 'physically-informed' design, and that analog will always sound better ")
@mod said:
actually, this patch really demonstrates the effect of aliasing. if you turn the tone knob down as far as it will go, and also turn the distortion down to zero, and turn aliasing off, you can clearly hear the rustling noise caused caused by those wrapping frequencies.
turn aliasing back on again, and the noise is gone.
Very strange, when I do what you say, the upsampled version sounds like the 'not upsampled one', with a 'sch sch' noise added !
@Maelstorm said:
@nau said:
The BJT gains are bound to my 'signal amplitude policy' : input file or audio source and output should never clip. These gains can be seen as follows : the first one (before the clipper) adjust 'how early' distortion occurs, and the second one gives the distorted signal a boost in order to give similar subjective level than dry signal.
The values were found empirically.This might be where I have the biggest issue, though the article doesn't make it so clear, either. [...] the DS-1 isn't a baby's distortion pedal.
[...] Also, you don't need to calculate the boost into the filter coefficients. That's only useful for plotting. You can just use [*~] before or after the filter do accomplish it.
I understand all these arguments. I'll modify the patch. At the beginning I was using this kind of reasoning, but as the 'nominal input level' is -20dbu (http://www.bossus.com/gear/productdetails.php?ProductId=127&ParentId=254#), and the dbu definition I found seemed difficult to bind to 'our' db, I just dared to make the basic (36db-20db=16db~6.3 times in amplitude) operation... not far from the 6 in my patch Not very scientific, though.
Anyway I understood another reason why my 'subjective hearing' failed: feedind my patch with a 0db normalised sample maximizes input level, and the result will always be 'over the top' compared to non-active guitar pickups with a volume knob not always pushed to max. In other words, if I look at demos on youtube the result heard will be less distorted than my patch's. Anyway this can always be seen as an additional parameter for a 'parametric DS1 deluxe edition patch'
@Maelstorm said:
As mod said, it's not so much more highs as less lows, and those lows are a result of aliasing. To my ears, the upsampled version sounds less muddy. (By the way, in your upsampled portion, you have a different argument for the second [DS1-bjt_stage~]. Making them equal makes the difference even less noticeable, and draws more attention to the mud than the highs.)
Ok, upsampling wins !
@Maelstorm said:
Yes, there is a difference, but it's not a Matlab thing. It's the choice of the logarithmic scaling in the x-axis. The article uses powers-of-ten as equal distances. Mine uses [mtof] for the scaling, so that a semitone, octave, or whatever musical interval is the same distance. Also, I made an adjustment so that everything between 0 and about 20 Hz (at 44.1k) gets squashed in the leftmost 10% of the graph. If I didn't to that, then about half the plot would be taken up with frequencies below the audible range.
Ok, perfect ! Everything's cool now.
@Maelstorm said:
(commenting peaking after ToneStage)
This has nothing to do with your tone stage. It's because of the passband ripple in the Chebychev filters. The IEM Chebychev filters have a 1 dB ripple, though I don't actually know if that means +/- 1 dB or +/- .5 dB. Either way, it's creating a boost at some frequencies, and pushing the output down by 1 dB should keep it below [-1, 1]. This could also be contributing to the highs, as the ripple is typically more pronounced near the cutoff frequency.
Mmh, I thought the same, but then I decided to check the plots taken out of the 'not upsampling' part, and the peaking is still there ! The Chebyshev filters can be the source, then ...
@Maelstorm said:
The output from [tanh~] will never clip, so as long as you make up for the ripple and don't boost the second BJT stage, you should be fine.
[...]
Just one more thing to add for now, and that is you're doing too much in the upsampled portion. The only thing that needs to be in there is the non-linear function ([tanh~]) and the anti-aliasing filters. Everything else is linear and doesn't benefit from upsampling, so it's just creating more computational load.
Of course I precisely want to get rid of this peaking to be able to fully rely on [tanh~] to 'master' my output gain. I'll try the FIR instead of cheby (as proposed by acreil) some day. (I don't even know yet how they work and how I'll have to implement it).
I left the 'full upsampled chain' in this patch only to see if someone would have commented it, and we totally agree. But this 'playing the noob' attitude of mine is a rather raw 'fishing method' for getting stimulating information ... sorry this lead you to lay down the whole picture BUT nothing wasted, as your final 'delicate' -1db cut surprises me and I'll use it (when I'll get rid of peaking) and moreover, as you are reminding me that you use a 18000 cutoff freq, I'll give a look again at it, just trying to find a good criterion to pick one
Thank you everybody,
See you,
Nau
P.S. : sorry for those very long sentences ... not very clear
 posted in technical issues
VisualTracker - request for participants
Here is some more info:
This is development info of VisualTracker for pd (pre alpha 100404)
What is it:
VisualTracker is sample sequencer – it triggers loaded samples in times defined in time line in editor window. Samples can be played in their default speed / length or can be fitted in tempo. In “fit mode” you can define number of bars to fit in and also multiplication of file. All changes have visual interpretation in sample canvases.
VisualTracker for pd (pre alpha 100404) was developed in Pd version 0.41.4-extended, on Windows XP
How to make it work:
- Open VisualTracker_(pre_alpha_100404).pd in pd.
- Editor and Samples window are automatically opened.
- Preset currentstate.vtp is automatically loaded – this preset is saved before closing the patch.
- After first run there are 3 empty sample boxes in samples window and 3 corresponding sample canvases in editor window.
- Load any wav (44100 Hz) by pressing „load“ in selected sample box. No space characters in path or filename are allowed. Loading of these files is aborted and error message appears for several seconds. Name of the successfully loaded sample including full path appears in sample box and also sample canvas in editor window. Size of sample canvas is changed according to the sample length. Try to change global BPM – size of sample canvas is recalculated.
- Check „fit“ to fit sample in current BPM. Set length of sample in bars and multiplication.
- Add another sample by creating object [sample] or just copy existing sample box in samples window.
- Switch to editor window, press CTRL+E to switch to pd edit mode and drag and drop sample canvases to desired position on time line. Sample canvases are automatically snapping to bar columns and rows.
- Switch back to normal mode by CTRL+E
- Press PLAY to replay your sample composition. Samples are played only if corresponding sample canvas is placed in track 1-6. If sample canvas is above the tracks sound is muted.
- Press „save“ in main VisualTracker window to save current preset to a text file. Any name and extension with no spaces is allowed.
- Before closing VisualTracker press „save state & close“. It saves current state to preset named currentstate.vtp and delete all sample boxes from samples window and all sample canvases from editor window. Now you can turn off and eventually save VisualTracker patch. This is important to avoid double appearance of sample canvases because information about samples and composition is stored independently from pd patch and should not be saved inside patch. If there are still some „orphaned“ sample canvases hanging delete them manually.
Components:
- Sample window: place for unlimited amount of [sample] abstractions. Once abstraction is created (by copying or creating the object) corresponding sample canvas is created in editor window. [sample] abstraction is sending data to sample canvas (name, color, size, snapping) and receiving back position. Triggering of sample playback is based on position of sample canvas.
- Editor window: place for sample canvases composition on the top of timeline grid. Sample canvases can be moved by mouse in pd edit mode (CTRL+E). Timeline grid will be extended and improved in next versions.
- Preset save/load: saves and loads presets to/from a text file using [coll] object. Preset contains global values (number of samples in composition, bpm) and local values for each sample box (filename, position, track, multiplication, number of bars, fit switch, color and two unused values).
- Sequencer: located in program subpatch. Very simple - functionality will be extended and improved in next versions
- Other: located in program subpatch. Contains some other patches as colortable, BPM manager, output etc.
 posted in patch~
Traktor (will work with others)Coge Midi clock Sync with OSC
This is a cross platform alternative for synchronizing two(or more) different computers to one Midi Clock.
Since one will have coge this will be between a Mac OSX and windows running traktor that produces midi clock.
For windows Midi Yoke (tested in XP) to wrap Midi clock to Pure Data extended (tested with v 0.41.4) from there the clock will be sent has an OSC message to one or all network computer(s). On the listening side there will be one other Pure Data patch converting a specific OSC message to Midi clock. Then coge can catch this midi clock just by clicking "Midi clk".
This is nothing special but it took me almost 3 weeks to accomplish it. Given that i knew nothing about pure data at the time, this site was very helpful. All examples were gathered from here.
Also note that this is not the best way.
There are Midi cables for this.
There are usb to midi converters, for those who don't have midi ports. Also external sound boards quite good with several inputs and outputs.
I have experienced a +/- 3 Beats float of BPM count on coge but always around the correct number, over time this seems to float less.
This still lacks testing.
Anyway.
You'll need Pure data extended on every machine.
You'll need Midi Yoke on Windows.
You can use Yac Driver on Mac OSX for midi wrap.
Don't know for linux, sorry. (read somewhere something about jack)
On pure data you'll need to define the midi device input or output which ever is the case.
On windows it's easy on any pure data windows you can set midi devices, choose midi Yoke (the channel number should be the same in the receiver input and sender output).
On OSX it's on the main window, under preferences.
If using this with quartz composer one can skip the pure data on the OSC server side (which is the one that listens). If adding more functions to this keep in mind that quartz composer does not understands 0 arguments messages. (I think this should be a bug)
You are advised to change the IP on the pure data patch to which ever is your destination. You can use 0.0.0.0 to broadcast. Don't use wireless, it's a 0 security communication protocol.
Hope to save someone's time. GL
 posted in news
More midi output device options needed
Yes, I already use something like midi yoke now. It is the standard osx midi routing software called IAC.
I forgot to mention in my question that I use one IAC output port to send signals from the PD patch to Ableton. In ableton I route signals from this IAC port to my MIDI outs (connected to the machines).
The other output I use to send signals to my controller, so that when I change the parameter of a knob I can send the current value of that parameter to the knob of the behringer (when I turn this knob the value doesn;t jump but starts from the value it is actually on).
This liimits my possibilities, I want to be able to filter out signals for certain machines. But now I can only use one actual midi output, The IAC bus.
The nice thing about PD;s midi controller interface is that another midi output is a different midi channel. So when I could have 4 midi output possibilities it would enable me to press a button that says to a knob: send to channel 17 (channel one of the second midi output device) instead of sending to channel 33 (channel one of the third midi output device).
I hope this is possiible. I think it actually is, because there are four midi inputs available.
 posted in technical issues
"Morphine" - fx-morphing engine
for some reason, the list of error messages became even longer...... 
mix.switch.nice 101
... couldn't create
init.post.dollarg
... couldn't create
flow.receive
... couldn't create
flow.send
... couldn't create
list.split 1
... couldn't create
flow.send
... couldn't create
flow.send
... couldn't create
flow.receive
... couldn't create
[makesymbol] part of zexy-2.2.3 (compiled: Feb 25 2009)
Copyright (l) 1999-2008 IOhannes m zmölnig, forum::für::umläute & IEM
flow.@parse
... couldn't create
flow.receive
... couldn't create
init.dollar.zero.top
... couldn't create
flow.receive
... couldn't create
flow.receive
... couldn't create
list.build
... couldn't create
[demultiplex] part of zexy-2.2.3 (compiled: Feb 25 2009)
Copyright (l) 1999-2008 IOhannes m zmölnig, forum::für::umläute & IEM
init.make.unique
... couldn't create
flow.receive
... couldn't create
flow.receive
... couldn't create
flow.send
... couldn't create
list.split 1
... couldn't create
list.split 1
... couldn't create
list.length
... couldn't create
flow.send
... couldn't create
flow.send
... couldn't create
wahwah~: an audio wahwah, version 0.1 (ydegoyon@free.fr)
expr, expr~, fexpr~ version 0.4 under GNU General Public License
mix.switch.nice 101
... couldn't create
init.post.dollarg
... couldn't create
flow.receive
... couldn't create
flow.send
... couldn't create
list.split 1
... couldn't create
flow.send
... couldn't create
flow.send
... couldn't create
flow.receive
... couldn't create
flow.@parse
... couldn't create
flow.receive
... couldn't create
init.dollar.zero.top
... couldn't create
flow.receive
... couldn't create
flow.receive
... couldn't create
list.build
... couldn't create
init.make.unique
... couldn't create
flow.receive
... couldn't create
flow.receive
... couldn't create
flow.send
... couldn't create
list.split 1
... couldn't create
list.split 1
... couldn't create
list.length
... couldn't create
flow.send
... couldn't create
flow.send
... couldn't create
error: inlet: expected '' but got 'symbol'
... you might be able to track this down from the Find menu.
error: inlet: expected '' but got 'symbol'
error: inlet: expected '' but got 'symbol'
error: inlet: expected '' but got 'list'
error: inlet: expected '' but got 'symbol'
error: inlet: expected '' but got 'symbol'
error: inlet: expected '' but got 'list'
error: inlet: expected '' but got 'symbol'
error: inlet: expected '' but got 'symbol'
error: inlet: expected '' but got 'symbol'
error: inlet: expected '' but got 'list'
error: inlet: expected '' but got 'symbol'
error: inlet: expected '' but got 'symbol'
error: inlet: expected '' but got 'list'
error: inlet: expected '' but got 'symbol'
error: inlet: expected '' but got 'symbol'
error: inlet: expected '' but got 'symbol'
error: inlet: expected '' but got 'list'
error: inlet: expected '' but got 'symbol'
error: inlet: expected '' but got 'symbol'
error: inlet: expected '' but got 'list'
error: inlet: expected '' but got 'symbol'
error: inlet: expected '' but got 'symbol'
error: inlet: expected '' but got 'symbol'
error: inlet: expected '' but got 'list'
error: inlet: expected '' but got 'symbol'
error: inlet: expected '' but got 'symbol'
error: inlet: expected '' but got 'list'
i'd really love to check out, what you have build there!
 posted in patch~
Random numbers, timers, projections
Hey everyone.
You'll have to excuse me 'cause I don't have a clue about PD, but need to use it for one of my current projects.
Basically, I want to project some text from my computer onto a blank canvas. I want to use a pressure sensor to detect when a user is sitting down. Once it knows someone is sitting down, I want the text to change.
From here on, I want the text to change after a given amount of time... say... 30 seconds for now?
When it gets to the last slide of text, I want it to do nothing other than display this line of text, until the user places their hand over an LDR. When the user's hand is placed over the LDR, the light will be reduced to a certain level. Once this level is reached, I want PD to time for 15 seconds, and at the end of the 15 seconds, illuminate any random combination of light bulbs and set off a rumble pack beneath where they have put their hand. If the user removes their hand before the 15 seconds is up, I do not want any of the light bulbs to illuminate, and I do not want the rumble pack to go off.
[When certain bulbs are illuminated, I want certain lines of text to be projected.
Say bulbs 1 and 2 are illuminated, but 3, 4 and 5 are not. I would like text to be projected that says "Bulbs 1 and 2 are illuminated. Bulbs 3, 4 and 5 are not". Or say Bulbs 1, 3 and 5 are illuminated, I want text to be projected that says "Bulbs 1, 3 and 5 are illuminated. Bulbs 2 and 4 are not."]
If the user stands up at any point in time, removing pressure from the pressure sensor, I want the initial line of text to be displayed on screen again, and everything to start over.
Sorry if this sounds very complex, please let me know if you can help out at all.
Edit ::
If it makes it any easier, you could ignore the bit that I've put in the square brackets. Instead of this, I would just like one more screen of text to be projected when any combination of the bulbs are illuminated.
 posted in technical issues
Control analog sensor data in PD?
Ahhh, i found the object i was looking for. I needed to convert numbers to audio signal using [sig~]. So i connected [sig~] to [phasor~] to [hip~] and finally to [dac~]. This outputs a sawtooth wave. I was able to place a [cos~] in there somewhere and output a smoother sound. I was stocked when i actually heard the pitch change while moving my hand away from the sensor.
Now I have two working IR sensors. I want the output of one to change the pitch of the sound file and the other to change the speed. I looked at many looper patches, and tried to implement the patches into my patch, but it didn't output sound for some reason. Check out the attachment. Is this the right way to play a local sound file using [soundfiler]? Do you have to load the frequency from a sound file into a graph in order for it to loop? Am I missing something?
Also, is there documentation out there that goes over the basic flow of data from numbers to sound, explaining what range of numbers creates what frequency, etc? It's hard to find simple documentation for beginners. Patches are very helpful because i play around with the different objects and messages, but i would like to understand whats going on in the background.
 posted in technical issues
Synthesis metal bars sound
HI,
i'm working on an installation based on this apllication made in java
i communique with pd via OSC
for each collision pd receive a bang with two parameters
height tube
position tube
i'm looking for synthesis metal bars sounds to transform this "thing" into a musical instrument
there is samples here
http://obiwannabe.co.uk/html/sound-design/sound-design-audio.html
http://obiwannabe.co.uk/sounds/effect-clonk-002-bar.mp3
http://obiwannabe.co.uk/sounds/effect-clonk-002-bar.mp3
http://obiwannabe.co.uk/sounds/effect-clonk-004-iron.mp3
http://obiwannabe.co.uk/sounds/effect-clonk-006-bar.mp3
What kind of simple patch should i have to make for this goal?
au revoir
Denis
 posted in technical issues
Inside on a rainy day
Something to share that combines a few different models in a linked way.
Start with a wind model based on turbulence, objects in the path vary their signals according to wind speed and their size and texture.
http://www.obiwannabe.co.uk/sounds/effect-wind3.mp3
And a rain model with carefully distributed droplets that make little clicks according to a range of textures they hit...
http://www.obiwannabe.co.uk/sounds/effect-plainrain.mp3
Next is a window pane built around a square lamina with glass-like character Here's a few knocks on the virtual window with a virtual stick.
http://www.obiwannabe.co.uk/sounds/effect-knockonwindow.mp3
and finally I combine them all in the same auditory scene with causal linkage, so the rain lashes against the window...
http://www.obiwannabe.co.uk/sounds/effect-rainywindow.mp3
(Total object count 80 operators)
Andy
 posted in output~