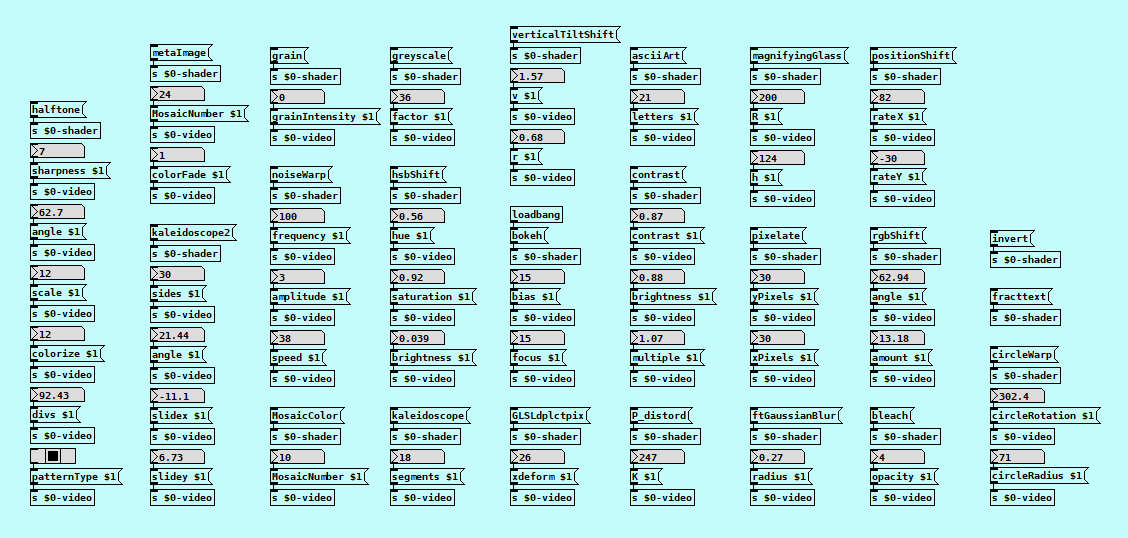
Ofelia - videoPlayer and GLSL Effects
i emulated the pixfilm metaimage object. I had to write the shader by myself this time, because I did not found anything similar. I am sure the code can be optimized, but it works ")
ofelia_video_glsl.zip
// fragment program

uniform sampler2D Tex0;
uniform vec2 resolution;
uniform float colorFade;
uniform float MosaicNumber;

void main()
{
    vec2 texCoords = vec2(floor(gl_TexCoord[0].s * MosaicNumber) / MosaicNumber, floor(gl_TexCoord[0].t * MosaicNumber) / MosaicNumber);
    vec4 color = texture2D(Tex0, texCoords);
    vec3 lum1 = vec3(0.299, 0.587, 0.114);
    color = vec4(vec3(dot(color.rgb, lum1) * (1.0 - (colorFade*(-1.0)+1.0)) + (color.rgb*(colorFade * (-1.0) + 1.0))), color.a);
    vec2 uv = (gl_FragCoord.xy - 20.0) / resolution;
    uv.y = uv.y * (-1.) + 1.;
    uv.xy *= MosaicNumber *(ceil((1.-uv.x)));
    vec4 color2 = texture2D(Tex0, mod(uv, 1.0));
    vec3 lum = vec3(0.299, 0.587, 0.114);
    color2 = vec4(vec3(dot(color2.rgb, lum) * (1.0 - colorFade) + (color2.rgb * colorFade)), color2.a);
    vec4 color3 = (color * color2);
    gl_FragColor = color3 * 2.;
}

and this are the effects that i collected so far ( also finding out about the possibilities...):
 posted in technical issues
ofelia sys_gui
colorpanelAndMouse.pd
@whale-av now you can choose colors with the colorpanel in the patch. I found and implemented a small lua script that converts hex to rgb values.
function ofelia.symbol(hex);
local hex = hex:gsub("#", "");
local rgb = {};
rgb[1] = tonumber("0x"..hex:sub(1, 2));
rgb[2] = tonumber("0x"..hex:sub(3, 4));
rgb[3] = tonumber("0x"..hex:sub(5, 6));
return rgb;
end;
or
function ofelia.symbol(hex);
local hex = hex:gsub("#", "");
local r = -65536*(tonumber("0x"..hex:sub(1, 2)));
local g = -256*(tonumber("0x"..hex:sub(3, 4)));
local b = -1*(tonumber("0x"..hex:sub(5, 6)));
local rgb = r+g+b;
return rgb;
end;
it is also possible to use the bind command (see [pd mouseExample]), but somehow not to get x and y mouse coordinates with %x and %y. perhaps that is still because of the pure data startup order.
edit: just realized that sys:gui is now pdSysGui in the new ofelia version (2.3). it is now also usable as an abstraction [pdSysGui]. adapting the patches is quite easy (but without they do not work anymore), here is the updated patch from above:
colorpanelAndMouse2b.pd
posted in technical issues
Tcl for a rainy day.........
@Newk
It's been a while, and then post surgery my brain has recently been rendered somewhat dumb.
Anyway, colours in Vanilla, always good for some fun.
Work in Progress.
It does quite a lot when you switch to edit mode, and the colours stick when you switch back.
Anything added to the patch (or edited) has the standard colours.... but switch out of edit mode and back in and the new colours are there.
I am wondering if that could be useful.......?
So a few new ideas could come out of this..........
Certainly Windows Vanilla 0.49......... vanilla_colours-plugin.tcl
Put it in a Pd known path, and delete it or move it elsewhere to stop the magic.
Please let me know if it works on other systems.
Edit the file to change colours or if you don't like arrows in edit mode.... it's fairly obvious.
Available colours........ tcl colours.txt
Some things not working.
Some weird stuff.
When it is finished I will make a menu item for the console so that colours can be chosen..... maybe.....
David.
 posted in tutorials
Hello everyone
People, especially kids are always restricted from playing video games. It is said that games will improve the violence, affect our health and eyes. However, you may be surprised with what researchers found out. There are endless health benefits to us, especially kids.
Games are now not just aggressive actions in action games or shooting games. Here we with a more gentle game genre that can help people relieve stress, boost the brain, etc. It is art games. Therefore, if you are wondering if art games can be beneficial or not, it’s time to explore over-expected benefits art games.
1. Promote Creativity
Creativity is one of the most significant ability for us to solve almost every single problems in our life. In art games, we will no longer have to face incredible challenges in real life such as global warming, wars, and mass extinctions. Free your soul in colouring games, room decoration, design or music games.

Art games promote creativity.
Paint your best picture with full of colours or mix the clothes of the princesses in dress-up games in your own way. It’s the way to build up the better creativity. If you want to help your kids boost their creativity, here’s top highly rated online art games for 7 to 12 year olds.
2. Support Fine Motor Skills
Now, it’s time to hold the paintbrush, draw lines and dots, mix different colours in games instead of real life. Alternatively, show your ability in decorating the most stunning room ever. These tasks will be the best way to enhance coordination and dexterity. They are fun and rewarding enough to keep gamers, especially kids coming back again and again. Especially, when kids get hooked on these art activities in games over time. Their motor skills can be improved fast. What a deal!
3. Develop Problem-solving Abilities
Art activities in games with epic graphics may give gamers endless opportunity to make choices, come to conclusion, evaluate results, and second-guessing decisions. People will feel comfortable with common uncertainty, and they will be flexible thinkers, more creative and confident people.

Games develop your problem-solving skills.
Which colour should be applied to the character? Which furniture will this house match and need? To play these games with high scores, good techniques are needed for suitable combinations and good ideas. These games are more suitable for girls than boys. So, enjoy art games for girl here!
4. Improve Vision
This game seems to be a little weird; however, some electronic gadgets such as tab, mobile, computer, etc can negatively damage your eyes with too much exposure. However, scientists show that playing games can help improve your vision. Especially, when entering colouring games, people will identify 4 colour shades well.
5. Reduces Stress
Art games are such a quick stress relief for people in depression. In these gentle games, people will quickly throw their worries away and free their mind from all disturbances once they concentrate on gaming sessions. Moreover, the heart rate will be kept at a normal level for certain games.
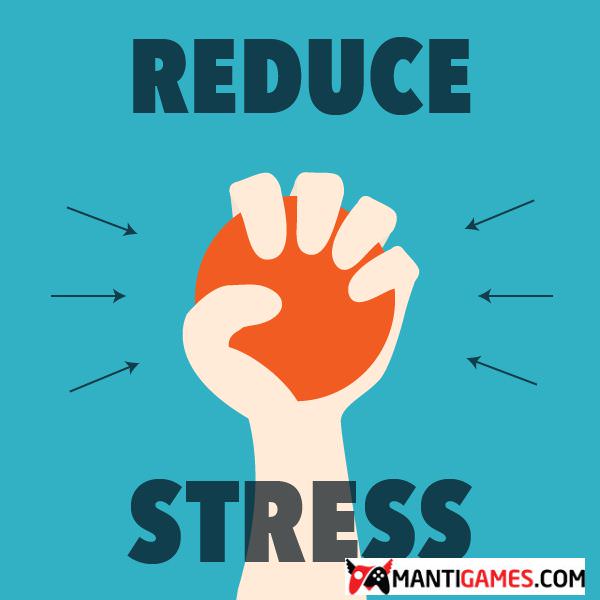
Reduce stress with amazing art games!
So, now, after understanding all the advantages of art games, it’s time to enjoy Coolest free online art games to play - check out now.
 posted in Off topic
my first ofelia patch
@Jona Hey, It looks so beautiful! 
First of all, you are not currently using fbo for drawing small blue element.
[ofCreateFbo] exists in the main canvas but you are not drawing the fbo since I can't find [ofDrawFbo] from your patch.
I modified your patch main.pd to show you how you can write @JonasPath3 to @fbo1.
It should look like this when drawn correctly.
I don't know if the result is what you wanted but I needed to change the blend mode when writing to fbo. If you use blend mode(other than ALPHA) when writing to fbo, it can look different than the original drawing because the background color of the fbo is also blended.
Also, your patch seems to load meshes every frame although it doesn't seem to change every frame. For example, from the patch I uploaded you will see the drawing of @JonasPath3 is written to @fbo1 once on startup, so if you're not going to use @JonasPath3 any longer(because you already have it in fbo), you don't need to load the mesh anymore.
Of course, there won't be a big difference if your patch is small, but it is a good practice to get rid of unnecessary overheads.
And regarding changing the color of one element, you can change the color when drawing 'n'th element in a loop. You just need a condition in a loop.
Here's a patch which I color only 30th element differently. main.pd
Since fbo is already colored blue, using [ofSetColor] will not totally re-color it. If you want to totally re-color elements, I think it would be easier to directly draw @JonasPath3 like your original patch.
 posted in patch~
How to convert Pd's color numbers for data structures to RGB
With the [draw] command in Purr Data there are methods to set colors:
[struct demo float x float y symbol foo float v1 float v2 float v3]

[fill blue(
|
[draw rect 40 40]

[demo]
You can use English words to set a static color as above.
You can also do
[fill v1 v2 v3( <- rgb colors

[fill hsl v1 v2 v3( <- hsl colorspace

[fill hcl v1 v2 v3( <- hcl colorspace

[fill lab v1 v2 v3( <- lab colorspace

[fill symbol foo( <- variable color name
The fields can also be constants, like [fill rgb 0 255 0(
 posted in tutorials
How to convert Pd's color numbers for data structures to RGB
Haha, in hindsight it looks so simple, but it took hours for me to figure it out, so i thought i'd better share it.
Some additional notes:
The conversion from RGB to Pd number is obviously not always exact, because the Pd numbers represent far less values, so the conversion only finds somewhat near colors.
From this thread about canvas RGB values i learned that PD calculates numbers internally with double-precision but saves them only in single-precision, which is the reason that the RGB values can actually be calculated, but the result can not be saved.
For everyone working with colors in data structures i highly recommend the jmmmp library which contains some very nice vanilla abstractions, including a color picker. You can find it at https://puredata.info/downloads/jmmmp and in Deken/Find externals. The objects are [ds-color-sel], [pd-colors] and [rgb-color]. ")
 posted in tutorials
Problem loading libraries (iemguts)
Eighteen-year-old Shen Qiang says he soon thereafter began winning Canadian contests, and came in Canada in 2004. He will be a proud representative of the Canadian Olympic team this summer. While he didn't immigrate explicitly to further his table tennis career (he came with his family, who live in Toronto), he's happy with Table Tennis Canada's sports app, and is looking forward to the autumn opening of this new 24-hour training centre in Ottawa, so that he can work harder on his sport. Produced in northeast China, Shen first picked up a paddle at nine. He quit college to proceed to Harbin, a town 300 kilometers away, to train full-time and represent the province of Heilongjiang and had left home. The contest in China was extremely intense, '' he states. https://ok.ru/group/53953306755154/ The athletes trained five days a week, six hours a day; they were paid to train fulltime and compete, he says. "In China, it is very competitive because in the event you do not make results then you will be removed from the team, and if you don't have table tennis without a school, there is no future for you."
 posted in technical issues
MobMuPlat NUMPAD "template" (as .json + .pd abstraction) for direct and precise entry of #'s into MMP
Stemming from a different project, I've made a MobMuPlat (MMP) NUMPAD "template" so that numbers may be entered directy (and more Precisely) into MMP instead of selected from siders, knobs, or other controls (which apparently pd can do by just clicking a number field, typing in the number, and pressing ENTER (Thanks, again, @LiamG)
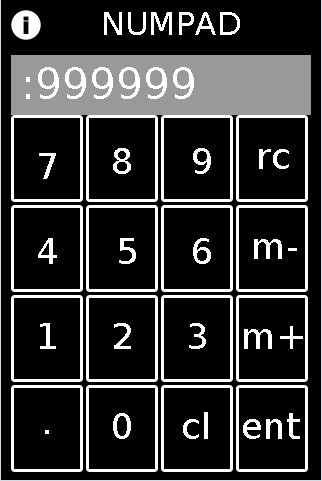
FEATURES:
Integers and Decimals from 1e-8 to 999999;
m+,m-,rcl: for storing (m+), removing stored number (m-) and recalling numbers (rcl)
cl:clear (but no backspace)
HOW-TO:
To test: in the MMP editor open the "mmp_numpad_template.mmp" file and experiment. (note: it will not start entering decimals until after you click "." and Then the next number). It is associated to the "abs_mmp_numpad_test.pd" which has the template embedded as an abstraction in it. It also has a slider on the second page, to test routing the ENTERed number to different "locations".
To implement:
First embed "abs_mmp_numpad_template.pd" as an abstraction in your MMP's .pd file. It has one outlet: the current value after the NUMPAD's ENTer is clicked and will receive all control signals coming from the NUMPAD.
Next, with a text-editor, open the "numpad-codeblock.jsn" file (or copy it from the code block below);
VERY IMPORTANT!!!: make a backup copy of your own mmp file before doing this.
In the text-editor, open "as-text" your .mmp file (or to experiment, the "pasteJSNtest.mmp" file which I have provided);
Past the numpad_template.jsn codeblock (from the file or the codeblock below), in between the mmp 'gui' brackets, as shown here:
{"backgroundColor":[0.5019608,0.5019608,0.5019608,1.0],"pageCount":1,"port":54321,"isPageScrollShortEnd":false,"startPageIndex":0,"canvasType":"widePhone","gui":[],"isOrientationLandscape":false,"version":1.64}
Once you have pasted it in, save your file, and open it in the MMP Editor.
The control and associated labels will be on the first page. You can move them, resize, etc. as you wish. And no matter where you put it (given its precise field names the entered value will get sent to the "abs_mmp_numpad_template" abstraction.
Sounds like a lot of work. But once you get the hang of it. I think it's well worth the effort: you will be able to have exact control over Any mmp value.
numpad-codeblock.jsn
{"mode":1,"highlightColor":[1.0,0.0,0.0,1.0],"borderThickness":3,"address":"/numgrid/0","color":[1.0,1.0,1.0,1.0],"dim":[4,4],"class":"MMPGrid","cellPadding":2,"frame":[10.0,115.0,300.0,360.0]},{"highlightColor":[1.0,0.0,0.0,1.0],"address":"/myLabel","textSize":36,"color":[1.0,1.0,1.0,1.0],"androidFont":"Roboto-Regular","textFontFamily":"Default","text":"cl","textFont":"","class":"MMPLabel","frame":[175.0,405.0,50.0,45.0]},{"highlightColor":[1.0,0.0,0.0,1.0],"address":"/myLabel","textSize":36,"color":[1.0,1.0,1.0,1.0],"androidFont":"Roboto-Regular","textFontFamily":"Default","text":".","textFont":"","class":"MMPLabel","frame":[35.0,400.0,40.0,50.0]},{"highlightColor":[1.0,0.0,0.0,1.0],"address":"/myLabel","textSize":36,"color":[1.0,1.0,1.0,1.0],"androidFont":"Roboto-Regular","textFontFamily":"Default","text":"ent","textFont":"","class":"MMPLabel","frame":[235.0,405.0,75.0,45.0]},{"highlightColor":[1.0,0.0,0.0,1.0],"address":"/myLabel","textSize":36,"color":[1.0,1.0,1.0,1.0],"androidFont":"Roboto-Regular","textFontFamily":"Default","text":"m-","textFont":"","class":"MMPLabel","frame":[245.0,225.0,60.0,45.0]},{"highlightColor":[1.0,0.0,0.0,1.0],"address":"/myLabel","textSize":36,"color":[1.0,1.0,1.0,1.0],"androidFont":"Roboto-Regular","textFontFamily":"Default","text":"m+","textFont":"","class":"MMPLabel","frame":[235.0,315.0,75.0,50.0]},{"highlightColor":[1.0,0.0,0.0,1.0],"address":"/myLabel","textSize":36,"color":[1.0,1.0,1.0,1.0],"androidFont":"Roboto-Regular","textFontFamily":"Default","text":"1","textFont":"","class":"MMPLabel","frame":[30.0,315.0,40.0,50.0]},{"highlightColor":[1.0,0.0,0.0,1.0],"address":"/myLabel","textSize":36,"color":[1.0,1.0,1.0,1.0],"androidFont":"Roboto-Regular","textFontFamily":"Default","text":"2","textFont":"","class":"MMPLabel","frame":[105.0,315.0,40.0,50.0]},{"highlightColor":[1.0,0.0,0.0,1.0],"address":"/myLabel","textSize":36,"color":[1.0,1.0,1.0,1.0],"androidFont":"Roboto-Regular","textFontFamily":"Default","text":"3","textFont":"","class":"MMPLabel","frame":[180.0,315.0,40.0,50.0]},{"highlightColor":[1.0,0.0,0.0,1.0],"address":"/myLabel","textSize":36,"color":[1.0,1.0,1.0,1.0],"androidFont":"Roboto-Regular","textFontFamily":"Default","text":"4","textFont":"","class":"MMPLabel","frame":[30.0,230.0,40.0,50.0]},{"highlightColor":[1.0,0.0,0.0,1.0],"address":"/myLabel","textSize":36,"color":[1.0,1.0,1.0,1.0],"androidFont":"Roboto-Regular","textFontFamily":"Default","text":"5","textFont":"","class":"MMPLabel","frame":[110.0,230.0,40.0,50.0]},{"highlightColor":[1.0,0.0,0.0,1.0],"address":"/myLabel","textSize":36,"color":[1.0,1.0,1.0,1.0],"androidFont":"Roboto-Regular","textFontFamily":"Default","text":"6","textFont":"","class":"MMPLabel","frame":[185.0,230.0,40.0,45.0]},{"highlightColor":[1.0,0.0,0.0,1.0],"address":"/myLabel","textSize":36,"color":[1.0,1.0,1.0,1.0],"androidFont":"Roboto-Regular","textFontFamily":"Default","text":"7","textFont":"","class":"MMPLabel","frame":[30.0,145.0,40.0,40.0]},{"highlightColor":[1.0,0.0,0.0,1.0],"address":"/myLabel","textSize":36,"color":[1.0,1.0,1.0,1.0],"androidFont":"Roboto-Regular","textFontFamily":"Default","text":"9","textFont":"","class":"MMPLabel","frame":[185.0,140.0,40.0,50.0]},{"highlightColor":[1.0,0.0,0.0,1.0],"address":"/myPanel","color":[0.6,0.6,0.6,1.0],"passTouches":false,"class":"MMPPanel","frame":[10.0,55.0,300.0,60.0]},{"highlightColor":[1.0,0.0,0.0,1.0],"address":"/numlabel/0","textSize":42,"color":[1.0,1.0,1.0,1.0],"androidFont":"Roboto-Regular","textFontFamily":"Default","text":":256 ","textFont":"","class":"MMPLabel","frame":[15.0,60.0,290.0,55.0]},{"highlightColor":[1.0,0.0,0.0,1.0],"address":"/myLabel","textSize":36,"color":[1.0,1.0,1.0,1.0],"androidFont":"Roboto-Regular","textFontFamily":"Default","text":"0","textFont":"","class":"MMPLabel","frame":[105.0,405.0,40.0,50.0]},{"highlightColor":[1.0,0.0,0.0,1.0],"address":"/myLabel","textSize":36,"color":[1.0,1.0,1.0,1.0],"androidFont":"Roboto-Regular","textFontFamily":"Default","text":"8","textFont":"","class":"MMPLabel","frame":[105.0,140.0,40.0,50.0]},{"highlightColor":[1.0,0.0,0.0,1.0],"address":"/myLabel","textSize":36,"color":[1.0,1.0,1.0,1.0],"androidFont":"Roboto-Regular","textFontFamily":"Default","text":"rc","textFont":"","class":"MMPLabel","frame":[250.0,135.0,50.0,50.0]}
Hope this may be of use to you.
Enjoy. And as a side comment: MMP is by far the fastest development environment I have ever worked in and is excellent as a ProtoTyper (tho admittedly my experience is limited). It works GREAT as an OSC-Controller, too. Daniel has done us all a great service by building it. Additionally kudos, to the PdDroidParty and libPD developers upon whose backbone it is built.
Many Happy Returns,
Scott
 posted in libpd / webpd
MMPonBoardEditorTemplate.mmp for creation of MobMuPlat files directly on the handheld (android only)
MMPonBoardEditorTemplate.mmp for creation of MobMuPlat files directly on the handheld (android only)
MMPonBoardEditorTemplate
by svanya
INFO: make copies of this template to use as the starting point for your created .mmp files.
This template is designed to expedite the creation of simple(!) MobMuPlat files on-the-go with only the use of the handheld (i.e. does not require the Java editor).
There are three sections to this document:
the templates (in this commented section)
the mmp header just below this section
the "ENTRIES SECTION"
and
the mmp footer (which closes the .json file).
To use the template:
Open this file in a handheld text-editor (you may need to rename it, ex. adding ".txt" (no quotes) to the end of its file name to associate it to the text-editor and NOT MobMuPlat).
Copy one of the sections from this Templates Section (not including its label and the label colon and paste it into the Entries Section below and for each template you have added more than 1, add a comma after each template except the last one.
The arrangment on the screen can then be edited (in that same text editor) by amending the "frame" section of each Entry according to the following format:
"frame":[left,top,width,height]
(on the JAVA editor the screen is scaled 320px wide by 480px high)
and
Re-open the .mmp file inside MobMuPlat (renaming it back to .mmp as necessary).
Enjoy! And Good Luck! Just post any comments or help you may need here and I will try and get to them as soon as I am able.
Ciao for Now. Peace,
svanya
for those interested here is the code:
/*
MMPonBoardEditorTemplate.mmp for creation of MobMuPlat files directly on the handheld (android only)

MMPonBoardEditorTemplate
by svanya

INFO: make copies of this template to use as the starting point for your created .mmp files.

This template is designed to expedite the creation of simple(!) MobMuPlat files on-the-go with only the use of the handheld (i.e. does not require the Java editor).

There are three sections to this document:
    the templates (in this commented section)
    the mmp header just below this section
    the "ENTRIES SECTION"
and
    the mmp footer (which closes the .json file).

To use the template:

Open this file in a handheld text-editor (you may need to rename it, ex. adding ".txt" (no quotes) to the end of its file name to associate it to the text-editor and NOT MobMuPlat).

Copy one of the sections from this Templates Section (not including its label and the label colon and paste it into the Entries Section below and for each template you have added more than 1, add a comma after each template except the last one.

The arrangment on the screen can then be edited (in that same text editor) by amending the "frame" section of each Entry according to the following format:

 "frame":[left,top,width,height]

(on the JAVA editor the screen is scaled 320px wide by 480px high)

and

Re-open the .mmp file inside MobMuPlat (renaming it back to .mmp as necessary).

TEMPLATES:

MMPLabel:

{"highlightColor":[1.0,0.0,0.0,1.0],"address":"/label/0","textSize":16,"color":[1.0,1.0,1.0,1.0],"androidFont":"Roboto-Bold","textFontFamily":"Default","text":"label","textFont":"","class":"MMPLabel","frame":[150.0,10.0,100.0,40.0]}

MMPButton:

{"highlightColor":[1.0,0.0,0.0,1.0],"address":"/button/0","color":[1.0,1.0,1.0,1.0],"class":"MMPButton","frame":[10.0,70.0,100.0,40.0]}

MMPToggle:

{"highlightColor":[1.0,0.0,0.0,1.0],"borderThickness":4,"address":"/toggle/0","color":[1.0,1.0,1.0,1.0],"class":"MMPToggle","frame":[10.0,130.0,100.0,40.0]}

vSlider:

{"highlightColor":[1.0,0.0,0.0,1.0],"address":"/vSlider/0","color":[1.0,1.0,1.0,1.0],"range":2,"class":"MMPSlider","isHorizontal":false,"frame":[10.0,190.0,100.0,40.0]}

hSlider:

{"highlightColor":[1.0,0.0,0.0,1.0],"address":"/hSlider/0","color":[1.0,1.0,1.0,1.0],"range":2,"class":"MMPSlider","isHorizontal":true,"frame":[10.0,250.0,100.0,40.0]}

MMPKnob:

{"highlightColor":[1.0,0.0,0.0,1.0],"address":"/knob/0","color":[1.0,1.0,1.0,1.0],"indicatorColor":[1.0,1.0,1.0,1.0],"range":2,"class":"MMPKnob","frame":[10.0,300.0,100.0,100.0]}

MMPXYSlider:

{"highlightColor":[1.0,0.0,0.0,1.0],"address":"/xyslider/0","color":[1.0,1.0,1.0,1.0],"class":"MMPXYSlider","frame":[10.0,420.0,100.0,40.0]}

MMPGrid:

{"mode":0,"highlightColor":[1.0,0.0,0.0,1.0],"borderThickness":3,"address":"/grid/0","color":[1.0,1.0,1.0,1.0],"dim":[4,3],"class":"MMPGrid","cellPadding":2,"frame":[150.0,70.0,100.0,40.0]}

MMPMultiSlider:

{"highlightColor":[1.0,0.0,0.0,1.0],"address":"/multislider/0","color":[1.0,1.0,1.0,1.0],"range":8,"outputMode":0,"class":"MMPMultiSlider","frame":[150.0,130.0,100.0,40.0]}

MMPLCD:

{"highlightColor":[1.0,0.0,0.0,1.0],"address":"/lcd/0","color":[1.0,1.0,1.0,1.0],"class":"MMPLCD","frame":[150.0,190.0,100.0,40.0]}

MMPMultiTouch:

{"highlightColor":[1.0,0.0,0.0,1.0],"address":"/multitouch/0","color":[1.0,1.0,1.0,1.0],"class":"MMPMultiTouch","frame":[150.0,250.0,100.0,40.0]}

MMPTable:

{"mode":0,"highlightColor":[1.0,0.0,0.0,1.0],"address":"/table/0","color":[1.0,1.0,1.0,1.0],"selectionColor":[1.0,1.0,1.0,0.5019608],"displayRangeLo":-1.0,"displayRangeHi":1.0,"class":"MMPTable","displayMode":0,"frame":[150.0,310.0,100.0,40.0]}

MMPPanel:

{"highlightColor":[1.0,0.0,0.0,1.0],"address":"/panel/0","color":[1.0,1.0,1.0,1.0],"passTouches":false,"class":"MMPPanel","frame":[150.0,370.0,100.0,40.0]}

THE ACTUAL MMP FILE FOLLOWS THIS
*/

{"pdFile":"osc_controller_mmp.pd","backgroundColor":[0.0,0.0,0.0,1.0],"pageCount":1,"port":54321,"isPageScrollShortEnd":false,"startPageIndex":0,"canvasType":"widePhone","gui":[

/*
ENTRIES SECTION: entries go below here and above the comment below
*/


/*
END: ENTRIES SECTION
The mmp footer is below.
*/


],"isOrientationLandscape":false,"version":1.64}