Beatslicer type patch?
@alexandros said:
Perhaps [bonk~]?
What I would like to do is detect peaks in an audio file at the same time as I load it into a table. Not realtime, or just as fast as possible.
As of now I have a patch where one table holds the sound file, another one holds 12 positions in ms, (and another one holds these 12 positions in percent.)
Either I use a list with predefined positions to load with a specific sound, or I divide the positions evenly across the sound file. In this latter case I would like a function where the locations are upon load nudged to transients to make each location more useful. Later on I would like to try to select positions by spectral content also/instead.
I attach my patch where I can load the 3 arrays on the fly. To maybe add some clarity.
Could [bonk~] be used to do this offline type of action?
 posted in technical issues
How to smoothe out Arrays ?
Hello everybody,
this is my first post and I am a Pure Data Beginner.
I would like to smoothe out an Array in a specific way.
This for example:
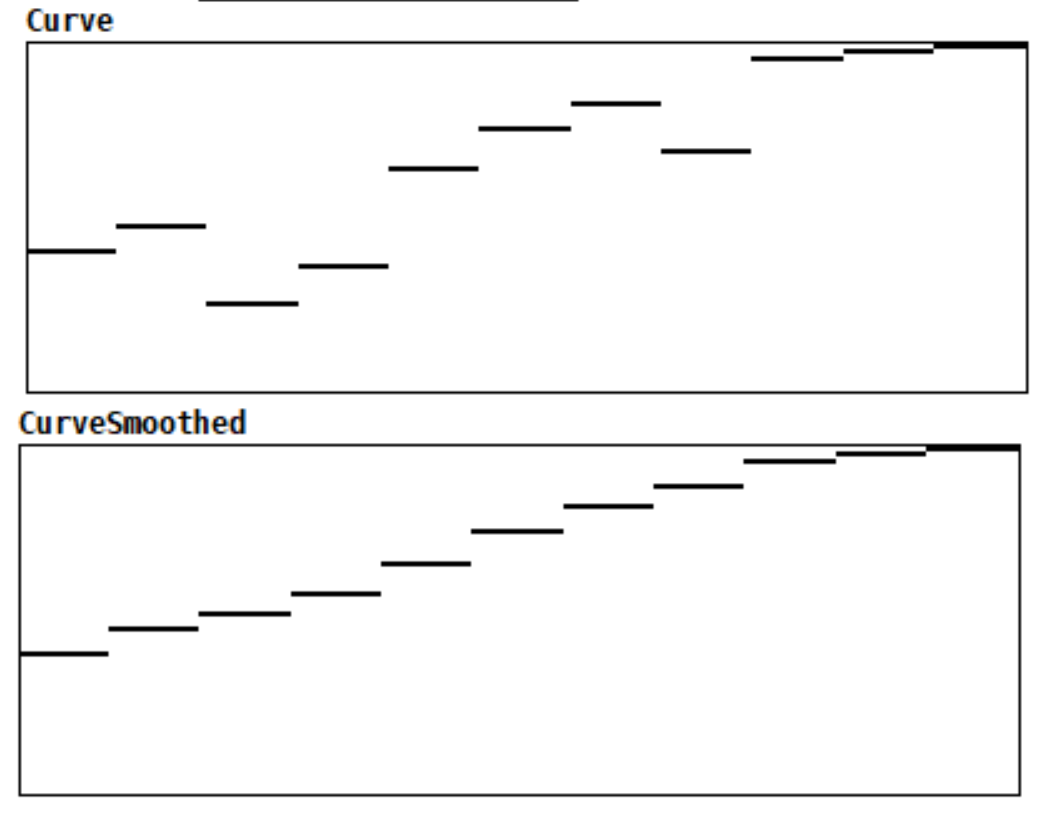
This curve is meant to rise until the end. The Values arent supposed to fall at any point. Two same values after each others is also not ideal. In my original patch, I recorded a Pitchbend Automation with 16384 Values. X and Y. During recording, there happened a few midi values, which didn't fit to the rest.
I would like to smooth out the recorded curve, that it is never falling an rises up until the last x value. Like here in the manually corrected example.
I have an Idea, but as I am a beginner I am very frustrated at the moment. tried to get it to work three days.
My Idea was to create a loop, which goes through the array and stops at position "n", if value x on position "n" is smaller or the same value like at position "n-1". Then a counter starts at this position and counts until a x value is bigger than the x value at position "n-1".
If it is bigger, the counter adds the last number. After that the Patch looks what the difference is of Value x on position "n-1" and Value y on position "n-1" plus the Counter Value. After that it divides the difference into the Counter Number as the value "Increment". Then the Patch goes back to Position "n" and adds up the P Value. Then it goes to position "n+1" and adds the Value "n" plus the P Value * 2 and so on, until it reaches the highest Point. After the whole loop beginns again, until it smoothes out the Courve completely.
How can I do that? Maybe there exists already something like that? A patch or so? I appreciate easy beginner tipps!
Thank you very much!! ")
 posted in technical issues
fx3000~: 30 effect abstraction for use with guitar stompboxes effects racks, etc.
It still does not work.
I added my-guitar-rig/my-guitar-rig~ to a window and it generated a lot of errors
I am running version 0.52.1 of pd
Hopefully this is helpful. The errors I got are:
 z~ 64
... couldn't create
 limiter~ 98 1
... couldn't create
io pair already connected
delay(wavey)(v).pd 39 0 40 0 (snapshot~->gatom) connection failed
 tof/pmenu 1 1 black white red
... couldn't create
 tof/pmenu 1 1 black white red
... couldn't create
 z~ 64
... couldn't create
 limiter~ 98 1
... couldn't create
io pair already connected
delay(wavey)(v).pd 39 0 40 0 (snapshot~->gatom) connection failed
 tof/pmenu 1 1 black white red
... couldn't create
 tof/pmenu 1 1 black white red
... couldn't create
 z~ 64
... couldn't create
 limiter~ 98 1
... couldn't create
io pair already connected
delay(wavey)(v).pd 39 0 40 0 (snapshot~->gatom) connection failed
 tof/pmenu 1 1 black white red
... couldn't create
 tof/pmenu 1 1 black white red
... couldn't create
 z~ 64
... couldn't create
 limiter~ 98 1
... couldn't create
 date
... couldn't create
 time
... couldn't create
 z~ 64
... couldn't create
 limiter~ 98 1
... couldn't create
 mknob 42 0 0 1 0 0 empty empty ratio:1.5:1 -2 -6 0 10 -262144 -1 -1 20175 1
... couldn't create
 tof/pmenu 1 1 black white red
... couldn't create
pd-float: rounding to 2048 points
warning: fx3000-in-2: multiply defined
warning: fx3000-in-2: multiply defined
warning: fx3000-in-1: multiply defined
warning: fx3000-in-1: multiply defined
warning: fx3000-in-0: multiply defined
warning: fx3000-in-0: multiply defined
pd-float: rounding to 2048 points
pd-float: rounding to 2048 points
warning: fx3000-in-2: multiply defined
warning: fx3000-in-2: multiply defined
warning: fx3000-in-1: multiply defined
warning: fx3000-in-1: multiply defined
warning: fx3000-in-0: multiply defined
warning: fx3000-in-0: multiply defined
pd-float: rounding to 2048 points
pd-float: rounding to 2048 points
warning: fx3000-in-2: multiply defined
warning: fx3000-in-2: multiply defined
warning: fx3000-in-1: multiply defined
warning: fx3000-in-1: multiply defined
warning: fx3000-in-0: multiply defined
warning: fx3000-in-0: multiply defined
pd-float: rounding to 2048 points
 posted in abstract~
modules in [pdjs]
Trying to understand how to import functions and objects from another js file with pdjs by @mganss, but I can't figure how!
modules.js:
var o = {foo: 0};
include("test_require.mjs",o);
// var req = require("test_require.mjs");
function bang() {
post('------------');
post("o.foo =", o.foo);
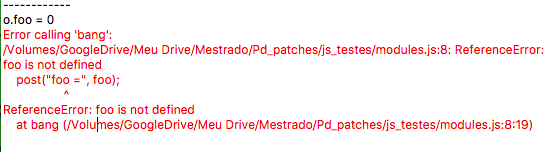
post("foo =", foo);
post('------------');
post('req.bar =', req.bar);
post('req.bar() =', req.bar());
post('------------');
};
test_require.mjs
const foo = 37;
function bar () {
    post("require bar");
}
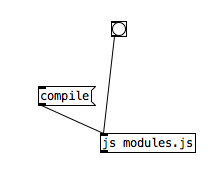
Patch
Pd Console:
Thanks any advance!
 posted in technical issues
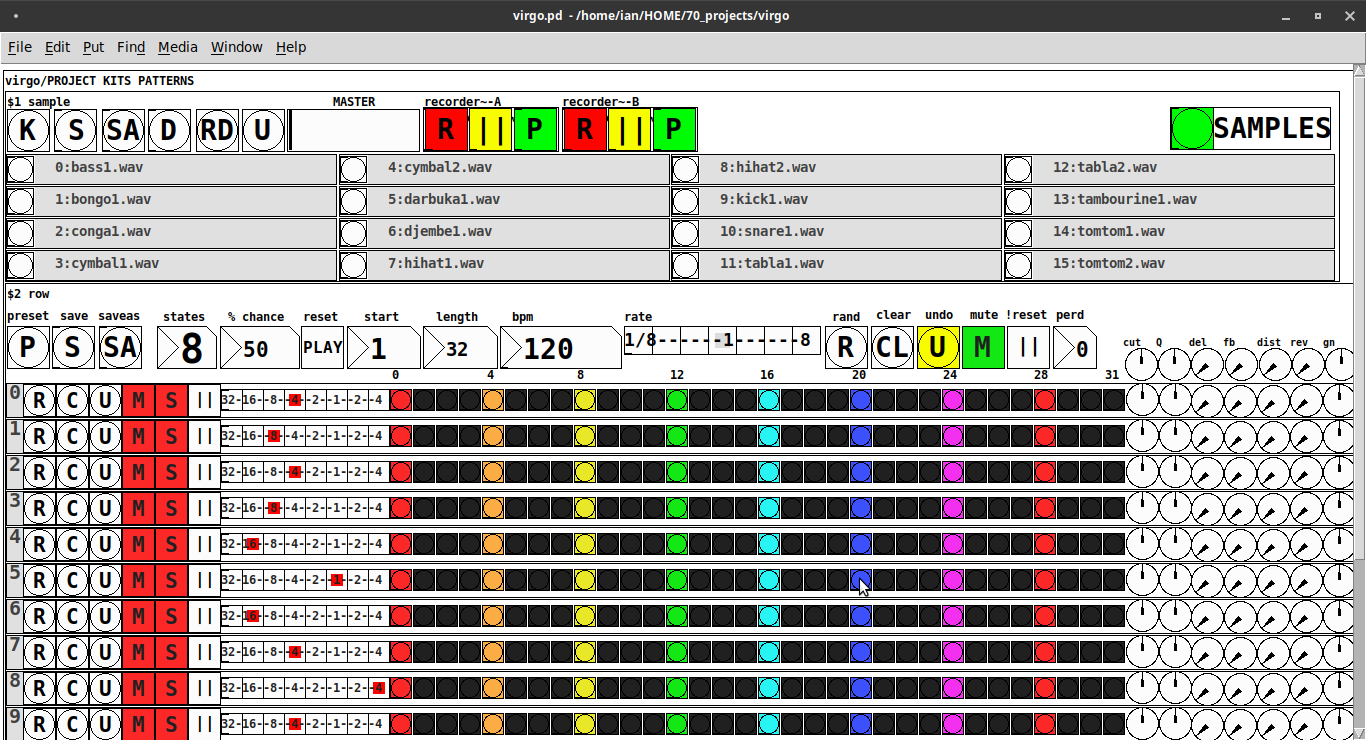
Just Another (Drum) Sequencer...SortOf, codename: Virgo
Just Another (Drum) Sequencer...SortOf, codename: Virgo
REQUIRES: zexy, moonlib, tof (as of Pd 0.50.2, all of which are in deken) and hcs (which comes by default with Pd 0.50.2 and is in deken (for extended))
Special Features
- Unique playhead per row; each with their own metro (beat)
- Up to 8 Volume states-per-beat (by clicking multiple times on the bang; where an rms=1 is divide among the states (2 states:0=rms=0(black), 1=rms=1(red); 3 states:rms=[0|0.5|1])
- Design approach: using creation arguments to alias abstractions, so subsequently they are referred to by their creation arguments, ex. in [KITS sample] sample is referred to as [$1]; which is how they are listed below)
(notes: what I learned experimenting with this design approach, I will share as a separate post. Currently, it does not include cut-copy-paste (of regions of the pattern)). I good way to start trying it out is clicking the "R" to get a random kit and a random pattern).
virgo:[virgo/PROJECT KITS PATTERNS]
- PROJECT[KITS PATTERNS]
- $1:[KITS sample]
- GUI
- K: openpanel to load a previously saved *.txt (text object) kit of samples; on loadbang the default.txt kit is loaded
- S: save the current set of samples to the most recently opened *.txt (kit) preset
- SA: saveas a *.txt of the current set of samples
- D: foldererpanel a sample directory to load the first (alphabetically) 16 samples into the 16 slots
- RD: load a random kit from the [text samples] object where the samples where previously loaded via the "SAMPLES" bang on the right
- U: undo; return to the previously opened or saved *.txt kit, so not the previously randomized
- MASTER: master gain
- (recorder~: of the total audio~ out)
- record
- ||: pause; either recording or play;
- play: output is combined with the sequencer output just before MASTER out to [dac~]
- SAMPLES: folderpanel to load a (recursive) directory of samples for generating random kits
- ABSTRACTIONS
- $1: sample
- bang: openpanel to locate and load a sample for a track
- canvas: filename of the opened sample; filenames are indexed in alignment with track indices in the PATTERNS section
- $1: sample
- GUI
- $2:[PATTERNS row]
- GUI
- P: openpanel to load a previously saved *.txt (pattern) preset file; on loadbang the default.txt pattern is loaded; the preset file includes the beat, pattern, and effect settings for the row
- S: save the current pattern to the most recently opened pattern .txt
- SA: save as (self-explanatory)
- states: the number of possible states [2..8] of each beat;
- %: weight; chance of a beat being randomized; not chance of what it will result in; ex. 100% implies all beats are randomized ; random beats result in a value)gain) between 1 and states-1
- PLAY(reset): play the pattern from "start" or on stop reset all playheads to start
- start: which beat to start the playheads on
- length: how many beats to play [+/-32]; if negative the playheads will play in reverse/from right to left
- bpm: beats-per-minute
- rate: to change the rate of play (ie metro times) by the listed factor for all playheads
- R: randomize the total pattern (incl period and beats, but not the effect settings; beats of 1/32 are not included in the possibilities)
- CL: clear, set all beats to "0", i.e. off
- U: undo random; return to the previously opened or saved preset, ie. not the previous random one
- M: mute all tracks; the playheads continue moving but audio does not come out of any track
- ||:pause all playheads; play will resume from that location when un-paused
- per: period; if 0=randomizes the period, >0 sets the period to be used for all beats
- Edit Mode
- Check the [E] to enter edit mode (to cut, copy, or paste selected regions of the pattern)
- Entering edit mode will pause the playing of the pattern
- Play, if doing so beforehand, will resume on leavng edit mode
- The top-left most beat of the pattern grid will be selected when first entering edit mode
- Single-click a beat to select the top-left corner of the region you wish to cut or copy
- Double-click a beat to select the bottom-right corner
- You may not double-click a beat "less than" the single-clicked (top-left) beat and vice-versa
- Click [CL] to clear your selection (i.e. start over)
- The selected region will turn to dark colors
- If only one beat is selected it will be the only one darkened
- Click the operation (bang) you wish to perform, either cut [CU] or copy [CP]
- Then, hold down the CTRL key and click the top-left corner of where you want to paste the region
- The clicked cell will turn white
- And click [P] to paste the region
- Cut and copied regions may both be pasted multiple times
- The difference being, cutting sets the values (gains) for the originating region to "0"
- Click [UN] to undo either the cut, copy, or paste operation
- Undoing cut will return the gains from 0s to their original value
- Check the [E] to enter edit mode (to cut, copy, or paste selected regions of the pattern)
- (effect settings applied to all tracks)
- co: vcf-cutoff
- Q: vcf-q
- del: delay-time
- fb: delay-feedback
- dist: distortion
- reverb
- gn: gain
- ABSTRACTIONS
- $1: [row (idx) b8] (()=a property not an abstraction)
- GUI
- (index): aligns with the track number in the KITS section
- R: randomize the row; same as above, but for the row
- C: clear the row, i.e. set all beats to 0
- U: undo the randomize; return to the originally opened one, ie. not the previous random one
- M: mute the row, so no audio plays, but the playhead continues to play
- S: solo the row
- (beat): unit of the beat(period); implying metro length (as calculated with the various other parameters);1/32,1/16,1/8, etc.
- (pattern): the pattern for the row; single-click on a beat from 0 to 8 times to increment the gain of that beat as a fraction of 1 rms, where resulting rms=value/states; black is rms=0; if all beats for a row =0 (are black) then the switch for that track is turned off; double-click it to decrement it
- (effects-per-row): same as above, but per-row, ex. first column is vcf-cutoff, second is vcf-q, etc.
- ABSTRACTIONS
- $1: b8 (properties:row column)
- 8-state bang: black, red, orange, yellow, green, light-blue, blue, purple; representing a fraction of rms(gain) for the beat
- $1: b8 (properties:row column)
- GUI
- $1: [row (idx) b8] (()=a property not an abstraction)
- GUI
- $1:[KITS sample]
Credits: The included drum samples are from: https://www.musicradar.com/news/sampleradar-494-free-essential-drum-kit-samples
p.s. Though I began working on cut-copy-paste, it began to pose a Huge challenge, so backed off, in order to query the community as to 1) its utility in the current state (w/o that) and 2) just how important including it really is.
p.p.s. Please, report any inconsistencies (between the instructions as listed and what it does) and/or bugs you may find, and I will try to get an update posted as soon as enough of those have collect.
Love and Peace through sharing,
Scott
 posted in patch~
Routing different signals to clone instances
@whale-av I got it! Thank you very much! It worked very good, but I get these warning messages:
warning: 0-fm: multiply defined
warning: 1-fm: multiply defined
warning: 2-fm: multiply defined
warning: 3-fm: multiply defined
warning: 0-fm: multiply defined
warning: 1-fm: multiply defined
warning: 2-fm: multiply defined
warning: 3-fm: multiply defined
Is that something I should worry about?
@lacuna it seems to work fine without the dummy i/o but I will implement it to ensure no delay is generated.
Thank you very much guys! You helped me a lot!
 posted in technical issues
fm synth
edit:
@whale-av
i did it this way, you should hear sound now if you tweak the envs a bit and assign it to the oscs, i simplified the operators, i think those numbers give a better modulation rate, now i need to try and add resonance and feedback to all the four operators.
yes you had to add a dac because i use it as an abstraction and forgot to chane it before i post it on te forum sorry ...
@whale-av maybe it is because i use for all my abstraction a tempo abs that i made that sends the tempo in ms si if you add a send to globalms with something like 115>s globalms and the tweak the faders you should hear sound.
the modulation is hapenning but only at a very fast rate and i still need to add filters and lfos to make it more lively, but for now i would like to be able to find the nice coeficients for multplying the signal before it goes to fm in .
sorry if its amess a m not so used to post work in preogress online and so i forget things ...
thanks for taking time to help !!
so i renamed wave~ by "tototo"
tototo.pd
testeurr.pd
 posted in technical issues
JASS, Just Another Synth...Sort-of, codename: Gemini (UPDATED: esp with midi fixes)
JASS, Just Another Synth...Sort-of, codename: Gemini (UPDATED TO V-1.0.1)
jass-v1.0.1( esp with midi fixes).zip
1.0.1-CHANGES:
- Fixed issues with midi routing, re the mode selector (mentioned below)
- Upgraded the midi mode "fetch" abstraction to be less granular
- Fix (for midi) so changing cc["14","15","16"] to "rnd" outputs a random wave (It has always done this for non-midi.)
- Added a midi-mode-tester.pd (connect PD's midi out to PD's midi in to use it)
- Upgrade: cc-56 and cc-58 can now change pbend-cc and mod-cc in all modes
- Update: the (this) readme
INFO: Values setting to 0 on initial cc changes is (given midi) to be expected.

JASS is a clone-based, three wavetable, 16 voice polyphonic, Dual-channel synth.
With...
- The initial, two wavetables combined in 1 of 5 possible ways per channel and then adding those two channels. Example: additive+frequency modulation, phase+pulse-modulation, pulse-modulation+amplitude modulation, fm+fm, etc
- The third wavetable is a ring modulator, embedded inside each mod type
- 8 wave types, including a random with a settable number of partials and a square with a settable dutycycle
- A vcf~ filter embedded inside each modulation type
- The attack-decay-release, cutoff, and resonance ranges settable so they immediately and globally recalculate all relevant values
- Four parameters /mod type: p1,p2, cutoff, and resonance
- State-saving, at both the global level (wavetables, env, etc.), as well as, multiple "substates" of for-each-mod-type settings.
- Distortion, reverb
- Midiin, paying special attention to the use of 8-knob, usb, midi controllers (see below for details)
- zexy-limiters, for each channel, after the distortion, and just before dac~
Instructions
Requires: zexy
for-entire-state
- O: Open preset. "default.txt" is loaded by...default
- S: Save preset (all values incl. the multiple substates) (Note: I have Not included any presets, besides the default with 5 substates.)
- SA: Save as
- TEST: A sample player
- symbol: The filename of the currently loaded preset
- CL: Clear, sets all but a few values to 0
- U: Undo CL
- distortion,reverb,MASTER: operate on the total out, just before the limiter.
- MIDI (Each selection corresponds to a pgmin, 123,124,125,126,127, respectively, see below for more information)
- X: Default midi config, cc[1,7,8-64] available
- M: Modulators;cc[10-17] routed to ch1&ch2: p1,p2,cutoff,q controls
- E: Envelopes; cc[10-17] routed to filter- and amp-env controls
- R: Ranges; cc[10-17] routed to adr-min/max,cut-off min/max, resonance min/max, distortion, and reverb
- O: Other; cc[10-17] routed to rngmod controls, 3 wavetypes, and crossfade
- symbol: you may enter 8 cc#'s here to replace the default [10-17] from above to suit your midi-controller's knob configuration; these settings are saved to file upon entry
- vu: for total out to dac~
for-all-mod-types
- /wavetable
- graph: of the chosen wavetype
- part: partials, # of partials to use for the "rn" wavetype; the resulting, random sinesum is saved with the preset
- duty: dutycycle for the "du" wavetype
- type: sin | square | triangle | saw | random | duty | pink (pink-noise: a random sinesum with 128 partials, it is not saved with the preset) | noise (a random sinesum with 2051 partials, also not saved)
- filter-env: (self-explanatory)
- amp-env: (self-explanatory)
- rngmod: self-explanatory, except "sign" is to the modulated signal just before going into the vcf~
- adr-range: min,max[0-10000]; changing these values immediately recalculates all values for the filter- and amp-env's scaled to the new range
- R: randomizes all for-all-mod-types values, but excludes wavetype "noise"; rem: you must S or SA the preset to save the results
- U: Undoes R
for-each-mod-type
- mod-type-1: (In all cases, wavetable1 is the carrier and wavetable2 is the modulator); additive | frequency | phase | pulse | amplitude modulation
- mod-type-2: Same as above; mod-type-2 May be the same type as mod-type-1
- crossfade: Between ch1 and ch2
- detune: Applied to the midi pitch going into ch2
- for-each-clone-type controls:
- p1,p2: (self-explanatory)
- cutoff, resonance: (self-explanatory)
- navigation: Cycles through the saved substates of for-each-mod-type settings (note: they are lines on the end of a [text])
- CP: Copy the current settings, ie. add a line to the end of the [text] identical to the current substate
- -: Delete the current substate
- R: Randomize all (but only a few) substate settings
- U: Undo R
- cut-rng: min,max[0-20000] As adr-range above, this immediately recalculates all cutoff values
- res-rng: min,max[0-100], same as previously but for q
- pbend: cc,rng: the pitchwheel may be assigned to a control by setting this to a value >7 (see midi table below for possibilities); rng is in midi pitches (+/- the value you enter)
- mod-cc: the mod-wheel may be assigned to a control [7..64] by setting this value
midi-implementation
| name | --- | Description |
|---|---|---|
| sysex | not supported | |
| pgmin | 123,124,125,126,127; They set midi mode | |
| notein | 0-127 | |
| bendin | pbend-cc=7>pitchbend; otherwise to the cc# from below | |
| touch | not supported | |
| polytouch | not supported |
cc - basic (for all midi-configs)
| # | name | --- | desciption |
|---|---|---|---|
| 1 | mod-wheel | (assignable) | |
| 7 | volume | Master |
cc - "X" mode/pgmin=123
| cc | --- | parameter |
|---|---|---|
| 8 | wavetype1 | |
| 9 | partials 1 | |
| 10 | duty 1 | |
| 11 | wavetype2 | |
| 12 | partials 2 | |
| 13 | duty 2 | |
| 14 | wavetype3 | |
| 15 | partials 3 | |
| 16 | duty 3 | |
| 17 | filter-att | |
| 18 | filter-dec | |
| 19 | filter-sus | |
| 20 | filter-rel | |
| 21 | amp-att | |
| 22 | amp-dec | |
| 23 | amp-sus | |
| 24 | amp-rel | |
| 25 | rngmod-freq | |
| 26 | rngmod-sig | |
| 27 | rngmod-filt | |
| 28 | rngmod-amp | |
| 29 | distortion | |
| 30 | reverb | |
| 31 | master | |
| 32 | mod-type 1 | |
| 33 | mod-type 2 | |
| 34 | crossfade | |
| 35 | detune | |
| 36 | p1-1 | |
| 37 | p2-1 | |
| 38 | cutoff-1 | |
| 39 | q-1 | |
| 40 | p1-2 | |
| 41 | p2-2 | |
| 42 | cutoff-2 | |
| 43 | q-2 | |
| 44 | p1-3 | |
| 45 | p2-3 | |
| 46 | cutoff-3 | |
| 47 | q-3 | |
| 48 | p1-4 | |
| 49 | p2-4 | |
| 50 | cutoff-4 | |
| 51 | q-4 | |
| 52 | p1-5 | |
| 53 | p2-5 | |
| 54 | cutoff-5 | |
| 55 | q-5 | |
| 56 | pbend-cc | |
| 57 | pbend-rng | |
| 58 | mod-cc | |
| 59 | adr-rng-min | |
| 60 | adr-rng-max | |
| 61 | cut-rng-min | |
| 62 | cut-rng-max | |
| 63 | res-rng-min | |
| 64 | res-rng-max |
cc - Modes M, E, R, O
Jass is designed so that single knobs may be used for multiple purposes without reentering the previous value when you turn the knob, esp. as it pertains to, 8-knob controllers.
Thus, for instance, when in Mode M(pgm=124) your cc send the signals as listed below. When you switch modes, that knob will then change the values for That mode.
In order to do this, you must turn the knob until it hits the previously stored value for that mode-knob.
After hitting that previous value, it will begin to change the current value.
cc - Modes M, E, R, O assignments
Where [10..17] may be the midi cc #'s you enter in the MIDI symbol field (as mentioned above) aligned to your particular midi controller.
| cc# | --- | M/pgm=124 | --- | E/pgm=125 | --- | R/pgm=126 | --- | O/pgm=127 |
|---|---|---|---|---|---|---|---|---|
| 10 | ch1:p1 | filter-env:att | adr-rng-min | rngmod:freq | ||||
| 11 | ch1:p2 | filter-env:dec | adr-rng-max | rngmod:sig | ||||
| 12 | ch1:cutoff | filter-env:sus | cut-rng-min | rngmod:filter | ||||
| 13 | ch1:q | filter-env:re | cut-rng-max | rngmod:amp | ||||
| 14 | ch2:p1 | amp-env:att | res-rng-min | wavetype1 | ||||
| 15 | ch2:p2 | amp-env:dec | res-rng-max | wavetype2 | ||||
| 16 | ch2:cutoff | amp-env:sus | distortion | wavetype3 | ||||
| 17 | ch2:q | amp-env:rel | reverb | crossfade |
In closing
If you have anywhere close to as much fun (using, experimenting with, trying out, etc.) this patch, as I had making it, I will consider it a success.
For while an arduous learning curve (the first synth I ever built), it has been an Enormous pleasure to listen to as I worked on it. Getting better and better sounding at each pass.
Rather, than say to much, I will say this:
Enjoy. May it bring a smile to your face.
Peace through love of creating and sharing.
Sincerely,
Scott
posted in patch~
Crackled Audio from PD on Raspberry Pi 4
@EEight said:
@tiemget How do you start pd (show us the command line)
Welcome to Purr Data
nw.js version 0.24.5
Pd has started the GUI
canvasinfo: v0.1
stable canvasinfo methods: args dir dirty editmode vis
classinfo: v.0.1
stable classinfo methods: size
objectinfo: v.0.1
stable objectinfo methods: class
pdinfo: v.0.1
stable pdinfo methods: dir dsp version
[import] $Revision: 1.2 $
    [import] is still in development, the interface could change!
    compiled against Pd-l2ork version 2.14.2 (20200922-rev.c4495143)
PD_FLOATSIZE = 32 bits
working directory is /home/pi
libdir loader 1.10
    compiled on Sep 22 2020 at 18:05:09
    compiled against Pd version 0.48.0.
libdir_loader: added 'Gem' to the global objectclass path
libdir_loader: added 'cyclone' to the global objectclass path
libdir_loader: added 'zexy' to the global objectclass path
libdir_loader: added 'creb' to the global objectclass path
libdir_loader: added 'cxc' to the global objectclass path
libdir_loader: added 'iemlib' to the global objectclass path
libdir_loader: added 'mapping' to the global objectclass path
libdir_loader: added 'markex' to the global objectclass path
libdir_loader: added 'maxlib' to the global objectclass path
libdir_loader: added 'memento' to the global objectclass path
libdir_loader: added 'mjlib' to the global objectclass path
libdir_loader: added 'motex' to the global objectclass path
libdir_loader: added 'oscx' to the global objectclass path
libdir_loader: added 'pddp' to the global objectclass path
libdir_loader: added 'pdogg' to the global objectclass path
libdir_loader: added 'pixeltango' to the global objectclass path
libdir_loader: added 'rradical' to the global objectclass path
libdir_loader: added 'sigpack' to the global objectclass path
libdir_loader: added 'smlib' to the global objectclass path
libdir_loader: added 'unauthorized' to the global objectclass path
vbap - v1.1 - 14 Aug. 2014 - (c) Ville Pulkki 1999-2006 (Pd port by HCS)
libdir_loader: added 'pan' to the global objectclass path
freeverb~ v1.2
libdir_loader: added 'hcs' to the global objectclass path
libdir_loader: added 'jmmmp' to the global objectclass path
libdir_loader: added 'ext13' to the global objectclass path
libdir_loader: added 'ggee' to the global objectclass path
libdir_loader: added 'ekext' to the global objectclass path
libdir_loader: added 'disis' to the global objectclass path
libdir_loader: added 'lyonpotpourri' to the global objectclass path
pdlua 0.10.1 (GPL) 2014-2020 Martin Peach et al., based on
lua 0.6~svn (GPL) 2008 Claude Heiland-Allen <claude@mathr.co.uk>
pdlua: compiled for pd-0.48 on Sep 22 2020 18:05:09
Using lua version 5.3
pdlua: using JavaScript interface (Pd-l2ork nw.js version)
error: audio I/O stuck... closing audio
There you go.
 posted in technical issues
On the off chance this might save you some trouble
How to connect multiple outlets to multiple inlets, etc.
(I saw someone do this on a video so looked it up.
The info was originally posted on the newsgroup at:
[link Intelligent Patching](link https://lists.puredata.info/pipermail/pd-list/2018-06/122789.html) by IOhannes m zmoelnig .)
These do work. Just sort of tricky to get the steps right.
quote:
Intelligent Patching
new connection features:
-
select any two objects, and press <Ctrl>+<k> (or <Cmd>+<k> if you insist), to connect them (trivially, so just the first inlet)
-
to connect a (signal) outlet to multiple arbitrary inlets, you can now press <Shift> while hovering the yet-unconnected cord over an inlet
-
to add more connections between two already connected object, select the connection and pressl <Ctrl>+<d> to extend the connections to the right ("duplicate")
-
to fully connect two objects, select both objects before connecting them.
-
to connect multiple objects to a single inlet, select all the source objects (but not the sink object) before connecting them.
-
(the other way round works as well, but will give you fan-outs!!!)
-
to connect multiple objects to a multi-inlet object, select all the source objects and the sink object before connecting the leftmost source to the leftmost inlet.
-
to connect a multi-outlet object to multiple objects, select all the source object and all the sink objects before connecting the leftmost outlet to the leftmost sink.
:end quote
May the info/techniques help to expedite yr work flow.
Peace through sharing.
-S
posted in tutorials